• Skip to primary navigation
  • Skip to main content
  • Skip to primary sidebar
  • Skip to footer

Tidbits

Inspiration for Do-It-Yourself Living

  • Home
  • About
    • About Me
    • Work with me
    • Media Kit
    • FAQ
    • Disclosure and Policy
    • Link Parties
  • Project Index
    • All
    • Decorating
    • DIY
    • Printables
    • Sewing
    • Crafts
    • Holidays
    • Recipes
    • Woodworking
    • Photography
    • Crafting with Kids
    • Other
  • Home Tours
  • Seasonal
    • Winter
    • Spring
    • Summer
    • Fall
  • Shop
  • Contact
You are at Home and DIY
Home and DIY
Food and recipes

You are here: Home / Uncategorized / Handmade Kids Christmas- Project #1

Handmade Kids Christmas- Project #1

November 22, 2010 • Uncategorized

0 shares

This is going to be the beginning of posts showing what handmade gifts my husband and I are making for my 2 sweet girls this Christmas. Most of these projects have been on my to-do list for at least a year. It will be nice to get some of them done.

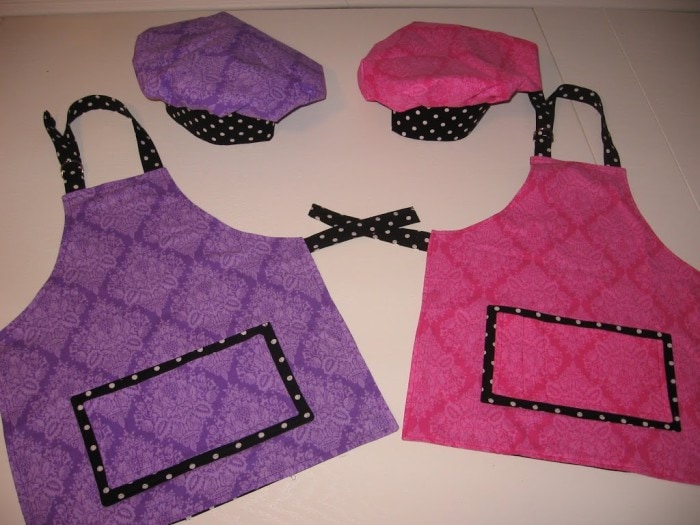
I searched the web over for the best kids apron tutorial, and I found this one to be exactly what I wanted. stardustshoes.blogspot.com has some amazing tutorials she has done for the Michael Miller Fabric designs. You’ll have to check them out! Her tutorials are great for beginner or experienced sewers.

Her child size apron pattern was still way too large for my 2 and 4 year olds, so I will explain some of the adaptions I made with the pattern to fit smaller kids, just in case anyone out there is the least bit interested.

My changed measurements on the Apron pattern are as follows:
On the fold: 19 inches
Bottom: 8 inches
Right side edge: 12 inches
Top: 3 inches


For the pocket piece I actually did two pockets. The contrasting back pockets is made using two pieces of fabric 6″ x 10″. The front pocket is made from 2 pieces of fabric 5″ x 9″. Follow her same instructions to make the pockets, only sewing the one on top of the other.


The straps I wanted to be kid friendly and so I didn’t have kids coming up to me all the time asking me to tie their straps.
Neck strap: 4″ x 18.5″
2 Waist straps: 4″ x 7 “
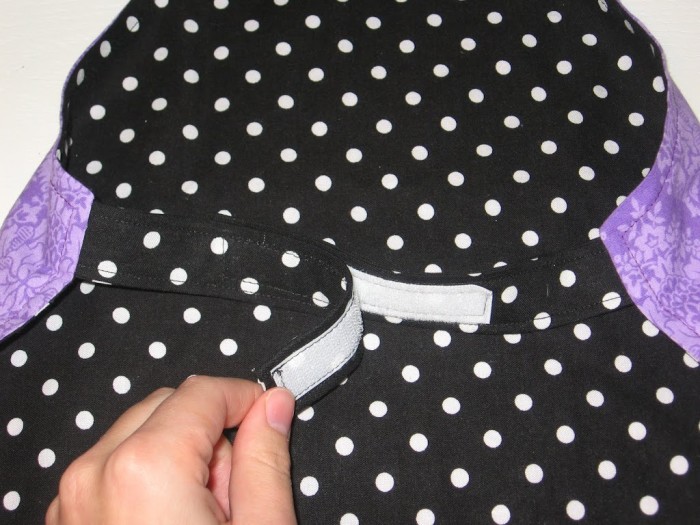
I then used a strip of Velcro on the waist straps so they could put them on themselves.


The chef hat tutorial was great! I only changed the band measurements from 8″ x 24″, to 7″ x 24″.

This was a very inexpensive gift to make. I found the fabric on clearance at Joann’s for $1.50 per yard. I only used 1 yard each of the purple and pink fabrics, and 1 1/2 yard of the black polka dot fabric, and I still have leftovers.

It’s just killing me to try these on my cuties!

I’m Cami! Welcome to my blog TIDBITS. Follow me along for beautiful home decor ideas and inspiration for do-it-yourself living
Thank you for Subscribing to TIDBITS! Talk to you soon.

There was an error submitting your subscription. Please try again.

0 shares

Leave a Comment

You might also like

  • 25 Beautifully Organized Spaces25 Beautifully Organized Spaces
  • Map Art for the College BoundMap Art for the College Bound
  • French Inspired Hot PadsFrench Inspired Hot Pads
  • Baby ProofBaby Proof

Reader Interactions

Comments

  1. [email protected] says

    November 24, 2010

    Love it. I do love me some aprons!! So fun! I just gave you an award. Check it out at getyourcraptogether.blogspot.com

    Reply
  2. Melissa says

    November 23, 2010

    Very sweet aprons. The fabric is lovely

    Reply
  3. CraftCrave says

    November 23, 2010

    Just a quick note to let you know that a link to this post will be placed on <a href="http://www.craftcrave.net&quot; rel="nofollow">CraftCrave</a> today [23 Nov 01:00am GMT]. Thanks, Maria

    Reply
  4. Monica says

    November 22, 2010

    Your girls are going to love those. They turned out really cute and thanks for giving the measurement changes that you did too.

    Reply

Leave a Comment Cancel reply

Your email address will not be published. Required fields are marked *

CommentLuv badgeShow more posts

This site uses Akismet to reduce spam. Learn how your comment data is processed.

Primary Sidebar

We are sisters, working independently under the same Brand, while sharing our individual passions. Follow Cami for all things HOME, and join Marci for all things FOOD. Enjoy!


About Cami
About Marci

My product lines

TIDBITS Planners
TIDBITS Linen

Our books

Front cover of 'Master The Electric Pressure Cooker' cookbook

Hot off the press
tidbits.
Right to your inbox.

Sign up to get post updates, monthly subscriber only content, and inspiration for do-it-yourself living
Thank you for Subscribing to TIDBITS! Talk to you soon.

There was an error submitting your subscription. Please try again.

Archives

Follow on Facebook

Footer

Welcome to my blog, TIDBITS! I am a sleep deprived Mom to 4 and a fanatical DIY'er. I absolutely love to create - but I love to inspire others to create even more!

Subscribe

Thank you for Subscribing to TIDBITS! Talk to you soon.

There was an error submitting your subscription. Please try again.

Privacy

Copyright

I love sharing my ideas and tutorials! I ask that you respect my work and follow these guidelines. 1. All images are property of Tidbits blog. 2. Feel free to use 1 or 2 images on your own webpages, provided a link back to my blog is clearly available. 3. Do not remove any watermark or crop/edit my images in any way, unless given written consent by myself. 4. All tutorials/ideas/designs are for personal use only and are not to be copied and distributed in any way. 5. Sharing and pinning through social media is always welcome!

An elite Cafemedia Home/DIY Publisher
Branding + Website By Coded Creative

0 shares