• Skip to primary navigation
  • Skip to main content
  • Skip to primary sidebar
  • Skip to footer

Tidbits

Inspiration for the Keeper of the Home

  • Home
  • About
    • About Me
    • Work with me
    • Media Kit
    • FAQ
    • Disclosure and Policy
  • Project Index
    • All
    • Decorating
    • DIY
    • Homesteading
    • Printables
    • Sewing
    • Crafts
    • Holidays
    • Recipes
    • Woodworking
    • Photography
    • Crafting with Kids
    • Other
  • Home Tours
  • Seasonal
    • Winter
    • Spring
    • Summer
    • Fall
  • Shop
  • Contact
You are at Home and DIY
Home and DIY
Food and recipes

You are here: Home / DIY / Painted Brass with Patina Technique

Painted Brass with Patina Technique

July 25, 2017 • Decorating, DIY, Repurpose

556 shares

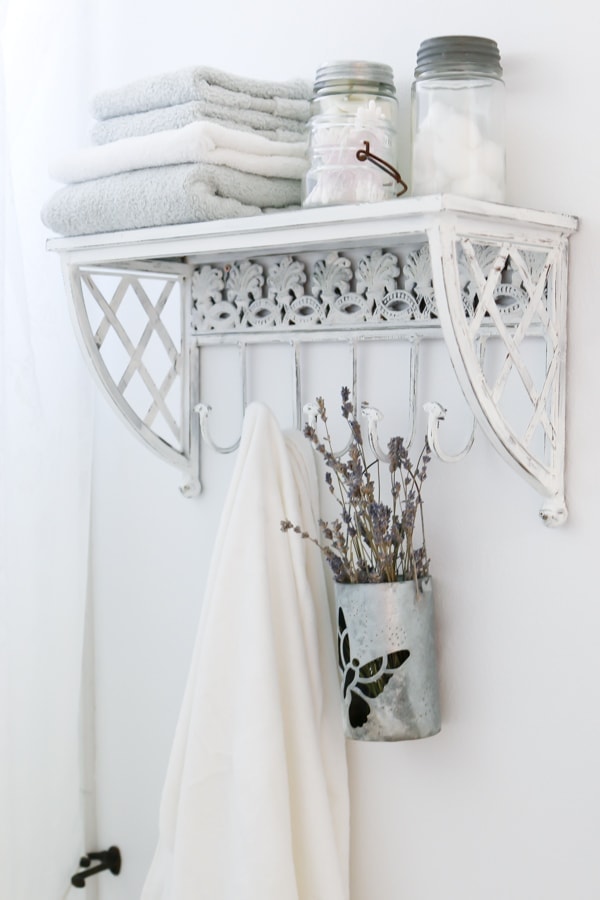
Don’t let a dated brass thrift store find scare you away!  Try this fun painted brass with patina technique to revive even the worst of home decor items.

Painted Brass with Patina Technique | Thrift Store Shelf for Bathroom

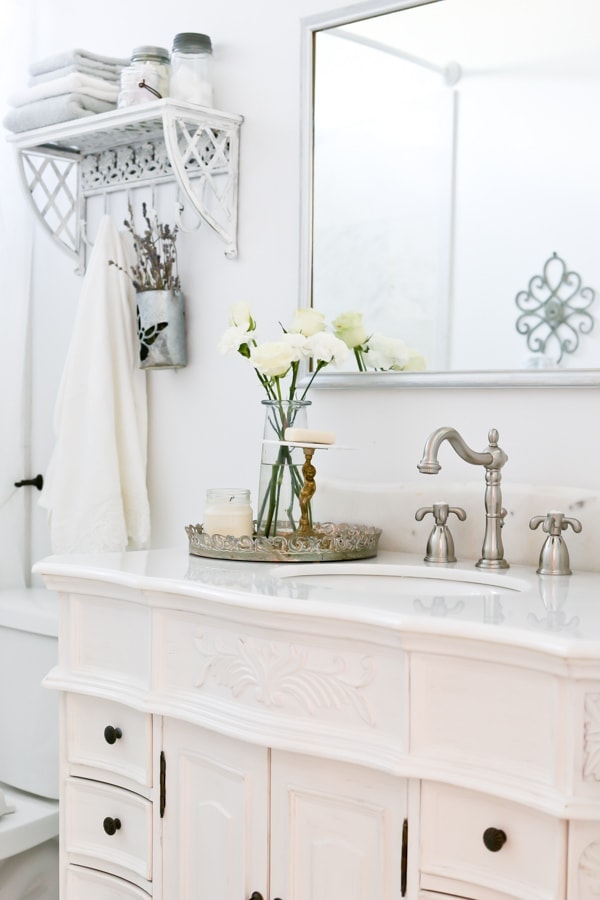
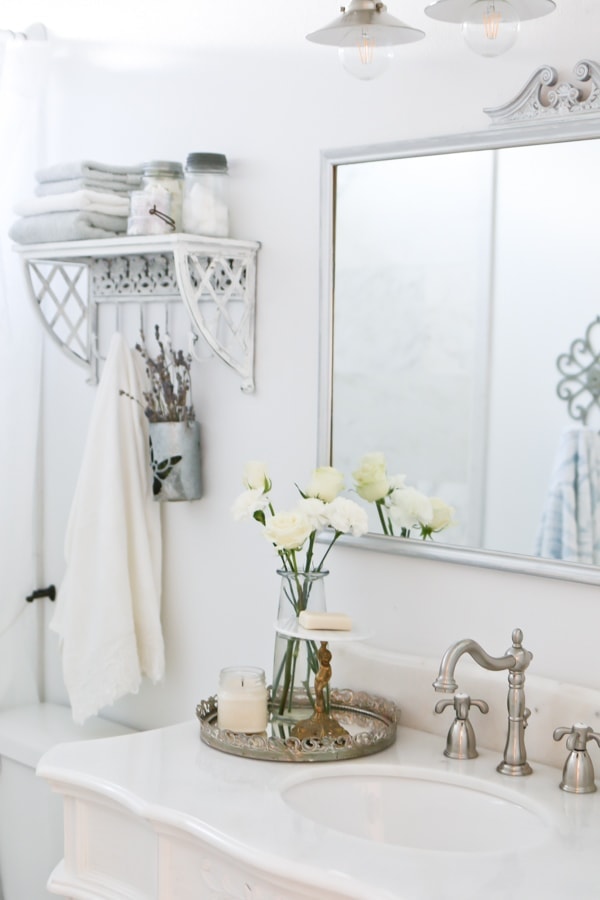
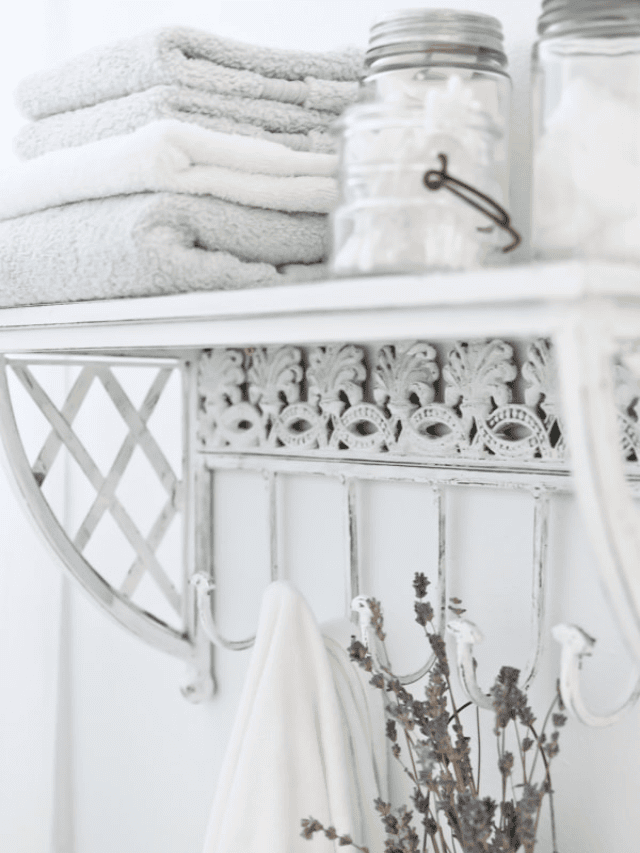
Do you recall our recent bathroom makeover reveal?  I finished this space up like I do most spaces, with some good ol’ thrift store finds.

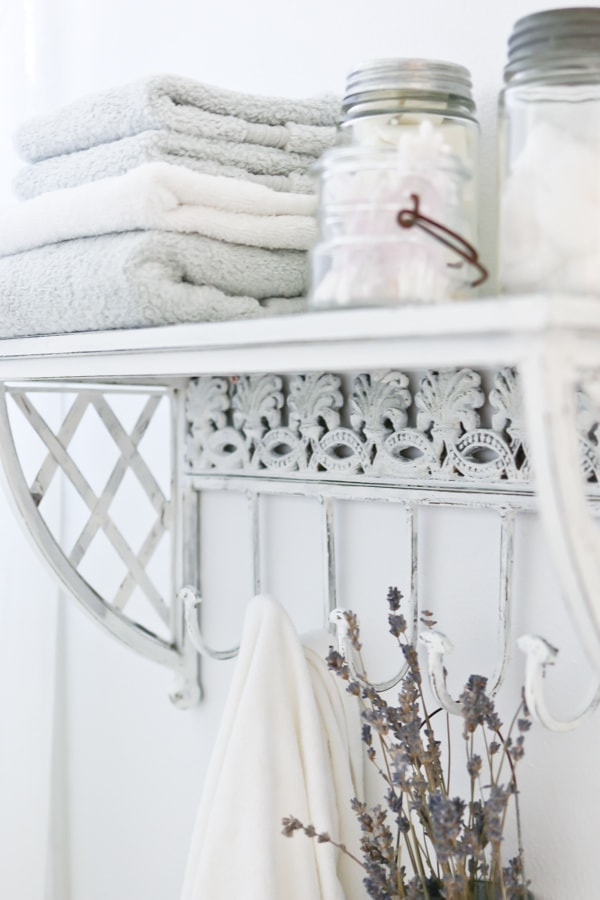
This wall shelf was one of my discovered goodies, and the perfect size to prop some folded washcloths and a place to hang towels in our small bathroom.

Painted Brass with Patina Technique | Thrift Store Shelf for Bathroom

But I almost didn’t see it, because it was sitting on the shelves of the thrift store, buried under other dated brass items.

Painted Brass with Patina Technique | Thrift Store Shelf for Bathroom

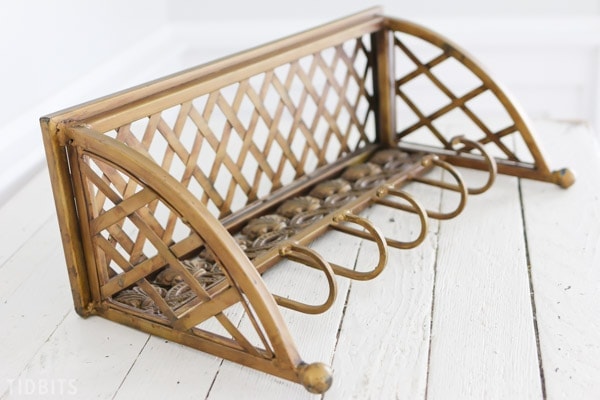
Now, I know that Brass is on a big comeback, whether I like it or not.  But the fact of the matter is that brass isn’t usually what my eye gravitates to, so I just about missed this darling shelf with hooks.

Painted Brass with Patina Technique | Thrift Store Shelf for Bathroom

I want to show you the super simple painting technique I used to give this brass shelf a white face lift and loads of beloved patina.

I was at a blogging conference earlier this year, and Folkart was there with a booth handing out samples of their new line of paints, and their most popular.  I knew I wanted to give them a try when I got home, and this painted shelf seemed like the perfect opportunity to play around.

*This is not a sponsored post.  Just sharing my discoveries with you!  I have provided my affiliate links for the products mentioned, for your convenience.  

Painted Brass with Patina Technique | Thrift Store Shelf for Bathroom

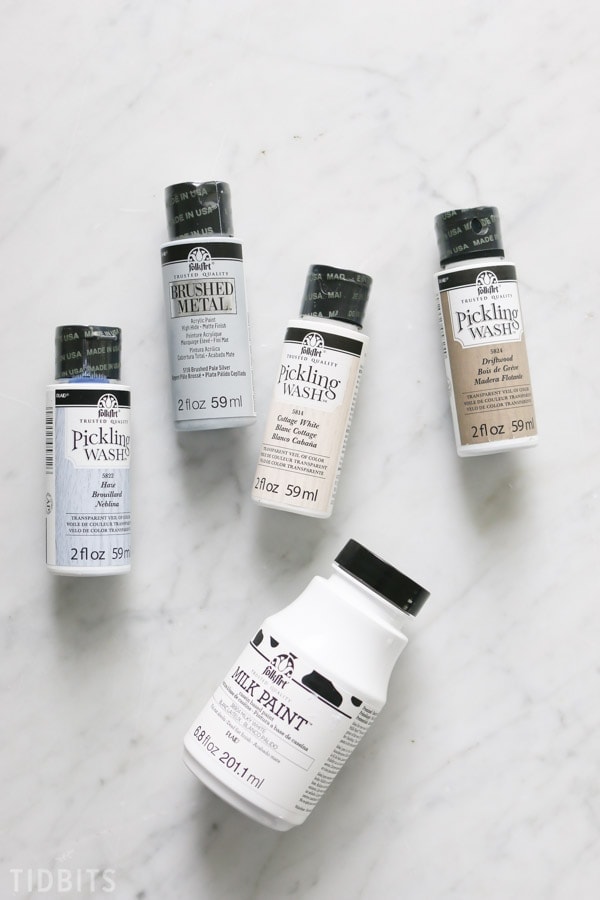
The Pickling Wash paints work great on wood to give it an aged feel, but I have yet to try those myself.  Let me know if you have, and the results you found!

But I already knew I loved the Folkart Milk paint (I’ve used it on many projects) but I wondered how it would work on this brass shelf layered above the Folkart brushed metal paint.

So I began to layer on the brushed metal paint, and was very pleased with how it adhered to the brass.  It acted much like a primer would, and gave me a nice dry abrasive surface to layer the milk paint on.

shop this post

Painted Brass with Patina Technique | Thrift Store Shelf for Bathroom

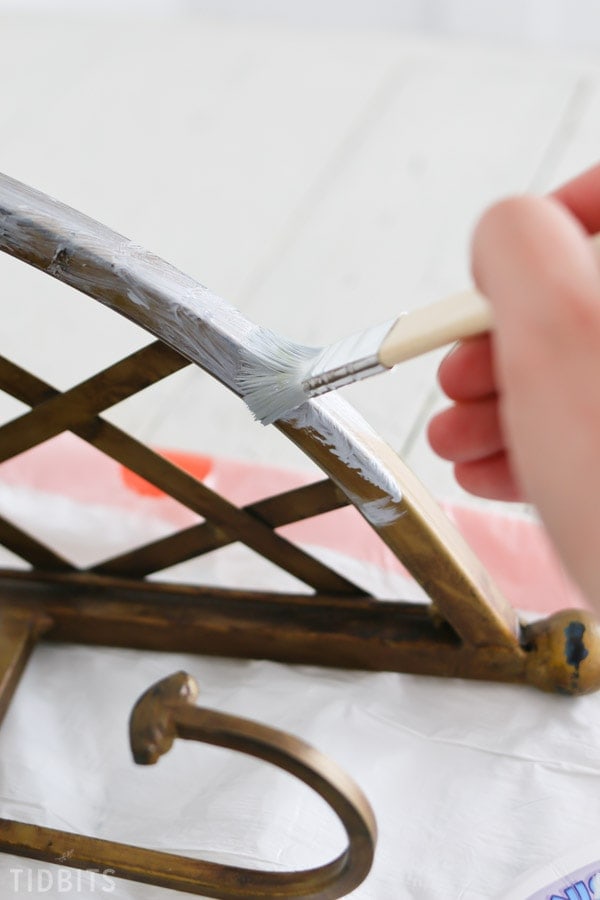
After a couple of coats of brushed metal, the gold/orange tones of the brass were practically diminished and it was ready for the milk paint.

Painted Brass with Patina Technique | Thrift Store Shelf for Bathroom

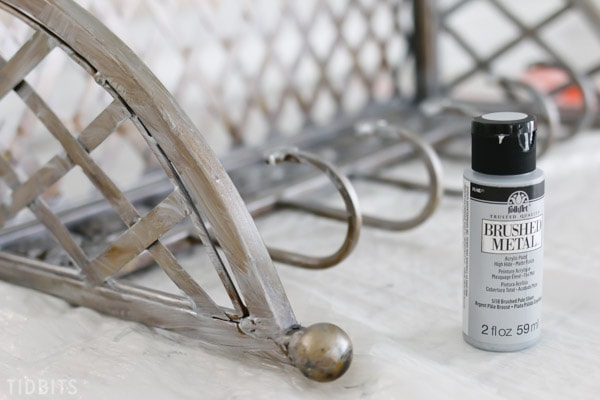
It took 2 coats of the white milk paint to almost cover it.  After completely dry, I took some sandpaper and lightly sanded some of the milk paint off to expose the silver metal underneath.

Painted Brass with Patina Technique | Thrift Store Shelf for Bathroom

After this experiment was said and done, I think the brushed metal paint was key to getting the brass undertones to take on a more blueish hue, rather than gold.

I used the rest of the brushed metal paint on my wood framed $5.00 thrift store mirror.  Now that’s a bottle of paint that packs a punch!

Painted Brass with Patina Technique | Thrift Store Shelf for Bathroom

I’d love to hear about some of your favorite paint techniques you’ve tried and had work out!  Or do you have any thrift store treasures you’ve revived lately?

There is pretty much nothing a can of white paint can’t fix, am I right?

Painted Brass with Patina Technique | Thrift Store Shelf for Bathroom
Painted Brass with Patina Technique Story

I’m Cami! Welcome to my blog TIDBITS. Follow me along for beautiful home decor ideas and inspiration for do-it-yourself living
Thank you for Subscribing to TIDBITS! Talk to you soon.

There was an error submitting your subscription. Please try again.

556 shares

Tags: bathroom, DIY, Folkart, Paint, repurpose, shelf, thrift
Leave a Comment

You might also like

  • How to Hang Plates on the Wall | DIY HackHow to Hang Plates on the Wall | DIY Hack
  • Painted Hutch MakeoverPainted Hutch Makeover
  • How to Create a Vintage Painted Finish on New WoodHow to Create a Vintage Painted Finish on New Wood
  • Antique Nightstand MakeoversAntique Nightstand Makeovers

Reader Interactions

Comments

  1. Silvia M says

    January 1, 2020

    I love the finished piece! Is there a reason you use milk paint instead of something like chalk paint?

    Reply
  2. Manco Painting says

    November 18, 2019

    Great post! Thanks for sharing!

    Reply
  3. Marlene Stephenson says

    July 26, 2017

    Thank you,this is the perfect way to fix brass, i don’t care for it myself, so i love the idea.

    Reply
    • camitidbits says

      July 31, 2017

      It certain instances, brass seems to work. But I like painted much better 😉 . Glad you enjoyed the tutorial! Thanks for stopping by!

      Reply
  4. Cecilia says

    July 26, 2017

    Oo, I hadn’t seen those paints yet. I have always like FolkArt’s craft paint. Now I want to go get me some of paints and try them out! Your shelf looks wonderful! Quite the transformation. I’m with you, brass isn’t on my list of things to decorate with. But now, who knows? ?

    Reply
    • camitidbits says

      July 31, 2017

      I love FolkArt’s selection and variety! Just cruising the aisles of Hobby Lobby, and it always gives me a painting itch 😉 . Thanks for coming by again Cecilia!

      Reply
  5. Connie says

    July 26, 2017

    Lovely. I don’t usually do the white patina on vintage items, but love this. And the technique is one I have not seen before. But looks like fun. Thanks.

    Reply
    • camitidbits says

      July 31, 2017

      It was a lot of fun Connie! Total experimental, but it worked great! Thanks for coming by!

      Reply
  6. camitidbits says

    July 25, 2017

    Thank you so much! I never thought to do this on light fixtures, but it would work great! You can find those by the dozens at thrift stores! Yay!

    Reply

Leave a Comment Cancel reply

Your email address will not be published. Required fields are marked *

CommentLuv badgeShow more posts

This site uses Akismet to reduce spam. Learn how your comment data is processed.

Primary Sidebar

Hi! I am Cami. My passion is to help you, as the keeper of your home, to feel inspired to create a home you love and to learn the homemaking skills to help you do so.


About Cami

My product lines

TIDBITS Planners
TIDBITS Linen

Our books

Front cover of 'Master The Electric Pressure Cooker' cookbook

Hot off the press
tidbits.
Right to your inbox.

Sign up to get post updates, monthly subscriber only content, and inspiration for do-it-yourself living
Thank you for Subscribing to TIDBITS! Talk to you soon.

There was an error submitting your subscription. Please try again.

Archives

Follow on Facebook

Footer

Welcome to my blog, TIDBITS! I am a homeschool Mom to 4 and a fanatical DIY'er. I absolutely love home - and I love to inspire others as the keeper of their homes!

Subscribe

Thank you for Subscribing to TIDBITS! Talk to you soon.

There was an error submitting your subscription. Please try again.

Privacy

Copyright

I love sharing my ideas and tutorials! I ask that you respect my work and follow these guidelines. 1. All images are property of Tidbits blog. 2. Feel free to use 1 or 2 images on your own webpages, provided a link back to my blog is clearly available. 3. Do not remove any watermark or crop/edit my images in any way, unless given written consent by myself. 4. All tutorials/ideas/designs are for personal use only and are not to be copied and distributed in any way. 5. Sharing and pinning through social media is always welcome!

An elite Cafemedia Home/DIY Publisher
Branding + Website By Coded Creative

556 shares