• Skip to primary navigation
  • Skip to main content
  • Skip to primary sidebar
  • Skip to footer

Tidbits

Inspiration for Do-It-Yourself Living

  • Home
  • About
    • About Me
    • Work with me
    • Media Kit
    • FAQ
    • Disclosure and Policy
    • Link Parties
  • Project Index
    • All
    • Decorating
    • DIY
    • Printables
    • Sewing
    • Crafts
    • Holidays
    • Recipes
    • Woodworking
    • Photography
    • Crafting with Kids
    • Other
  • Home Tours
  • Seasonal
    • Winter
    • Spring
    • Summer
    • Fall
  • Shop
  • Contact
You are at Home and DIY
Home and DIY
Food and recipes

You are here: Home / Decorating / Thrift Store Chair Makeover | French Country Style

Thrift Store Chair Makeover | French Country Style

September 23, 2015 • Decorating

439 shares
  • 2

Thrift Store Chair Makeover | French Country Style - TIDBITS

Never underestimate the power of thrift store shopping with girl friends.

I probably would have talked myself out of it, on my own.  My husband would have called it a piece of junk.

But with friends – they are always excited by the thoughts of someone else spending money. 😉  Am I right?

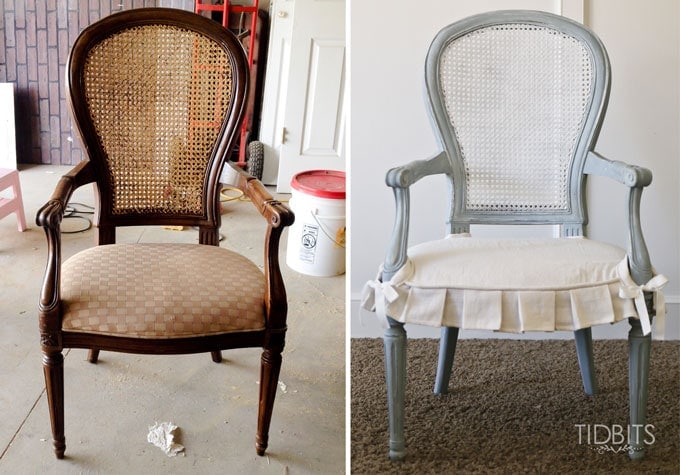
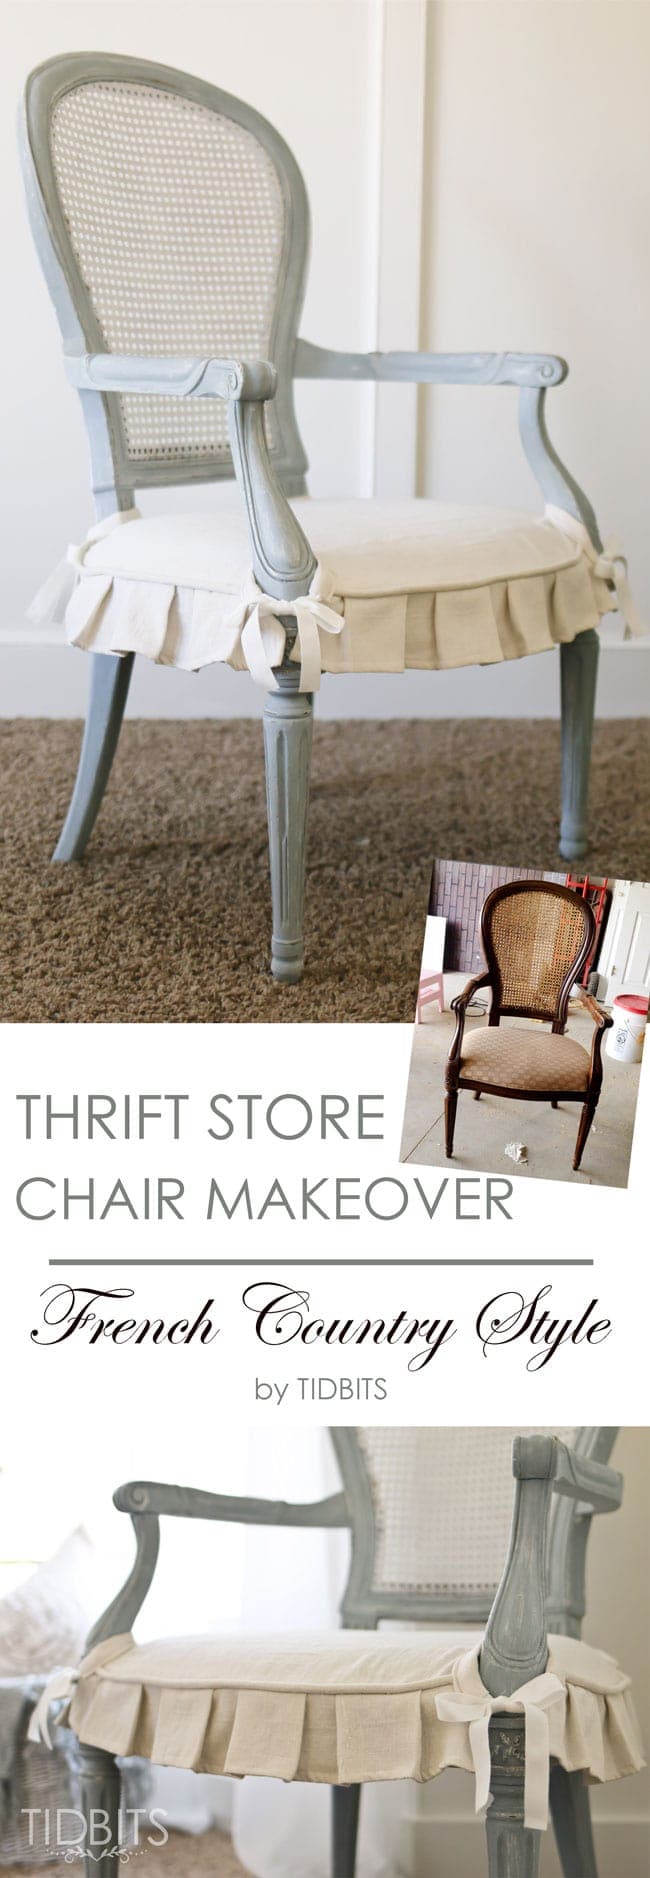
So, I caved to peer pressure – and bought a really ugly chair for $15.00.

Thrift Store Chair Makeover | French Country Style - TIDBITS

Because we all saw the potential within.

Because that is what real friends do.

Thrift Store Chair Makeover | French Country Style - TIDBITS

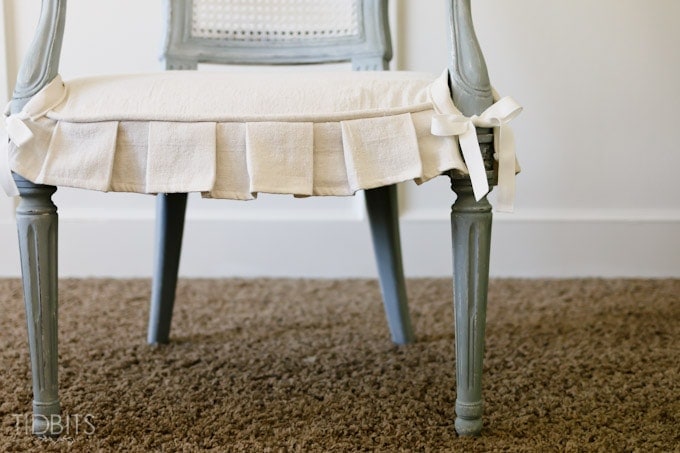
Thanks to some very special paint (details below), my trusty sewing machine, and my never ending stash of bleached drop cloth –

Thrift Store Chair Makeover | French Country Style - TIDBITS

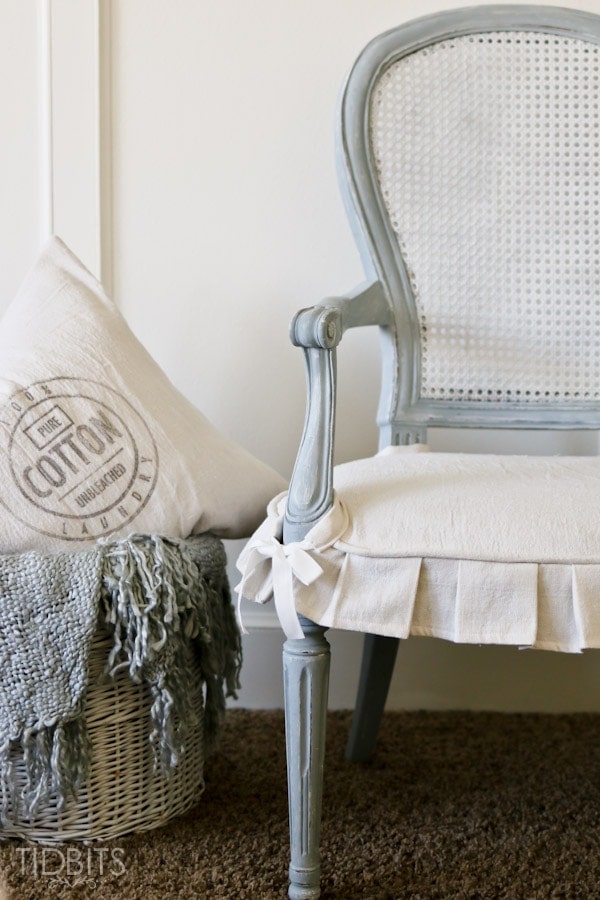
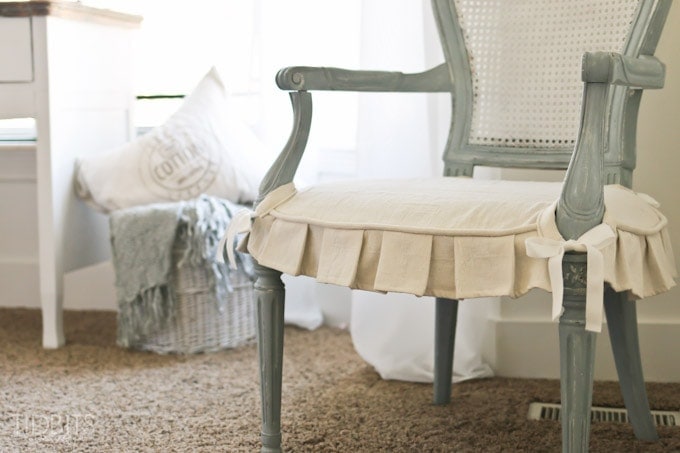
This chair never looked so good.

She still hides some ugly within.

Thrift Store Chair Makeover | French Country Style - TIDBITS

But don’t we all?

Thrift Store Chair Makeover | French Country Style - TIDBITS

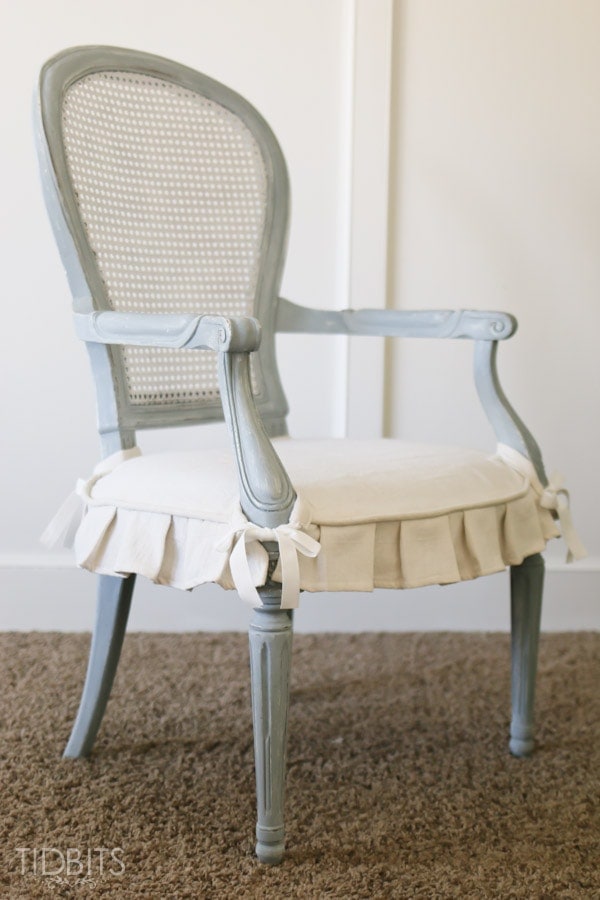
However, the closer you look – the lovelier she becomes.

Thrift Store Chair Makeover | French Country Style - TIDBITS

It is really the roughness around the edges, that make her beautiful.

Thrift Store Chair Makeover | French Country Style - TIDBITS

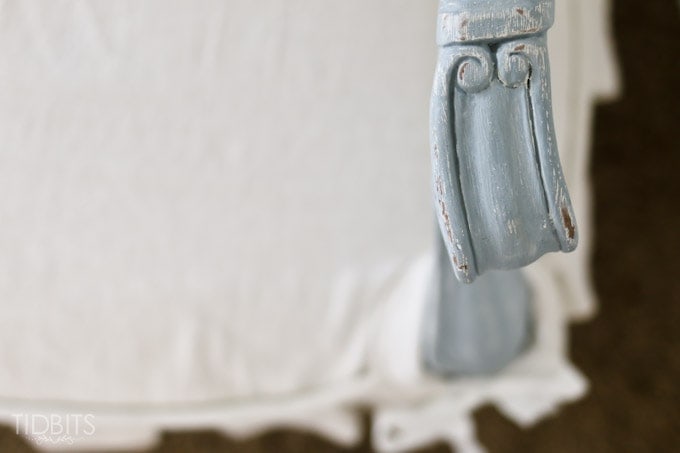
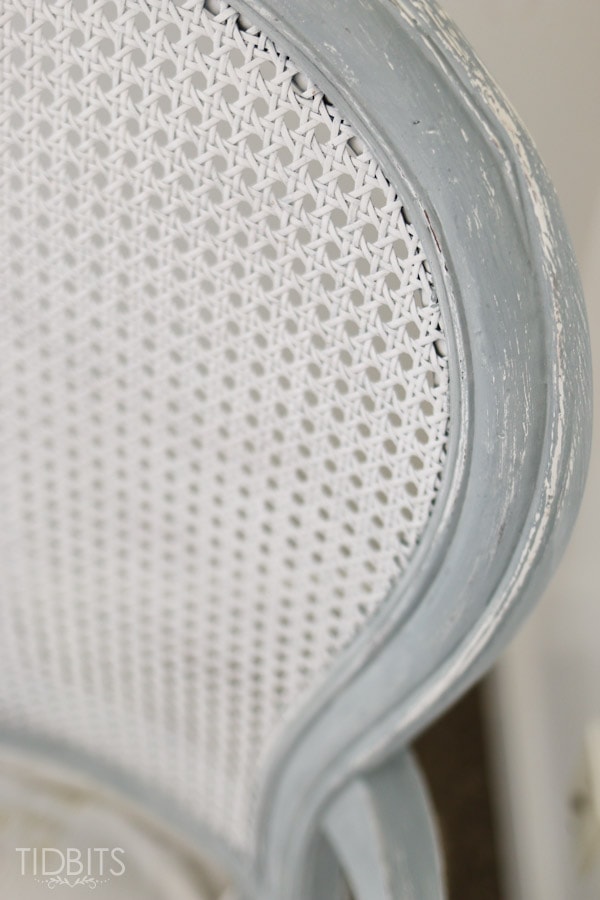
I started by sanding the piece lightly, to give the surface some grip.  Then spray painted the wicker back with white spray paint.

Thrift Store Chair Makeover | French Country Style - TIDBITS

I had a small sample package of Miss Mustard Seed Shutter Gray Milk Paint, but I knew it wouldn’t be enough to cover the chair frame.  So I first applied this Rust-oleum Chalk Paint, in Linen – one coat.  This mostly covered the stained wood, leaving the nice chalky finish.

Thrift Store Chair Makeover | French Country Style - TIDBITS

Then I mixed my Shutter Gray milk paint and brushed it over the chalk paint.  It went on so smoothly with that chalk paint under it, and covered very well.  I only need the one coat of milk paint, so I had plenty to spare.  The milk paint didn’t chip or peel and bonded without a bonding agent.

Thrift Store Chair Makeover | French Country Style - TIDBITS

After it was dry, I ran some sand paper lightly over the surface – which revealed some of the white underneath and some of the wood.  I was head over heels with the look!

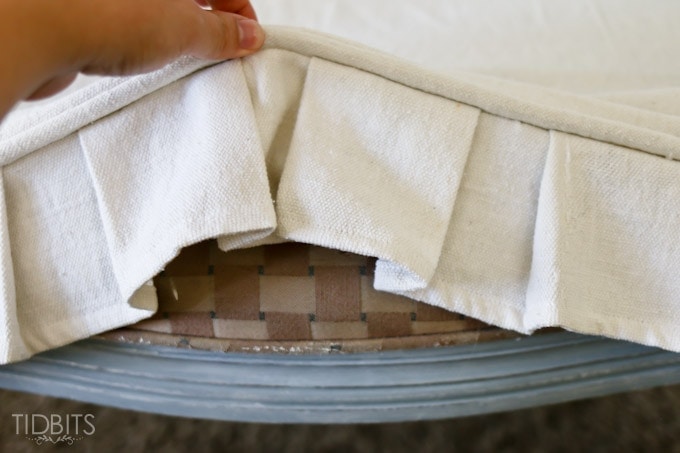
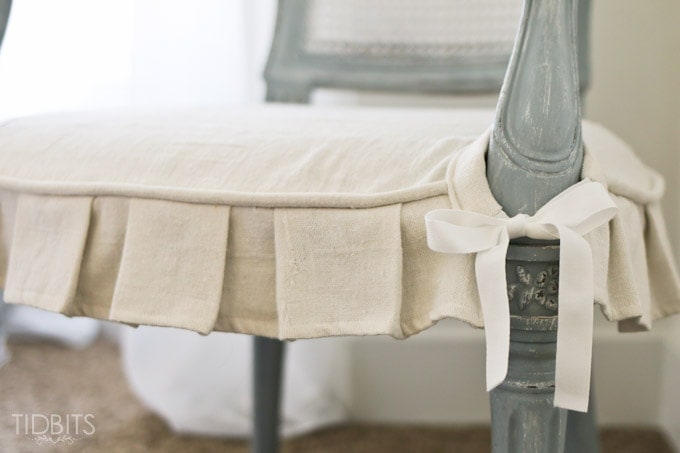
I made the pleated drop cloth cover (how to bleach drop cloth HERE), with some twill tape ties – and called it a day.

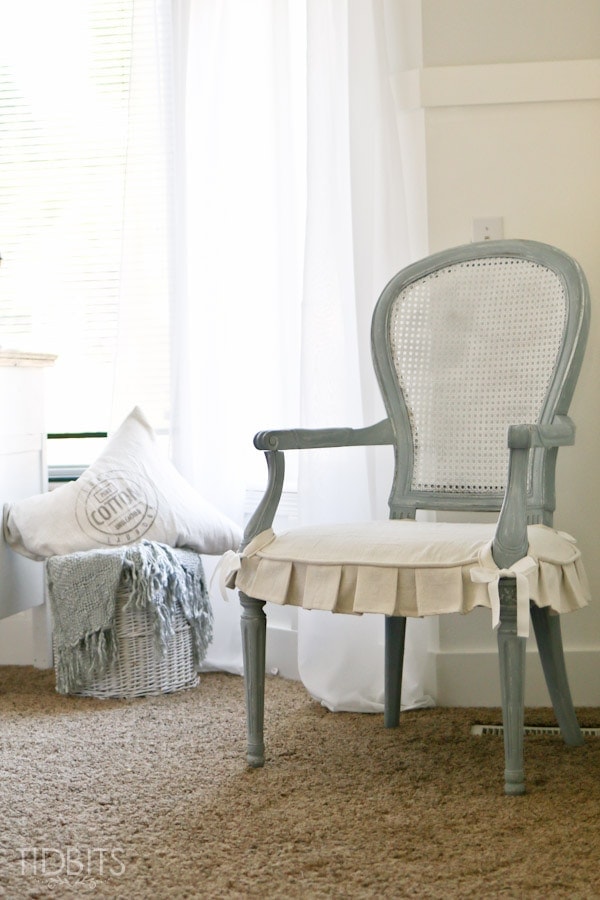
And now our Master Bedroom makeover is just about there – and I can’t wait to show you the rest . . .

Thrift Store Chair Makeover | French Country Style - TIDBITS

So stay tuned!  By the way – what do YOU think of the chair?  Would you have snagged it up in all it’s brown glory for $15.00?  I’d love to know!

Thrift Store Chair Makeover | French Country Style - TIDBITS


*Linking up to these parties, HERE.

*This post contains affiliate links.  Rest assured, I only recommend products I use and love.

I’m Cami! Welcome to my blog TIDBITS. Follow me along for beautiful home decor ideas and inspiration for do-it-yourself living
Thank you for Subscribing to TIDBITS! Talk to you soon.

There was an error submitting your subscription. Please try again.

439 shares
  • 2

Leave a Comment

You might also like

  • RunawaysRunaways
  • Charlie Brown Tree – with a Cute BottomCharlie Brown Tree – with a Cute Bottom
  • Pink Christmas Inspiration and IdeasPink Christmas Inspiration and Ideas
  • Fall Entry WayFall Entry Way

Reader Interactions

Comments

  1. Cami says

    December 26, 2020

    Hi,

    I have a similar chair but now is covered in oil paint. Should I chalk it over it or how to get rid of the paint from the cane?

    Thanks Cami 😊

    Reply
  2. Fiberscope.Net says

    September 6, 2019

    It only proves that amazing makeovers on a budget are more than real!

    Reply
  3. Rose Smith says

    May 18, 2019

    Could you tell us how you made the chair covers, especially how you went around the legs.

    Reply
  4. Becky Ackroyd says

    November 9, 2018

    It’s lovely! I just picked up a 6 chair set like this for free today, and they are going to get a makeover much like yours. Thanks for the inspiration & I love your style!

    Reply
  5. Amanda says

    June 2, 2017

    I was hoping for a tutorial on how to make the seat covers.

    Reply
  6. Loretta says

    March 31, 2017

    Did you repair the canning too? It looks damaged in the before but not the after. I have a chair that needs this! Thanks!

    Reply
  7. Alaina says

    March 5, 2016

    I love how the chair turned out. I plan on making a slipcover for a couple of chairs like yours, however I am having trouble with the back and how to make the curves. I hope mine turn out half as nice as yours.

    Reply
  8. Peg says

    January 4, 2016

    Absolutely! Terrific buy and what you did to it is amazing! Love it.

    Reply
    • Brigida Desserre says

      January 23, 2016

      Beautiful! I love it! Funny today I painted two chairs like yours but without the arms. I have old white and Louis blue by Annie Sloan and debated which one to use. I ended up using old white but after seeing yours I’m going to give them a top coat of Louis blue.. Thanks for sharing!

      Reply
  9. Jam Jar Gill says

    October 10, 2015

    Oh my gosh this is gorgeous! love it 🙂
    Jam Jar Gill recently posted…RECIPE JOURNAL: Meatless Mondays {weeks 14 & 15}My Profile

    Reply
  10. Tone says

    September 25, 2015

    You know what, I have seen chairs like these many times at the local thrift shop, and I allways walked on by. But I promise you, the next time I wont!!
    The chair looks amazing! Shutter Grey is my favourit amongst MMS. It is actually a very good idea to give the furnitures a layer of chalkpaint (I use homemade) before you use milk paint. It sticks better (In my case, it has never flaked off when doing so…) + you dont have to spend alot of expencive milkpaint:)
    Great job!
    Tone recently posted…Dining room makeoverMy Profile

    Reply
  11. Kim says

    September 24, 2015

    SCORE!!!!

    Reply
  12. Rhonda says

    September 24, 2015

    Love love the seat covers! How did you make them? Been wanting to sew some kind of cover for my ugly kitchen chairs and this look is adorable

    Reply
  13. Rhonda says

    September 24, 2015

    Love the seat cover. How did you make it? Have been wanting to make covers for my kitchen chairs

    Reply
  14. Carol Lander says

    September 24, 2015

    Would have paid twice that for the chair. Beautiful job. Love the colors and the chair cover.

    Reply
  15. Susan says

    September 24, 2015

    Your seat cover is amazing. The welting, the pleats, just everything about this is perfect. Real sewing talent!!

    Reply
  16. Pamela Lee says

    September 24, 2015

    I appreciate your words of seeing potential. It hit the spot this morning. Right for me. Thanks.

    Reply
  17. Brenda says

    September 24, 2015

    Definitely would have bought the chair. You have to have vision!

    Reply
  18. Heather Anne says

    September 24, 2015

    I would have bought it too – but only if she had a sister! I’ve got severals single chairs and I’m on the hunt for two chairs that match right now. You did a lovely job with the make-over!

    Reply
  19. Cecilia says

    September 24, 2015

    Oh yes, I would have! She had the potential there and you brought it out. I love how it turned out! Very pretty!
    Cecilia recently posted…Rope Wrapped PumpkinsMy Profile

    Reply

Leave a Comment Cancel reply

Your email address will not be published. Required fields are marked *

CommentLuv badgeShow more posts

This site uses Akismet to reduce spam. Learn how your comment data is processed.

Primary Sidebar

We are sisters, working independently under the same Brand, while sharing our individual passions. Follow Cami for all things HOME, and join Marci for all things FOOD. Enjoy!


About Cami
About Marci

My product lines

TIDBITS Planners
TIDBITS Linen

Our books

Front cover of 'Master The Electric Pressure Cooker' cookbook

Hot off the press
tidbits.
Right to your inbox.

Sign up to get post updates, monthly subscriber only content, and inspiration for do-it-yourself living
Thank you for Subscribing to TIDBITS! Talk to you soon.

There was an error submitting your subscription. Please try again.

Archives

Follow on Facebook

Footer

Welcome to my blog, TIDBITS! I am a sleep deprived Mom to 4 and a fanatical DIY'er. I absolutely love to create - but I love to inspire others to create even more!

Subscribe

Thank you for Subscribing to TIDBITS! Talk to you soon.

There was an error submitting your subscription. Please try again.

Privacy

Copyright

I love sharing my ideas and tutorials! I ask that you respect my work and follow these guidelines. 1. All images are property of Tidbits blog. 2. Feel free to use 1 or 2 images on your own webpages, provided a link back to my blog is clearly available. 3. Do not remove any watermark or crop/edit my images in any way, unless given written consent by myself. 4. All tutorials/ideas/designs are for personal use only and are not to be copied and distributed in any way. 5. Sharing and pinning through social media is always welcome!

An elite Cafemedia Home/DIY Publisher
Branding + Website By Coded Creative

439 shares