
This post may contain affiliate links, which means I get a small percentage of the sale at no extra cost to you. I only recommend items I love and have had a positive experience with. Thank you!


Any seasonal fruit is yummy with this yogurt, but I particularly like peaches which flavor very well with the vanilla I’ve added to my yogurt. Unless you like plain yogurt, I think some type of sweetener is needed. I only ever add honey or real maple syrup – and prefer the syrup with the peaches. My kids will only eat it if I sprinkle some brown sugar on top so I do that for them.
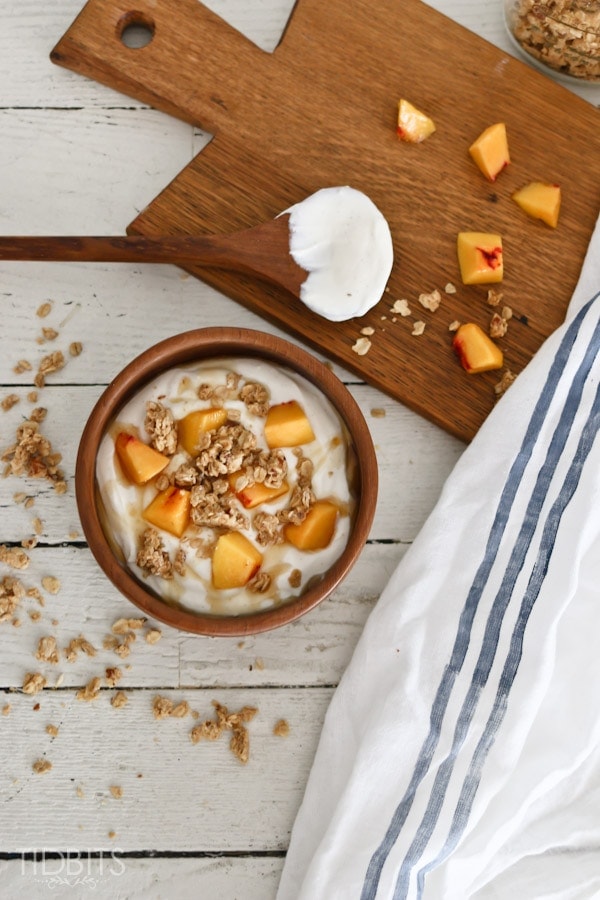
My favorite healthy granola to add comes from this recipe on Pinch of Yum. This yogurt mixture makes a wonderful breakfast or afternoon snack.
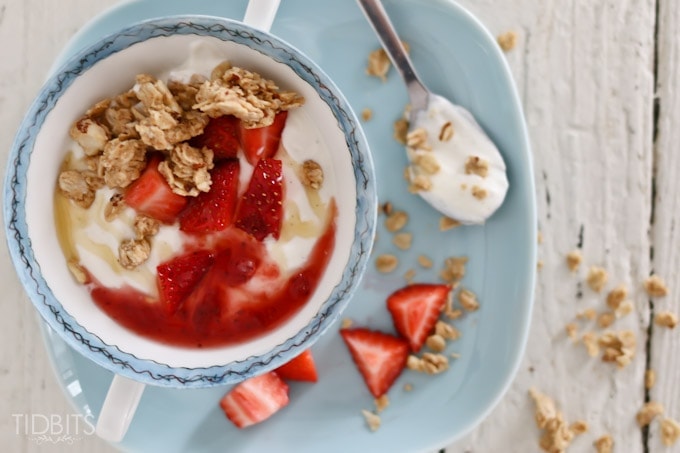
The other mix I love is fresh strawberries, a dollop of strawberry jam, and a swirl of honey – topped with granola.
Mix it all up and take a bite.

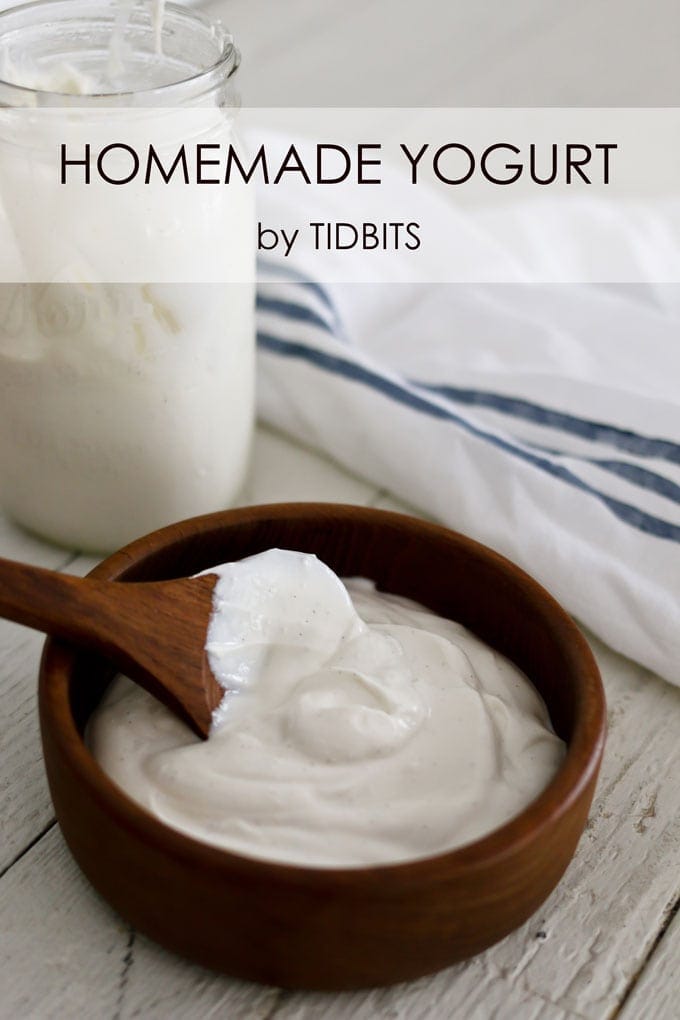
That image above makes me drool every time. Homemade yogurt doesn’t have as much of the tang found in store bought yogurts and this method I’m about to share makes it so thick and creamy.
First, let’s talk about the food and supplies you will need.
SUPPLIES:
- Instant Pot
- The newest Instant Pot model is currently priced at $132.45 on Amazon. It may seem pricey but it is definitely not just for yogurt. It can replace the need for a rice cooker or a general pressure cooker and even a slow cooker crock pot. It saute’s, steams and keeps food warm. My pressure-cooking-loving sister has 5! and rarely uses her oven or stove any more. She pointed out to me that the best unsweetened yogurts are super expensive and for the cost of a gallon of milk (assuming you are using your own yogurt as a starter) you can have up to 3 quarts of yogurt and at least a quart of buttermilk. So that is less than $4 for all of that! She has seen sugar free yogurt at natural grocers for $8 a quart. This pot can definitely save you money over time! I am just getting warmed up to it’s possibilities but excited to try more. Christmas gifts anyone?
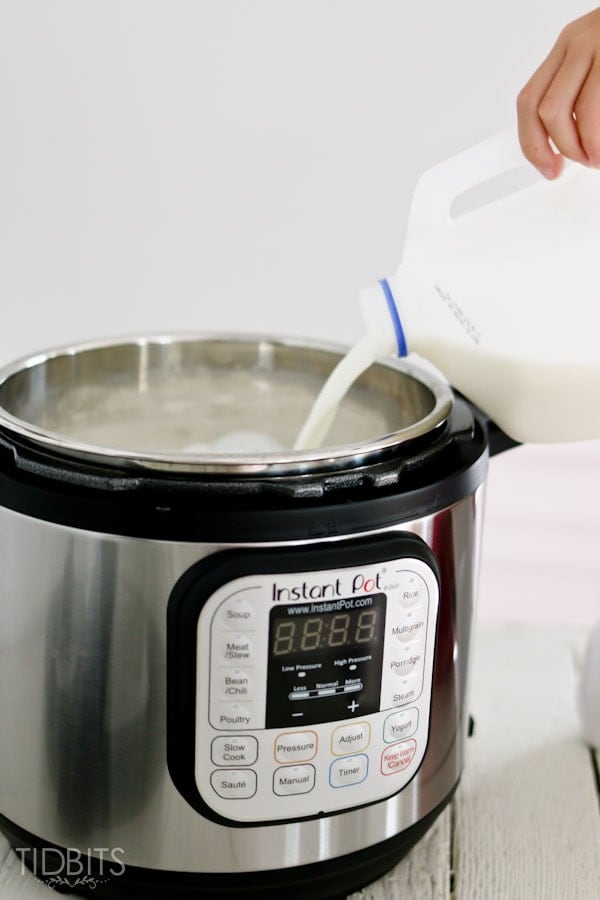
- 1 Gallon of Milk
- We like to use 2% for a creamier yogurt. You could up the cream with whole milk or try a low fat with 1%. The recipe/instructions that follow are for a gallon of milk. Adjust if necessary for a smaller yield.

- Yogurt Starter
- We won’t go into a science lesson (because I don’t like science) but to make yogurt you need a starter – which is simply 1/4 cup of plain yogurt. You can preserve some from your last batch or purchase a small container of plain yogurt. Make sure it has live active cultures.
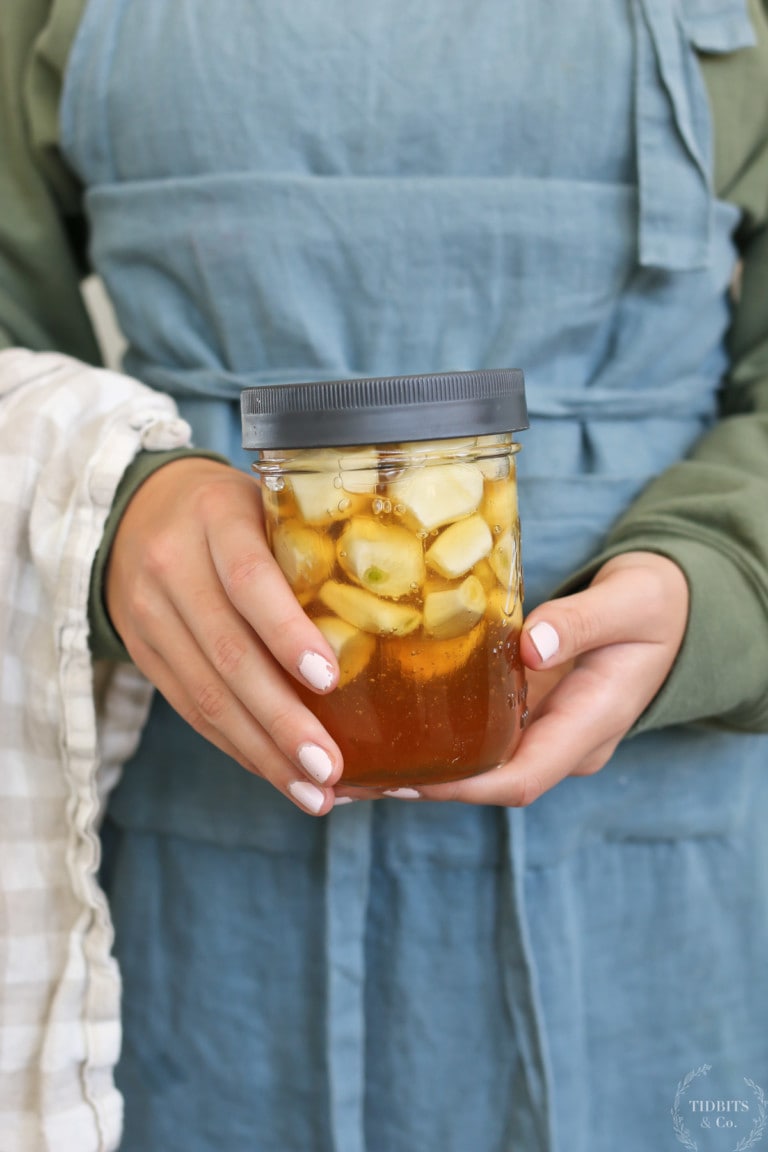
- Vanilla (optional)
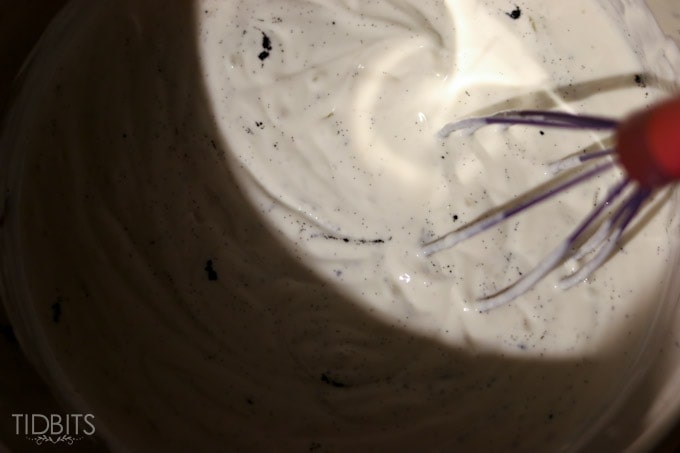
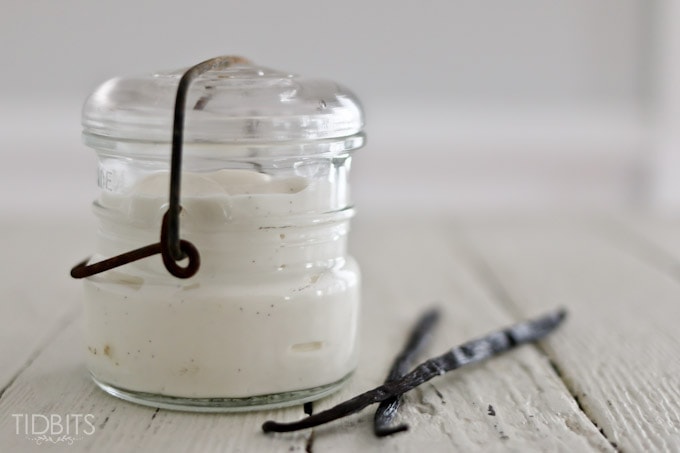
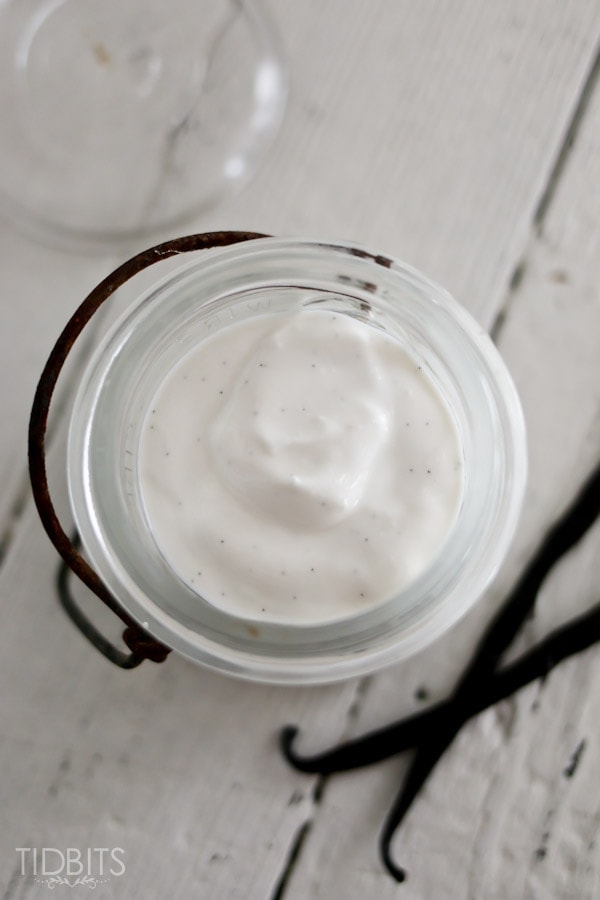
- Adding vanilla adds a great flavor to this yogurt. The amount you add depends on how potent you like it. I add 1 Tablespoons, my sister adds 1-2 teaspoons. We also like to scrape 1 vanilla bean and add it to the yogurt, for more flavor and beautiful vanilla specks in our yogurt.
- Strainer
- When all cooked, you need to strain the whey from the yogurt. Our favorite product for that is these Nut Milk Bags, bought HERE. They work wonderful! You can also use cheesecloth, I’ve heard.
- Powdered Milk
- This helps to thicken up the milk and is optional. Only a small amount of 3 Tablespoons is needed.
PROCESS:
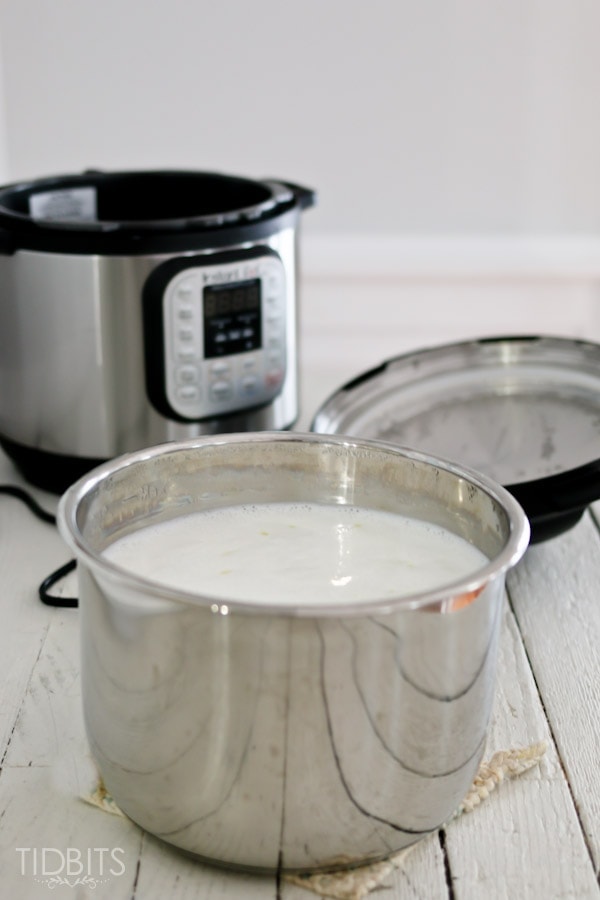
Pour the entire gallon of milk into the pot, which is off at this point.
Add 3 Tablespoons of powdered milk.
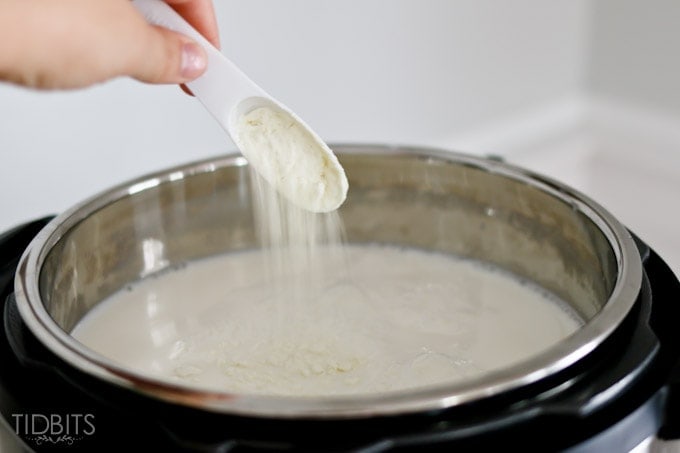
Stir with a whisk until powdered milk is incorporated and dissolved. We recommend using a whisk that is rubber coated (like THIS one) or stirring and handling the yogurt with something that is not metal. Because the pot is metal, if you were to use a metal whisk it is possible to get a hint of the metal on metal taste that can transfer to foods. Some people notice this more than others.
Now you can close the lid so it is locked in place. I keep the pressure vent switched to sealed, but I don’t think it matters with yogurt because you are not pressure cooking it. (If none of this makes sense because you haven’t used an electric pressure cooker – I highly suggest reading the manual or watching youtube videos showing how these function).
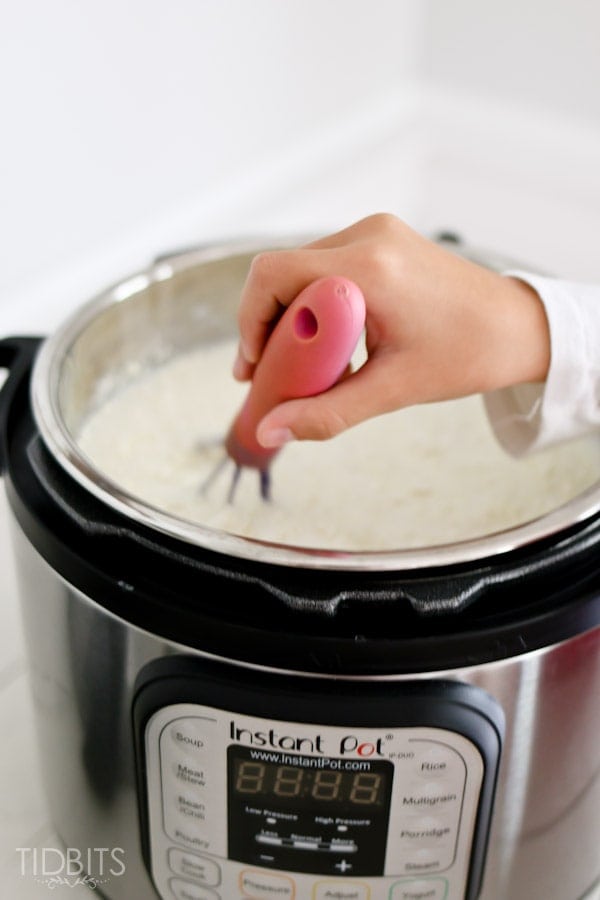
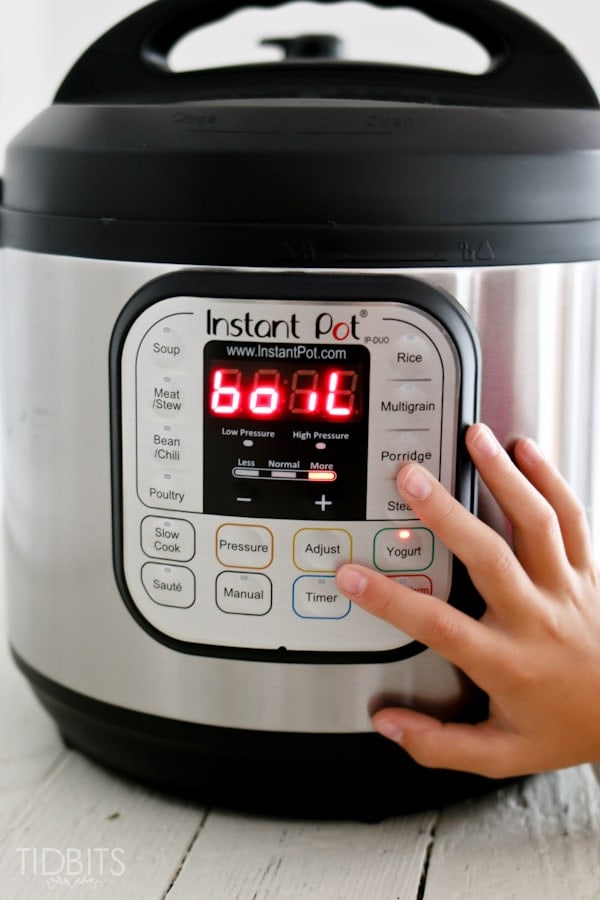
Plug the cooker in and press the yogurt button.
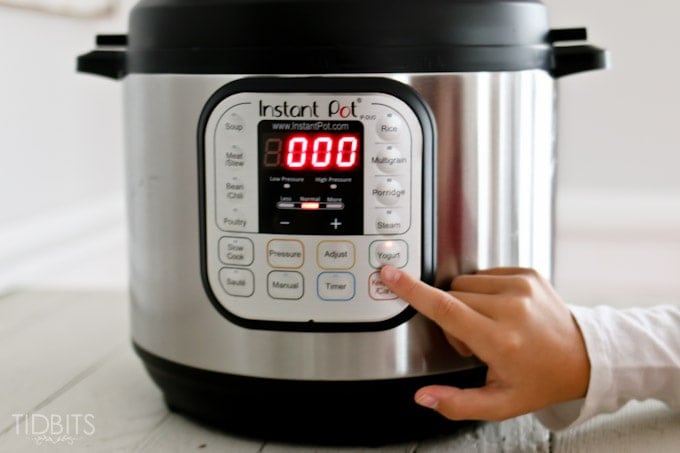
Quickly after that, press adjust once, and the screen will display boil. Scalding the milk is the first process of making yogurt. You need to get it to a certain temp, but you simply don’t need to worry about that because the cooker will stop the boil setting when it is finished. This boil process takes approximately 1 hour for a gallon of milk. You could essentially boil on the stove till you hit about 180 degrees Fahrenheit, but then you would dirty another pan and you would have to watch it to not scald the bottom. Pushing a button is so much easier.
When it is finished boiling, the cooker will beep at you a few times and then display “yogt”. It is important to be aware of this beep and unplug the machine right after.
Now you need to cool the yogurt to around 110 degrees Fahrenheit. I speed this up by removing the inside pot and letting it cool on the counter. I whisk every once in awhile to release heat if I’m in a hurry.
This cool down process takes about 1 hour as well. If you have a digital thermometer, like THIS one I have, you can just clip it to the pot and easily see when the correct temperature is reached.
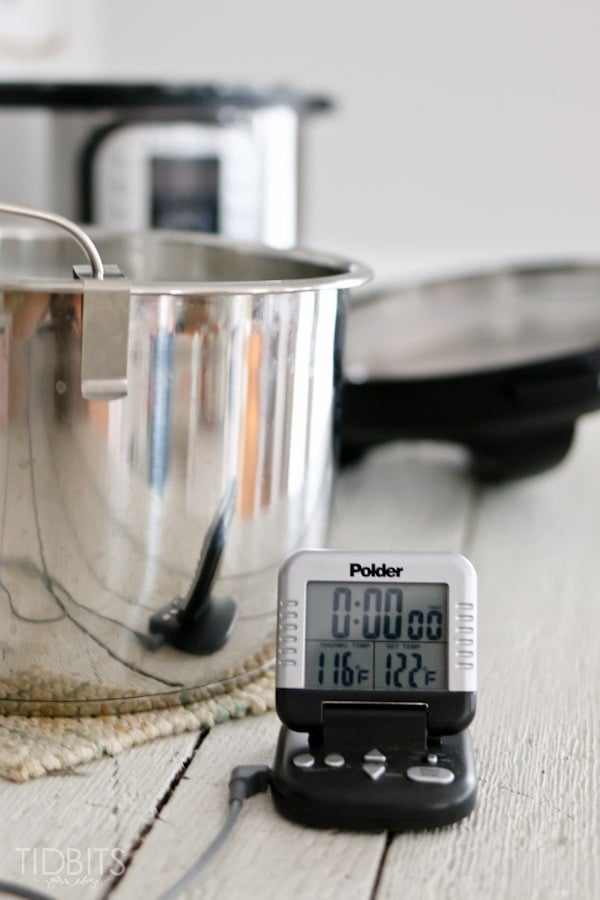
At 110 degrees you are ready to add the starter.
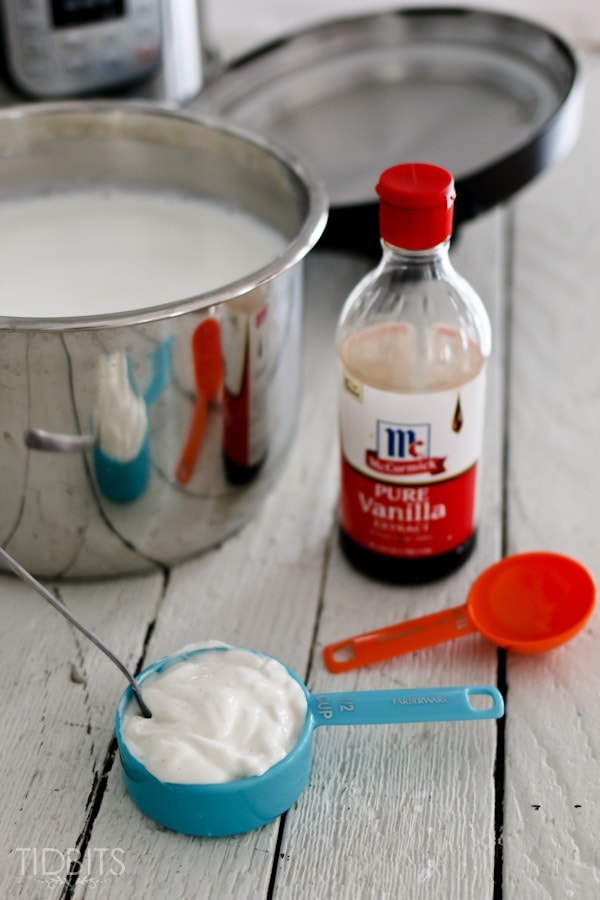
Dump in the 1/4 cup yogurt.

Mix VERY thoroughly.
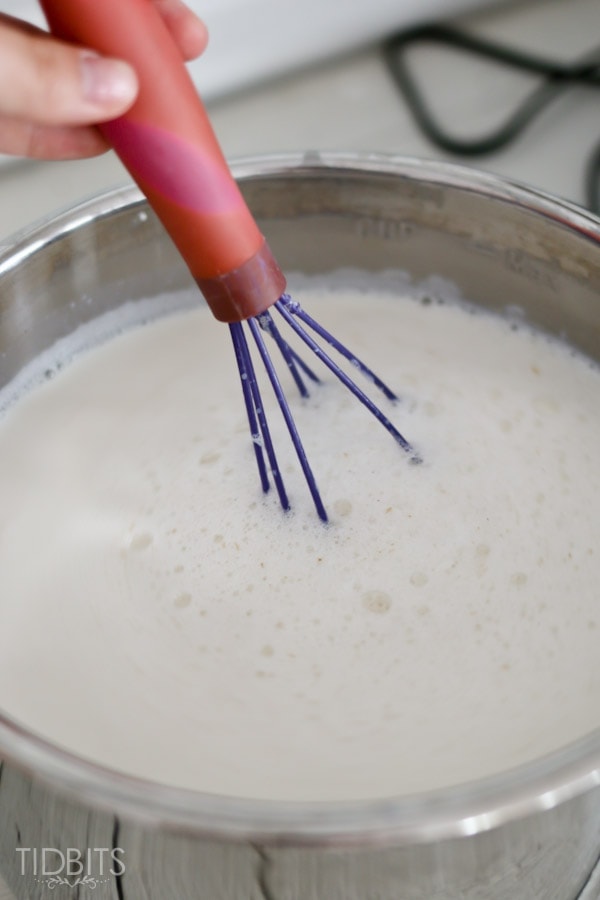
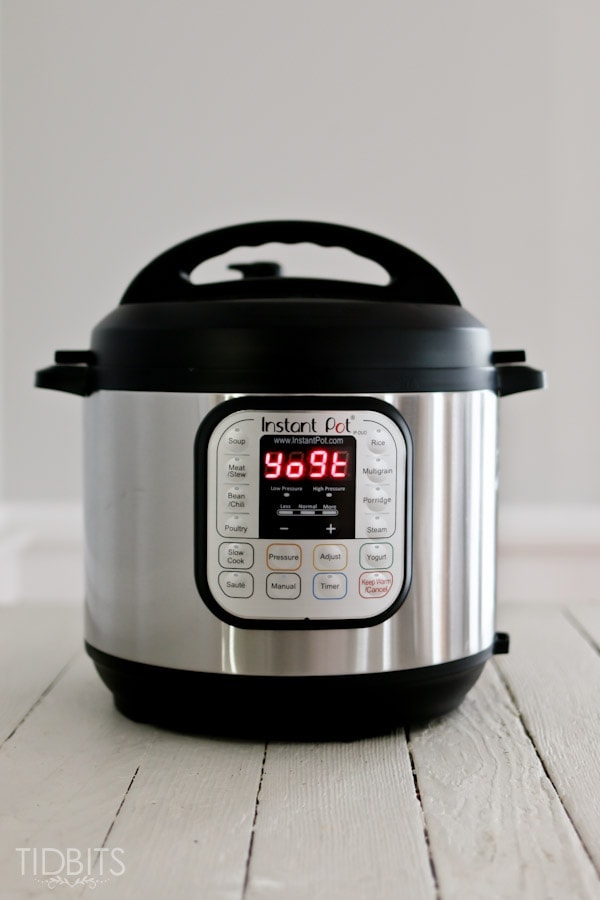
All that was the hardest part (which it shouldn’t have been that hard). Now put the pot back inside the cooker, seal the lid, plug it back in, and press yogurt.
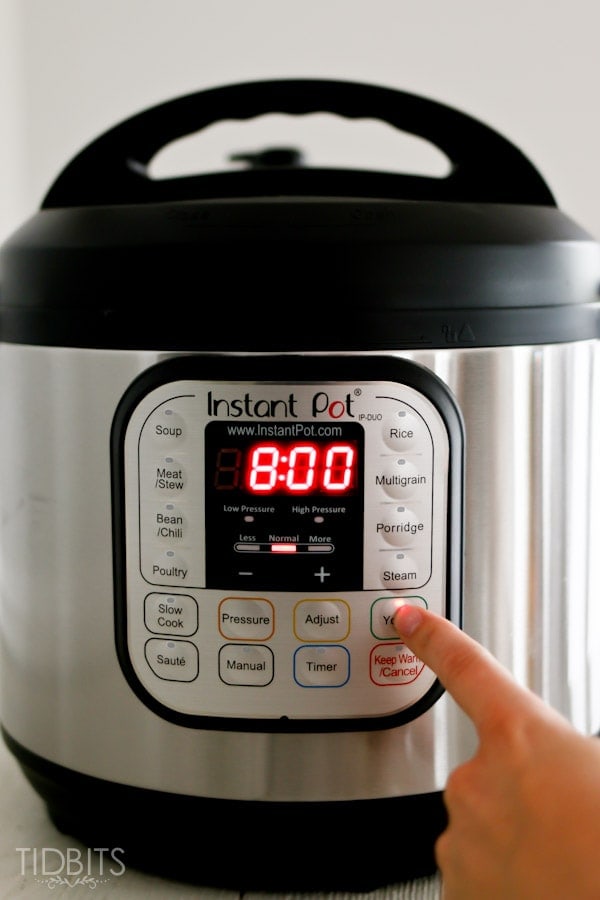
It will say “8:00” which means 8 hours. If it doesn’t say “8:00”, press adjust until it does. Don’t touch a thing more and it will promptly beep at you signifying it has started the incubation process. The display will say “0:00” which means it is going to count UP until it reaches 8 hours.

Now you just forget it for the rest of the day/night and let the pressure cooker do its thing. When 8 hours is up, it will beep again. (By this time it was night and I had to flip on nasty overhead lighting for my pictures. Sorry.)
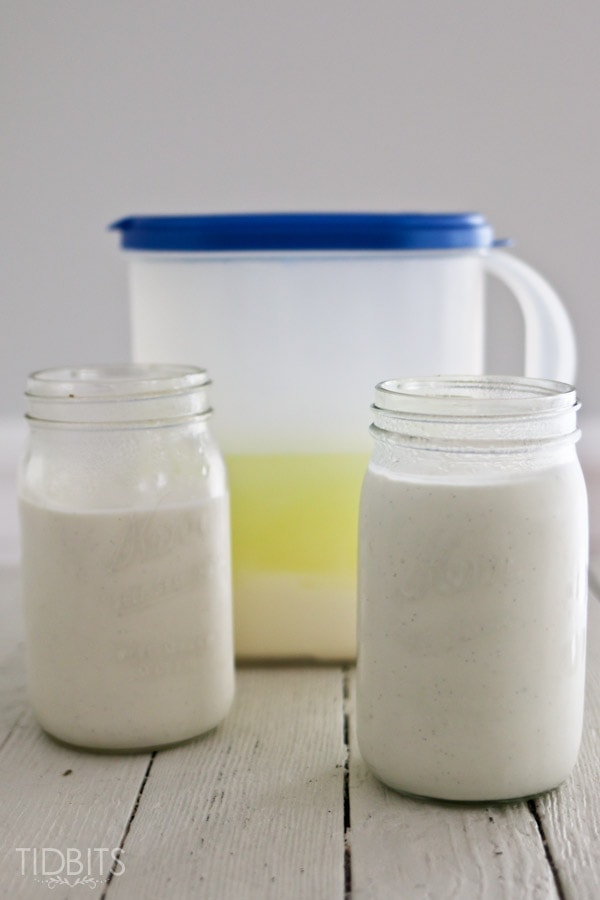
You could at this point, stir your yogurt and put it in jars to set overnight. But I don’t recommend that quite yet. Straining the whey yields a much less runny product, and I am certain you will like it better. My sister and I fill our nut milk bags with the yogurt and place a bowl underneath to catch the whey. I then hang it on cupboard handles to strain.
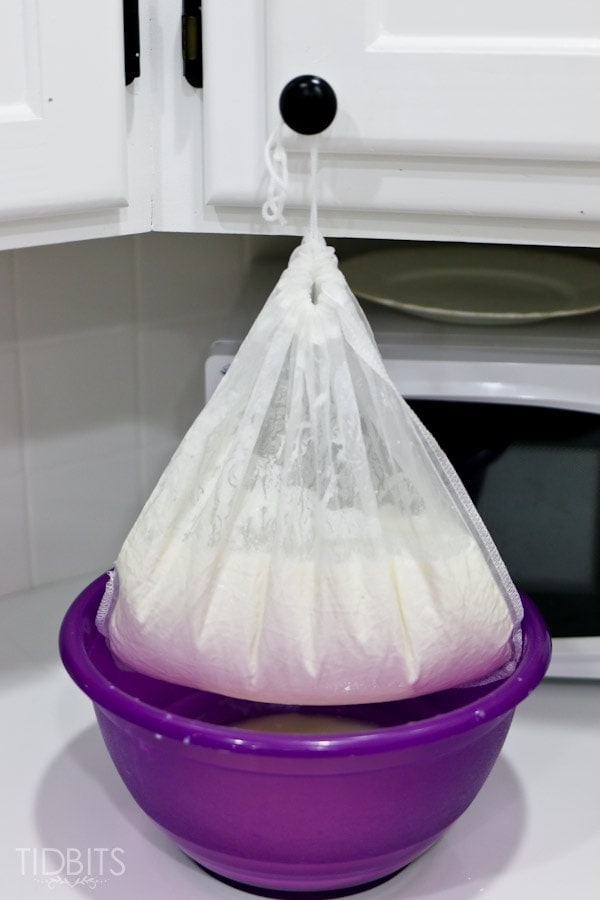
It’s a bit funny, but it works.
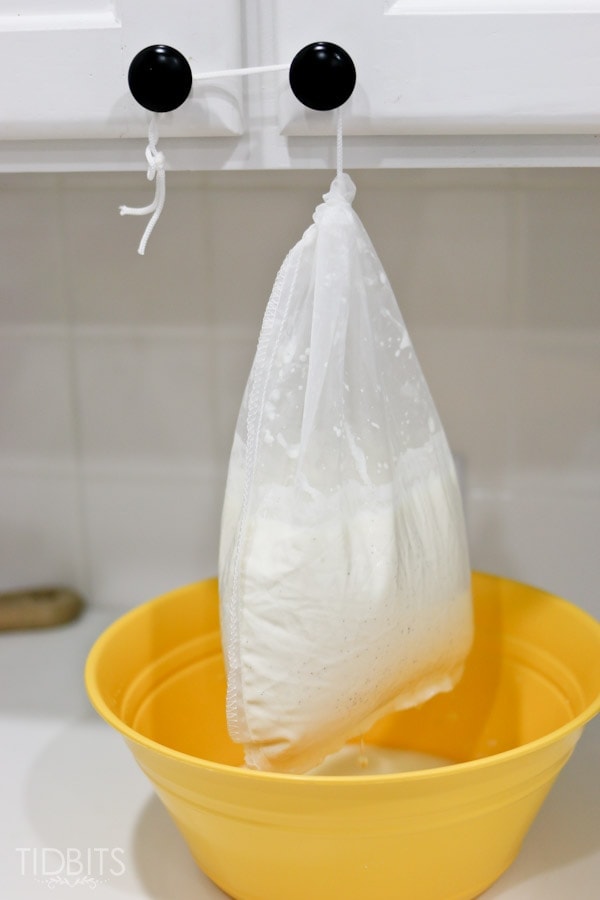
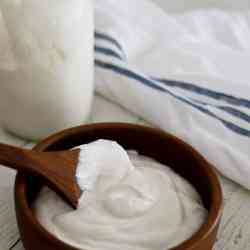
How long you let this strain will impact your final results. I find I really really like it thick, similar to a greek yogurt – so I let mine hang there for up to an hour. My sister does hers for 1/2 an hour, and yields slightly more yogurt than I do. You may want to experiment with your batches.
This next step, I found to be quite important. Rather than emptying the yogurt from the bags to the jars to set, it is best to empty the strained yogurt back into the already dirty instant pot and stir it once more. This gets rid of any lumpy yogurt and gives it a consistent consistency. This is also the point where I slice open a vanilla bean and scrape the seeds to mix into my yogurt.
Then it is time to place the yogurt and whey in jars or containers to set in the fridge overnight.
Lets talk about yield, real quick.
When I strain my yogurt in the nut milk bags for an hour, I end up getting about 2 Quart size jars full.
This batch was slightly less (I think I left it longer than an hour and someone drank a bit of my milk beforehand). My sister’s 1/2 hours strain gets her about 2 1/2 – 3 jars. However, I want to be sure you don’t think all that whey is a total waste. DON’T THROW IT OUT! The whey mixed with a scoop or 2 of yogurt can be used as a substitute for buttermilk. My kids love my buttermilk bran muffins I make with it. I’ve been searching other recipes that use buttermilk which I’m excited to try.

Now if you think you won’t eat that much yogurt, it lasts up to 2 weeks in the fridge – but mine always gets eaten before that ;). It will get tangier the longer it sits.
Here are a couple of things you can do with your yogurt, besides just eating it up.
- Use it in place of sour cream (best if you don’t add vanilla).
- Try mixing 1 cup of yogurt with 1 cup of milk and honey to taste. Throw it in the ice cream maker and you have healthy and delicious frozen yogurt.
If you need to justify the purchase of the Instant Pot, let me help. Spending that much money just to make yogurt seems difficult to fathom.
Here are some incredible pressure cooking sites that use the electronic pressure cookers. You can glance at the recipes and methods they use to get a feel for all the amazing things it can do.
When you are sold and ready to buy, click the link below!
Instant Pot Electric Pressure Cooker – Buy HERE!
Instant Pot Resources:
http://www.hippressurecooking.com/
https://www.pressurecookingtoday.com/ (Her steel cut oat recipe, HERE, is to-die-for amazing! Have you ever tried to boil steel cut oats? I had a hard time ever getting them to feel fully cooked until I tried the pressure cooker).
And for more TIDBITS favorite recipes, check out our NEW COOKBOOK titled Master the Electric Pressure Cooker Cookbook.
Please feel free to ask me any questions and I will do my best to answer them! I would also love to hear if you have any comments, such as – do you love/hate homemade yogurt? What mix-in’s do you use? Have you ever tried the Instant Pot? Or anything you could add!
Finally, here is a printable recipe, with very general directions. Use the recipe card for quick reference once you’ve gotten a feel for how the pressure cooker works.
Homemade Yogurt with an Electric Pressure Cooker
Ingredients
- 1 Gallon 2% Milk
- 3 Tablespoons Powdered Milk optional
- 1/4 Cup yogurt with active cultures
- 1-2 Tablespoons Vanilla optional
- 1 Vanilla Bean optional
- 1/2 cup sweetener optional
- Nut Milk Bags
- Instant Pot
Instructions
- Pour milk in pot.
- Add powdered milk if using and stir.
- Lock lid in place, plug in cooker.
- Press yogurt.
- Press adjust until display reads “boil”.
- When boil cycle is finished (about an hour), check the temperature and use the saute function to warm to 185 degrees F. Unplug cooker, remove pot and place on cooling rack. Cool milk to 110 degrees Fahrenheit.
- Mix in yogurt starter.
- Lock lid in place and turn on cooker.
- Press “yogurt” and then “adjust” until the screen says “8:00”. The milk will now incubate for 8 hours.
- When pressure cooker beeps at the end of 8 hours, place in refrigerator and chill yogurt for 6 hours or overnight.
- Strain yogurt using a Nut Milk Bag, Euro Cuisine Yogurt Strainer, or coffee filters for 1/2-1 hour or overnight for a greek yogurt consistency.
- Pour yogurt into a bowl. Add vanilla extract or vanilla bean seeds, and/or sweetener at this point, if desired. Whisk until smooth. (A hand held mixer makes quick work of this, only mix until smooth)
- Place yogurt in jars and store in fridge.
- Add your favorite mix-ins and enjoy!
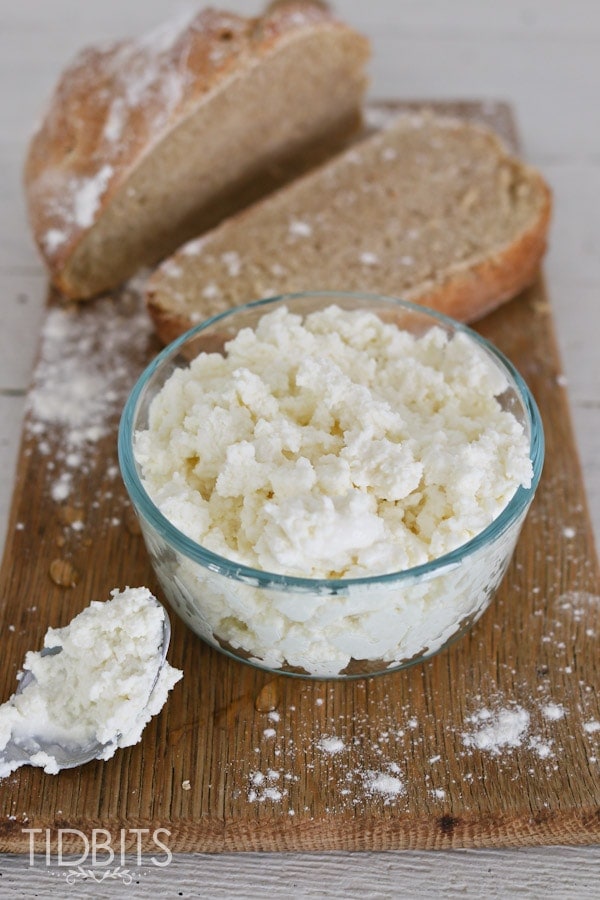
If you liked this yogurt recipe, you may want to try making Homemade Ricotta Cheese in your pressure cooker as well.
Here are some pin friendly images for you to use on Pinterest!
*Linking up to these parties, HERE.
* This post contains affiliate links. Rest assured, I only recommend products and services I use and love.


Thank you for your step by step clear instructions. I just bought an instant pot a month ago and all of the recipes I have seen for yogurt seemed complicated. I made some today and it turned out great!
I love this yogurt! I do hate throwing out the leftover whey, though. Would you share the buttermilk bran muffin recipe you mentioned in this post?
So I tried this last night- followed it exactly like the recipe says. When it beeped at the end of 8 hours, I opened the pot only to find a pot full of room temperature milk! It looks like I set it right- after it beeped it displayed “yogt”… any idea what happened??
Caroline, That’s so disappointing! Have you made it before successfully? It’s hard to know what went wrong, there can be several different factors. Was the milk 180-185 after it boiled? Was your starter fresh? Any possible contamination? Is your yogurt setting on medium temperature?
I have found it’s difficult for me to get it up to the correct temperature using the Instant Pot (I had to do the “boil” setting several times before it got up to 180), so I usually do that part on the stove because it’s faster, then do the rest in the Instant Pot. You might want to give that a shot.
I loved your story of how your sister introduced you to yogurt making & the IP. Along with your excellent discussion of how to make yogurt, I took the leap & made yogurt.
In late April, I began using the IP I purchased on cyber Monday. My goal was to overcome “IP intimidation” by cooking something every day for one month. About 10 days ago I made yogurt for the first time. I was so pleased with the results, I started my second batch last night, and this batch is just as thick and smooth, and tastes wonderful. I used Fage yogurt for my starter, 2% milk. I did not add any milk powder.
For my second batch, I decided to make less yogurt. I used just 1/2 gallon of milk and 2 TBS of starter yogurt. Worked great!
I did research several internet sites for IP yogurt making, and based on that research, and some organizational issues encountered during my first batch, added a couple of steps to your process:
I sterilized the IP as my first step. I added 3 cups of water and go under pressure for 5 minutes. You can also press the steam button for 5 minutes. Several sites stressed importance of this first step.
After sterilizing the IP, I cooled down the inner pot by putting it & the IP lid in the refrigerator for 30-40 minutes. I unplugged the IP to cool it down as well. Another site suggested that putting milk into the IP that is too warm may result in runny yogurt, and recommended starting the boil process with a cold inner pot and lid.
Halfway through the boil process, I opened the lid & stirred the milk with the silicone whisk. I stirred the milk a second time about 3/4 of the way through the boil process. For some reason this helps to distribute the heat and bring the temperature up to 180 degrees.
You really need to have the thermometer and other tools ready when the boil process ends. If you’re planning to put the pot in the sink filled with cold water, make sure that is also ready. The milk begins to cool down quickly once the lid is removed, so I immediately turn on the sauté function. Then I get a temperature reading as I stir the milk. I continually stir until I get a temperature reading of 185.
About 30-45 minutes before the yogurt is fully strained, I start sterilizing the yogurt jars, jar tops & rubber jar stoppers. I also sterilized the spoon(s) and rubber scraper I use to remove the yogurt from the bean bag.
Sterilizing & refrigerating the inner pot & lid does add 45 minutes to the process. I am not a scientist, but accept the premise that starting the boil period with a cold inner pot affects the texture and consistency of the yogurt. I was very happy with the my initial batch as well as the thickness and texture of my second batch.
Per Marci’s 12/31/15 post, I purchased the Chief alarm. I love it, it’s digital, easy to use & read. Best of all, it’s high/low temp alarms tell me when it drops to 110 degrees. My only complaint is it doesn’t clip onto the inner pot while it is in the IP. So I have to stir the milk & hold onto the thermometer.
Thank you Jane! All great tips!
I own the Cusinart Electric Pressure cooker which does not have a yogurt setting. In reading the posts on making yogurt it sounds like you need the InstaPot pressure cooker to be able to make yogurt, is this correct?
Yes and no. You’ll definitely need a yogurt function to do it the way I instruct, but I’ve seen recipes that make yogurt in mason jars inside the pressure cooker, and just use the pressure cooker to keep a nice warm environment. There’s an Instant Pot and a Fagor Lux pressure cooker that sports the yogurt function and I highly recommend both pressure cookers if you’re in the market!
Wonderful recipe – it was the first thing I made in my Instant Pot and it came out great. One question though, when you mention sweetener in the recipe, what should you use? Can you use regular sugar or should it be something else? My son loved adding honey to the yogurt are processing, but if I wanted to sweeten it beforehand, what is best to use?
That was meant to say adding honey after processing 😉
Emily, You can really use any sweetener you want. I’ve used white sugar, honey, agave, and maple syrup. You could also use brown sugar or coconut sugar. So use whatever you have! I’m glad it worked well for you!
Thanks 🙂 Can you confirm though when you add the sweetener if using white sugar… looks like after it is strained, but I would think that it wouldn’t dissolve well at that point and leave it grainy??
Ive actually done it while my milk is heating to 180 as well as after its been strained. It has worked for me both ways.
I made this for the first time last week as a gift for a friend. I kept some for myself and we absolutely love it!
I apologize if this is a repeat question. Do you think i could cut the recipe in half?
Dianne, yes it works great cutting it in half 🙂
I am excited to see how this turns out as I am currently in the straining stage. I think I am also going to purchase the cookbook. I don’t mean to be rude or anything, but I am an English teacher, and the word “receive” is spelled incorrectly on the cookbook order page. Totally common mistake.
Darci, You’ll love the yogurt and book! And thanks so much for catching the typo, I really do appreciate it!
I’ve been making this yogurt for several months now. I absolutely love it! Two questions: at which point do you take out your starter? I’ve been taking mine after I strain the whey out and mix the yogurt back up. Second, I’ve not been sterilizing my tools before making yogurt. Am I going to poison my family?
Thanks,
Heather
Hey Heather, I’m glad you’re loving the yogurt! I don’t bother taking out my starter. I just try to leave a little in the bowl that I serve it from. I actually rarely use my own yogurt as my starter. It seems like it makes it tangier, but not everyone agrees with that. And I honestly have never sterilized anything in the 6 years I’ve been making it.
My Instant Pot didn’t get the milk boiled to 180 degrees. I tried twice but it could only get it up to about 140 or 160. Second problem was that it did a little scalding on the bottom of the pot. I didn’t know if I should proceed with the 8 hours yogurt making process at that point or not. I chose to empty the pot of milk and clean the pot from the bottom of the pot (it wasn’t burned but milk was stuck on the bottom) and then after the milked cooled to 110 degrees, I proceeded with the rest of the yogurt making my adding my live and active yogurt starter and let it do it’s 8 hour thing. The yogurt came out just fine but I can’t understand why it didn’t get up to 180 degrees when it said “boil” and why it scorched a bit on the bottom.
Alice
Alice, I’m convinced there’s some inconsistency with the pots. Some people’s milk consistently hits 175-180 and others say it only goes to 160. One thing you might try is letting your gallon of milk sit at room temperature for 30-60 minutes. This works well for me. I think the sweet spot is 185. I let it go through one boil cycle and then I use saute to warm it to 185, stirring often so I don’t get the scalding on the bottom of the pot. Try that the next time, it works well for me!
Hi y’all. I haven’t seen this particular getup in the comments, for straining the yogurt. It requires you to have an extra refrigerator or sufficient space in your own — and probably would need to remove a shelf for a day. I use a gallon of milk to make my yogurt, and I found that straining in colanders lined with super-clean lightweight knit (cut from old Tshirts, and super-cleaned) was working better than coffee filters, and I didn’t want to buy or hand a nut bag.
Having access to a restaurant supply store nearby, I knew they would have options to hold that much bulk. But they didn’t! So I improvised with what they did have. I already had a few eight quart cambro square plastic containers (yes you read correctly 8 quarts or two gallons of capacity). I knew a four-quart cambro wouldn’t fit correctly inside the 8-quart to permit the whey to drain. It fit completely inside the 8-quart.
But they had a six-quart container that did — about 3 to 4″ of clearance above the bottom of the 8-quart. We bought the 6-quart container (didn’t need a lid, the 8-quart lid fits), and I drilled about 18 holes in the bottom with a 3/8″ bit, and cut a square of T-shirt material to line the bottom. Now I could get all the yogurt in the strainer.
I let it strain in the fridge for a full 24-hour period to get the thickest greek-style yogurt, and use the leftover whey for baking or (once I get a new batch) pour it out in my garden (NEVER down the drain, there’s just too much good stuff to waste!).
Hi Cami, I’m hoping you could help me figure out what went wrong with my batch of yogurt. I’m brand spankin new to both the instantpot and yogurt making but was eager to give this a shot last night. I followed all your steps up until the straining part (my bags are ordered but won’t be here for another couple days). This morning when I opened my instantpot the yogurt was still very watery, and after watching some more videos I noticed other people’s yogurts were a lot more set and firm. I canned them and put them in the fridge, but even after 2 hours they were still extremely runny. My guess is my culture didn’t proliferate properly, but being that I’m completely new I might be missing some obvious issue. Have you had this issue, and is it salvageable?
For the incubation period, I had to change the pressure from ‘more’ to ‘normal’ (by using the adjust button) otherwise it would got to ‘boil’ again after pressing the yoghurt button.
I love this yogurt!!! My go to recipe! Trying to figure out WW points…any ideas about nutritional info. I make with 2% milk
Pam,
It would be similar to the nutritional information for any plain 2% yogurt. So you could just check the label of one at a grocery store. It really is the best yogurt!
Dan, We plan on doing a complete yogurt recipe update so it’s very clean and clear. In the meantime, the recipe in our Ebook is right on the money and easy to follow! I always add my vanilla after I’ve strained the yogurt so the alcohol that is in Pure Vanilla doesn’t interfere with the yogurt making process. You can use honey, maple syrup, agave, or white sugar to sweeten. I use about 1/2 cup. That can really be added whenever (Before the boil cycle, when starter is added, or after yogurt is strained). The taste and texture is MUCH better with even a half hour of straining. Let me know if that doesn’t help. Hopefully I didn’t confuse you further!
Nope, I think I have a good idea now! Thank you for the response!
This says that the recipe is printable, but I don’t see a “print” button. I certainly don’t want to end up copying all those pictures. How do I do this?
Jacqueline, The yogurt is a 2 page post and the recipe is on the second one. Here’s the link, I hope it will work from here! http://www.tidbits-cami.com/easyrecipe-print/6320-0/
Your original recipe is my go to recipe. my husband loves it!! He is so spoiled, I can’t buy store bought anymore. The only thing I do different from the original is that I refrigerate before straining. I started refrigerating when one time I didn’t plan well and the yogurt was done in the middle of the night so I just put a lid on it and set it in the fridge. I found that the yogurt thickens more when refrigerated. When I run out of powdered milk I’ll try leaving it out and see if it makes a difference. Thanks for the update.
Elaine, my husband refuses to eat yogurt, but my kids LOVE the homemade stuff. They won’t even eat yoplait yogurts anymore. I too chill it before straining it now. I haven’t used the powdered milk for some time and it works wonderfully. I’m glad you’re enjoying it!
Will adding sugar after the boil ruin the yougurt? And how long will the whey keep in the fridge?
Erica, That should work just fine. I’ve had the whey in my fridge for up to 2 weeks several times.
I am so glad I found your site! From a friend on LampworkEtc. com All I saw was onepot this and onepot that and finally broke down and bought one today! I bought a Cuisinart yogurt maker and all the accessories last year and could never make a good yogurt. I can’t wait to try your recipe.
Pat
Thanks Pat! Get ready for some seriously glorious yogurt 😉
Patricia, You’re wonderful, thank you so much!
I want you both to know how much you have inspired me. I have been very sick most of this year. My 17 year old granddaughter and y’all have inspired me to get off my butt and start my own food blog! I feel like an almost new woman. Hopefully we will open on January 1.
Patricia, That’s so wonderful! Doing this with Cami definitely inspired me to do things I never thought I would as well. Good luck!
I have a problem with getting a “boil” reading when I click on “Yogurt” for the final 8 hour cook. In your photo above, when you click on “yogurt” you get an “8:00” reading. But when I click on “yogurt” for the final 8 hours, I get the “boil” reading still, and I’m afraid I’m going to reboil it all and wreck it. Is it because when I heard the beeping after the initial milk heating, which was at “boil,” I just unplugged it, but it is still set at “boil?” Very frustrating… I can’t seem to get it to read out “8:00” and here I am with a gallon of milk in the Instant Pot.
Bonnie, you need to press yogurt and then adjust until it says 8:00. This may be coming to you too late though. I hope you got it figured out!
Can I use Kefir as a starter? I like how it has so many good culture’s in it. Thank you in advance for your information.
Kimberley, Funny you should ask! Cami asked me that a couple days ago, I told her to go for it, and it worked like a charm! So yes, it will work 🙂
Greetings from Canada. To make your recipes (i.e. using milk) more international, please put in brackets measurements for milk in cups. It will help so many people, instead of looking for the another website which is using cups or litres instead of Gallons. Why looking up on Google how many cups is Gallons if your recipes can include it. Thank you.
What is the max amount of milk you can use in the Instant Pot for this recipe? I like my greek yougurt as thick as possible, so i strain it for a long time. The yield from 1/2 gallon of milk is too smal for me. So, i was thinking of increasing the amount of milk and starter. The question is whether i will have to change time settings as well. Has anyone done this?
Anastasia, I’ve only ever done a gallon of milk. If you have an 8 quart I’m sure you could do a bigger batch. Just check the temperature at the end of the boil cycle. I’m guessing you’ll need to use the saute function to bring it up to 180-185 degrees.
I’ve been making this yogurt for a while – it’s always delicious! I’ve tried a few other recipes and this one is far superior and much easier. I do make it plain and have been using 1/2 cup starter since that’s what I always did! And I just use plain Costco 2% milk – but no vanilla. I do strain it for a lot longer because I like very thick yogurt – I wind up with about 2 quarts of yogurt and 2 quarts of whey, which I do use (smoothies, muffins, pancakes, etc.). I may try refrigerating it first before straining to see if that makes a difference. My only tip is that I really hated using my nut milk bag for this. It was SO messy and hard to get the yogurt out. I bought industrial size coffee filters at the restaurant store (I have about 200 of them LOL) and line a large colander with it. I just set the colander over a bowl and it is much easier and cleaner.
I’d like to try the coffee filter idea. I HATE washing the strainers! I’ve made some updates to the yogurt recipe you may want to look at in the intro of the yogurt recipe. I only use 1/4 cup starter now and I think it’s made a big difference in how much yogurt I get from it. Give it a try and let me know what you think.
I have replicated this recipe with perfect results multiple times, but my last two batches have been super runny. I can pour the yogurt out of the mason jar (where previously I had to use a spoon to scoop it out) after straining for an hour and a half. Any suggestions?
Heather, Are you using 1/4 cup of fresh starter? 2% milk? What temp are your boiling it to? I’ve found that boiling it to at least 185 produces a thicker yogurt. Is there any thing you’ve done different? Are you adding real vanilla before incubation?
Hi Marci,
Yep. Doing the same thing I’ve done previously – 2% milk, 3 tbsp of dry milk, hitting boil on the instant pot, cooling to 110, adding 1/2-1/4 cup of starter (I don’t add vanilla, we prefer plain), then setting it for 8:00 or 8:30 (which had worked fine before as well). The batch before the latest I use starter from my previous batch and for the latest batch I used Chobani.
I don’t check the temperature after it beeps from the boil setting immediately after opening the lid, but after setting it on the counter and assembling the temperature monitor (it has a docking station, cord to the thermometer, and device that shows the temp) it always showed above 170 when I did get a reading.
Any suggestions? I’m at a loss for why it would start producing different results. I use a nut bag for straining and even strained an hour and a half with still runny results.
Heather, so for your next batch, check the temperature after the boil cycle. Hit saute and simmer it until it gets to 185 degrees. Cool to 110. Add 1/4 cup fresh starter. I always use Fage, but Chobani should be just as good. This should work! Keep me posted!
Would this be considered Greek yogurt or regular?
Candy, Depends on how much you strain it. It’s like a Yoplait consistency even without straining it, but I like to strain about an hour for a greek yogurt thickness.
Any chance for a dairy-free (i.e., almond milk) yogurt recipe in the Instant Pot?
Teresa, I’m sorry to say, I’ve tried almond milk yogurt twice and I haven’t had much luck yet. If I can get it figured out, I’ll post it for sure!
For the straining, I go to a baby store and get plain, single layer cloth diapers. They are cheap, and work great for straining. You can tie it to a wooden spoon and dangle it over a colander or pot.
Feta is a sheep’s milk cheese, often with goad milk as a component. So no, you wouldn’t make feta with the leftover whey.
I made this last week and the yogurt turned out wonderful. Thank you so much:) I loved the yulu brand yogurt which has been discontinued and this was very similar.
I loved hearing your feedback! I’ve never heard of lulu but my favorite store brand is Wallaby and my kids also loved it so much that it was getting so expensive. That’s what inspired me to figure out the homemade method actually. There’s no going back to store brand now! Congrats on your success!
Why did you start cooling it before straining?
It was a tip I read and after trying it I liked it for 2 reasons, 1) it seems to make a small difference in how much yogurt I end up with, meaning more yogurt, less whey 2) but I especially like that I can just throw my pot of yogurt in the fridge until I’m ready to strain it. Which is wonderful for those moments that I didn’t time things very well and won’t be around to transfer my strained yogurt to jars when it’s ready. Give it a try and see what you think!
In the picture narrative it says mix in 1/2 cup of yogurt and in the printed instructions it says 1/4 cup. Just wondering which is correct. Thanks!
Use 1/4 cup. I did an update on the recipe in the intro. I didn’t realize I missed that one, thanks!
I am trying to find a recipe for almond yogurt made in the instant pot. Have you tried making almond yogurt? If so, I would love the recipe!!
I haven’t tried it, but my dairy free yogurt starter arrives today! So I’ll be in touch. I’m in the middle of a move so it’ll probably be next week.
I’ll be patient but look forward to seeing what you come up with!! Thank you!
AC, to update, my first try was an experiment, and a total fail! Round 2 happening this week!
Thanks for the update!! Hoping round 2 is a success!!
I just made my first oh-so-delicious batch (honestly the best yogurt I’ve ever put into my mouth!) but I lost about half of it to liquid that didn’t set up. It’s thick-ish but not like yogurt. I followed the instructions – the 115 degree, then back in the InstaPot for the 8 hours. The liquid yogurt won’t go to waste as I’ll make smoothies for the grandkids, but not sure what happened. Also, the yogurt that did set up is very soft – very delicious but very soft. Did I do something wrong? For one thing, I did fail to purchase powdered milk. Could that be the cause for half being liquid?
Linda, I’ve made some updates to the recipe since I posted it almost a year ago that we will be including in our book that’s coming out soon, and then after we finish climbing that mountain, I’ll do an update on the blog. But to summarize, sometimes my Instant Pot doesn’t get the milk to 180 degrees, which 90% of the time, it doesn’t matter one bit, and then 10% of the time, my yogurt is runnier and I always wonder if that might be part of it. So if I’m not being lazy, I’ll check my temp at the end of the boil cycle, and use the saute function to simmer it the rest of the way to 180-185 degrees. Also, I cool it to 110 now. I haven’t put the powdered milk in for months. And finally, I put my pot straight to the fridge after the incubation is complete and let it sit overnight before I strain it. That’s it in a nut shell! It really is the best tasting yogurt ever though, right!
Thank you, Marci. I will try those few changes for next time. And truly, it is the best yogurt. I was not a huge fan of yogurt but I am now!
Some folks say to let the final product cool in the fridge before straining it. Does it matter?
I’ve actually done it that way the last 3 times I’ve made it and I love it! I seem to get more yogurt out of it, but I also love that I can just throw it in the fridge until I’m ready to deal with it. I’ve updated my yogurt making process in the book Cami and I are writing and that’s one of the things I’ve changed.
Hello! I made your yogurt recipe today and loved how easy it was. I noticed though that my yogurt has a slight taste of what I made for dinner in the instant pot last night, have you ever had that problem? The metal pot doesn’t smell like it but the lid sure does. Any suggestions?
I have 2 pressure cookers and I designate one of them to all the potent smelling foods. But a cheaper route is to buy an extra silicone seal. That will keep you from having Italian roast flavored yogurt!
Hi, Just pointing out a discrepancy in the article versus the ingredient list. In the article it states 1-2 teaspoons of vanilla, up to 1 Tablespoon, but in the ingredients list it says 1-2 Tablespoons of vanilla. I went with the smaller amount and it is cooking now, hopefully it is correct!
I just made this yogurt and it turned out perfectly…I have a question not about yogurt…can I cook frozen chicken in the insta pot…or do I have to thaw it first? Thanks for all your help…I love this new way of cooking!
Yes you can cook frozen chicken. I haven’t tried it yet, but the instructions I see most often are to do 8-10 minutes at high pressure with a natural release. I usually buy my chicken fresh because I don’t have much freezer space.
You can definitely cook frozen chicken in the IP. I made a Honey BBQ Chicken Wings recently and just dumped in the frozen chicken wings !!! No excuses for not cooking when you forget to unfreeze your meet ! AMAZING !
I have tried to read through all the comments to check if this question has been asked before, and it’s probably a stupid question, but….. if one uses some store bought yogurt as a started, can a probiotic be added too? Or is the probiotic a ‘starter’ in itself?
Sorry if this has been asked… and answered before.
Thanks so much for the comprehensive recipe!
I’ve only ever used a good quality yogurt (Fage) as my starter. So I’m actually not sure if you can just add a probiotic. If I ever try it, I’ll update on it.
I nitice in your pictures that the “normal” indicator is lit after you press YOGT and the eight hours starts counting down. On mine the “less” indicator is lit. Did I do something wrong?
I’ve been making yogurt using my dehydrator for years, but we’re looking to downsize from a house to an RV and I’ve been testing other methods…I have a Cuisinart pressure cooker (greatest invention ever!) I’m going to test the warm setting with jars of water, like a water bath, I think it will be easier than the sauce pan I’ve tried with hot water then put into the microwave to conserve heat. In the early years I strained my yogurt, but recently, I’ve been adding agar agar which is a plant based gelatin. I add 1 teaspoon to 3 pints of milk when bringing to up to 180 degrees along with 1/4 C dry milk…I get very creamy yogurt without the straining.
Thanks for the idea of using the instant pot for yogurt. I routinely make a crockpot/oven light yogurt, but this sounds easier. Can you culture the yogurt in the pot for 24 hours. The longer it is cultured, the less carbohydrates it has.
It does actually have an 8 hour and 24 hour preset option. I’ve only ever done it for 8 hours though. Let me know if you try it!
Ugh, man! I was so excited to make this in my brand new InstantPot (IP-LUX). I pour the milk in and go to push the yogurt button and there is not one?!? Unless I’m missing something, I am not able to make yogurt in this model? Just double-checking before I go to the trouble to send it back and get theDUO model?
This is the one I have http://www.amazon.com/Instant-Pot-IP-DUO60-Multi-Functional-Pressure/dp/B00FLYWNYQ
And in my opinion, EXCHANGE IT! The yogurt this thing makes is worth every extra penny!
Hi, I was wondering if it’s possible to use a flavored yogurt with live cultures as a starter? I want the cultures in the Activia brand of yogurt but plain is not available where I live. I was hoping to use vanilla flavored Activia as a starter. Any thoughts? Thank you!
Yes, flavored yogurt is fine
Do you add the sugar at the boil, the “cooking” ot at the end…..I made my first batch today and while very good it’s just a bit to tart and I wanted to add some sweetness to it
I have made yogurt following your wonderful step by step method now about 4 times. I do add about 1 1/4 cup of white sugar as I am used to sweetened store bought yogurt still, and like it lightly sweetened. Maybe someday I can wean myself off sweetened yogurt completely. I will say that I found using the nut milk bag messy and a pain. I found another gadget for straining the yogurt off of Amazon, basically it is a bowl with a strainer on top. I bought two since it only strains 2 quarts and I make double of that (using a gallon of milk). I actually let it strain in my refrigerator overnight and the yogurt was amazing! So thick! Thank you for the teaching me how to make yogurt in my instant pot!
I am intrigued by your straining method and was wondering if you would mind posting a link to the strainer bowl from Amazon that you are using – or you can email the link to me.
Thanks,
LeAnn
mslurk@hotmail.com
I’m very interested in making this yogurt recipe in my instant pot! I would like to add some sugar so that it is not too tart. At what point do u add the sugar? Do you add it after the scalding or from the very beginning?
I add the sugar after the scalding. I add the sugar about the same time as I add the vanilla and yogurt.
If you’re using sugar, I would do what Vicki suggested and add after scalding. If I’m using a liquid sweetener like honey or agave, I usually add it after my yogurt is done and I’ve strained it. Be sure and strain your yogurt until it’s quite thick if you do it this way so that the sweetener doesn’t thin out your yogurt too much. I personally prefer to add sweetener as I serve the yogurt so that I have unsweetened yogurt in the fridge to use for savory and sweet applications.
Hi Vicki
Can you please give me the link to the bowl you mention from this post?
April 22, 2016 at 10:17 am
I’m interested in trying it va the but bags.
Thank you
Euro Cuisine GY50 Greek Yogurt Maker
https://www.amazon.com/gp/aw/d/B0091XNL0I/ref=sxts1?ie=UTF8&qid=1470716350&sr=1&pi=AC_SX236_SY340_FMwebp_QL65
I had the same problem as one other here which is that the boil function appears to be on a timer and got the milk initially up to only 68C (155F) so I repeated this step 5 or 6 times to get the the temp up to the point of sterilisation. More importantly from my experience making yoghurt in other ways, if you don’t heat it fully it doesn’t denature the milk protein and you lose a lot of your batch to whey as the milk curdles. You state this clearly in your post but it’s worth checking that your pot is doing what it’s supposed to. I am more or less at sea level in the UK. YMMV
I’ve wondered if there could be other factors such as elevation that may effect the process, but I would suggest contacting Instant Pot about it and see if they’ll replace it. Some have said it was a defective pot so that’s a possibility. I’ve personally supervised the making of yogurt in 3 of the instant pots and they all got the milk to at least 175. If you bought it from Amazon, they’re usually amazing about replacing defective items.
Do you have a similar recipe for yogurt using coconut milk? Your recipe is so way more comprehensive than some I’ve seen.
Thanks so much for this! I already had an electric pressure cooker, but I just bought this Instant Pot so I could make yogurt. I’ve made this recipe three times, and it’s turned out great every time.
Have you ever made it, but split up the cooking? Doing the first two hours, putting in the fridge with the yogurt starter and then putting in the pressure cooker for the 8 hours (yogurt setting). I am so busy that doing all of it at once is hard.
Can you strain using cheesecloth or even a coffee filter? I don’t want to buy the bags if I don’t like how the yogurt turns out.
I didn’t realize how messy emptying the nut milk bags would be. Any tips on a cleaner straining?
I’m so glad to see you post about using whole milk! We buy full fat (with the heavy cream on top) raw milk so I’m excited to try this! I’ve never made yogurt so I wasn’t sure when she mentioned 2% yielding creamier texture. I’m wondering if using chia or fresh ground flax seed would work in place of powdered milk (did you use powdered milk?) for added health benefit…thoughts?
Oh yes, I love the idea of a glass jar over plastic! I haven’t been to any of those stores lately; I guess I get to treat myself to a trip to town soon! Thank you for the recommendations. I’ll keep an eye out for your update.
Hi! I’m wondering if you ever tried using chia or flax as a thickener, and if it worked?
I just purchased the Polder digital thermometer your recommended from Amazon and the clip has been changed; it will not attach to the side of the pot. Bummer!
I just want to thank you for generously sharing this recipe. I always thought it daunting to make yogurt at home, and I’ve made this 3 times now with perfect results each time.
Would you be so kind to share your buttermilk bran muffin recipe. There are so many recipes but I’d like to use a recipe using the whey as you’ve used. Thank you so much!
I’ve tried this twice now and can’t seem to get it right. I’ve tried 2% and whole milk. I’ve tried cultures and plain yogurt. When I strain it I get more yogurt through the mesh than I do the yellow/clear whey. Tonight I got two quarts of the yogurt/whey mixture. It looks more like runny yogurt than whey.
I figured it out! I was using a whey dry milk instead of plain old dry milk! I used just plain dry milk today and the yogurt turned out beautifully!
Yogurt FAIL….
I have made yogurt in my IP 6 times and it turned out perfect every time using this recipe.
My friend Lori bought the same IP and had only made a roast in it that came out perfect. Today she tried yogurt with the same recipe and FAILURE. She tried 2 times to scald/boil (by pressing Yogurt then Adj) and even though the setting said the right thing, when it beeped and she took it out to cool, it had only heated to about 95 degrees. After the second try, she scalded it on the stove top and waited till it cooled to 115. She then added her starter and returned to the IP, set it on Yogurt and it went for the 8 hours. Then she opened it, it hadn’t processed at all! It was still milk with yogurt mixed in. I went over and we walked through the process and it seems like she did everything right. And ideas what might have happened?
That is so so strange! It’s hard to give you any advice without knowing what went on, but it seems you did all the troublshooting you could. I did have this happen once. I basically got a whole gallon of buttermilk! It didn’t set up at all. I couldn’t figure out what I did or didn’t do and figured I must have had a mommy moment. Hope she is able to make it with success now! So weird!
Maybe it is an altitude issue?
I’ve been making yogurt in my crock pot, this is going to be so much easier! Wanted to mention, I use my whey for bread making and it gives the bread a wonderful sourdough flavor.
Thanks for sharing your recipe.
Hi, thank you so much for your post and recipe. Is it ok to use skim milk? Have you added sugar to your yogurt? If so, how muh and at what point in the process? Looking forward to trying this with my new instant pot!
Do you think probiotic capsules would work instead of yogurt for the starter?
Do you know if this yogurt recipe works well using coconut milk as my grandson is dairy & soy intolerant and I would like to make some yogurt in my instant pot for him?
Not sure if I ruined it already or not. I added all the ingredients then boiled it. Then I created a cold water bath to cool it down to 115 but it went quickly down to 90. I added a second 1/2 cup of Greek yogurt and put it in the pot and pressed yogurt for it to incubate for 8 hours. Does it incubate at 115 or will it be a cold 90 degrees and not work?
Hmmm. Not really sure, actually. I haven’t ever had that happen. I would love to hear if it ended up working out!
It did work! Tastes great. Love it
Is there a problem with adding the powdered milk after the boil while the milk is hot and right before the active cultures?
I really don’t think that will be a problem at all as long as it gets dissolved in there. Let me know if you try it and see any varied results!
Do you use instant powdered milk or the not instant?
I have successfully made this several times. Tonight, however, after 8 hours it is runny as in nearly the same consistency as milk. it cooled down to 111 and then I added the yogurt and vanilla then set my IP on yogurt… wonder if the yogurt wasn’t the best choice? it was a grass fed, organic milk plain yogurt…Any idea what I may have done? thanks so much. I love this recipe as it is very easy to follow and the results are fabulous.
Would it be possible to use gelatin instead of powdered milk?
Thank you for a fantastic yogurt recipe. I have made this recipe 3 times in my instapot in the past few weeks and I am now in love with homemade yogurt and don’t want to eat store brands. I have also made your banana ricotta muffins recipe and they were gobbled up immediately by my family. AND then I read your post about favorite Netflix shows and I watched the entire first series of The Paradise in 2 days. Thank you for your great recipes and TV recommendations. Next I am sure I’ll have to start decorating my home with your home decor recommendations!
So thrilled you could find much to enjoy on my site! That makes me happier than you know, and I so appreciate you taking the time to tell me. Isn’t “The Paradise” amazing!!?
I made your yogurt recipe yesterday, let is ‘cook’ overnight and strained it this morning. It’s now sitting in the fridge. I can’t wait to give it a try after work. Thanks for your easy to follow instructions and the photos were a big help too.
That’s definitely going to happen more with the 1%. My experience with 1% and skim milk is that I ended up with a ton of whey and only 1 1/2-2 quarts of thin yogurt. Using the milk powder and 2% milk gets me 3 quarts which is why I’ve stuck with the higher fat milk.
Thank you Marci!
I made your recipe last night to the letter except I used 1% milk. My question is there was some yogurt coming through the nut milk bags as they were straining the whey….is that normal? It just seemed like a lot!
Thanks so much Cami for your brilliant recipe. I bought an Instant Pot and saw people posting your yogurt recipe, and I was nervous to try. Well, one day my 20 year old son and I each came home with 2 gallons of milk a few minutes apart. Time to make yogurt! I was worried that a gallon would just be too much and we would NEVER get through it. Boy was I wrong! I have made 7 batches (gallons) in the last 13 days!! I have followed your recipe to the letter, and it has been perfect every time. I use 2%, but have also combined half and half with 1%. I generally don’t use vanilla just because it is more versatile. I love peaches and honey in it, but my favorite way to eat it is with lemon curd (from pressurecookingtoday.com) I have seen a lot of yogurt fails, and I just send them to your site. Thanks again!
Thanks for your great instructions on using the Instant Pot for Yogurt. I ordered my pot a couple weeks ago; I finally made the purchase because it can make yogurt. I have used different methods in the past but this seems so simple. And thanks for giving me the confidence to use it for also Boiling the milk in the pot. A suggestion for everyone who like Fat Free Greek yogurt– I love to use Braum’s Fat Free milk. It is already concentrated so it is not necessary to add powdered yogurt and makes wonderful thick greek yogurt that you do not need to strain. Though I do like the idea of having the whey to use so will probably make some for local store milk that is not concentrated.
Correction: With Braum’s Fat Free milk it is not necessary to add powdered milk. (Should have proof read my post.)
Where do you find braums milk? I’ve never heard of that
Brahms is an ice cream, burger, and grocery joint in Oklahoma, Texas, and some other surrounding states.
I use Braum’s whole milk but no powdered milk. Many times and dreamy creamy. Especially after 1/4c homemade vanilla sugar. That takes the tang down a bit so my sensitive 7 yo loves it.
Anyway, my mom hadn’t used her instant pot after I gave it to her a month ago so when visiting I used a gallon of Kroger whole milk. What a difference. It was not as creamy and did have some small lumps in it. So glad I have my Braum’s – especially at 2/$5 a gallon!
Thank you so much for the wonderful tutorial, the utter lack of adds and wonderful photographs. I never studied how yogurt was made so I was in the dark, however I am an avid homebrewer and I love all things fermenting. From beer to Kombucha and now yogurt.
Your steps are very clear and I had no problem with making my first batch less one little error. An error which I think could benefit a caveat.
After the boil I cooled the milk down to 115F…or so I thought. I don’t use a digital thermometer, I’ve had an analog that works great for brewing but it may be out of calibration, and as soon as I hit that magic 115 mark I “pitched” the starter, grabbed the inner pot and put it back in the outer pot. I closed the lid and the Instant Pot. this was last night. I woke this morning with time to transfer my newly made yogurt into a straining bag before heading to the gym. What I found was warm milk.
Long story short. I troubleshot what I did and believe that I put the starter in while the milk was still too hot. I haven’t found it yet but there is a temp that is going to kill all the bacteria rendering it useless.
I took a temp of the warm milk only a few minutes after I discovered the problem and it was sitting at 100F. I hadn’t contaminated the batch so I grabbed another 1/4 cup of starter yogurt, pitched it in the warm milk and reset the Instant Pot. Just as I suspected I was greeted with a nice batch of yogurt.
So, my advice is if you are afraid that the batch may not be working you should cool down the milk, after the boil, to between 100F & 110F
Of course I could be completely wrong as it was my first batch and it did go wrong so I only have that one data point to base my judgment on.
Thanks again for the instructions.
I don’t have my instapot…yet, but I’m tying to compile recipes and tips for when I order mine. I love the idea of making yogurt, but was wondering if you have to use a plain yogurt as your starter? I have some honey flavored greek yogurt I love the taste of, and was hoping to be able to use that instead? Do you know why exactly you have to use plain vs. flavored?
I’ve read that it’s just fine to use a flavored yogurt. I’ve never tried it however, so I can’t guarantee it for this particular process.
Hello, I am so excited to make this recipe! But I am a busy mom of 4, I was hoping to start the process in the evening And let it do it’s magic over night and wake up to strain and add vanilla beans. Would it be bad if it sat in the pot longer than 8 hours? Thanks for posting a beautiful recipe!
Yogurt gets more tart the longer it “cooks”, so that’s one thing. But If you’re saying you’re not going to have it “cooking” for some of that time, I’m not sure if that is a food safety problem or not. When I’ve been short on time, I have just placed the pot in the fridge and strained it later so that could be an option. The instant pot stops the yogurt making process and switches to warm at the end of 8 hours.
Hi – I just received my instant pot and tried to make yogurt last night. This morning I opened the pot and it was very, very thin. I have used a Dash greek yogurt maker for a year with great success but wanted the instant pot so I could make a gallon at a time. I have never needed powdered milk and would prefer not to use it. I used 2% milk and one Dannon plain yogurt for the starter, boiled, cooled, then set for 8 hours. Any tips? Thanks!
It sounds like you might get the consistency you want by straining it. I’m no expert, though–just attempting my first (half) batch myself!
The yogurt went right through the strainer. Almost the consistency of kefir. The strainer I use is meant for straining yogurt to make Greek yogurt. Hope your 1/2 batch turned out!
Thanks Jen! It was pretty good 🙂 Good enough that I’m making a full batch today, ha! I didn’t have a way to strain it the other day, but now I have cheesecloth and/or a grain bag that DH uses with his homebrew. I didn’t mix mine at the end when I finish last time (because I made plain, not vanilla) either, and there were some small “pieces” in it; I think it was “skin” from boiling the milk? So I am trying to stir mine earlier this time. And I don’t want to thicken mine TOO much, I don’t think, so I’m trying to decide how I’m going to strain it this time…
You can find the nut bag she mentions on Amazon for a great price, very handy to have in the kitchen for other uses too. I believe it was around $10. Hope that helps!
Jen. I am so sorry the yogurt didn’t work! This actually happened to me once, even after I had made several successful batches. And I’ll be honest, I never did figure out what happened. I used the batch for buttermilk instead, but that is a lot of buttermilk and I think I threw it out before I used it all. Without being there watching your process, it is hard for me to say what could have gone wrong. My only suggestion would be to try it again, being sure to follow my step exactly. Just want to verify, in your comment you mentioned adding the starter before you boiled – which if you did that I imagine that would mess it up. The starter goes in after the milk is cooled. I just think you should give it another go. Your ingredients sound right on, and hopefully you can get it to work the second time.
This is Marci, Cami’s sister that she mentioned in this post. I’ve made yogurt using this technique a bazillion times now so I thought I’d chime in and answer some of the questions that have been posted here. First of all, this thermometer http://www.thermoworks.com/products/alarm/chefalarm.html is the bomb and works great with yogurt because you can set a high and low temp alarm. No need to repeatedly check it, just put it in the milk and come back when it alarms.
I’ve never made yogurt with almond milk, but I’ve researched it and it seems like it takes a specific kind of starter to make it work. There’s more about that on the yogurt making thread on the instant pot website.
Also, this process only works with pressure cookers that have a yogurt setting. In fact I’ve seen a lot of comments on the instant pot yogurt making thread that say it works better with the cooker Cami featured here than the new smart pot made by instant pot. I’ve also tried this process in the Fagor Lux brand and it didn’t work near as well as the instant pot (scorched the bottom of the pan, took Forever to get to 180 degrees)
I’ve tried this with skim milk, 1%, and 2%. I’ve never tried whole milk (which would probably be delicious) But the less fat the milk has, the more grainy my yogurt gets and the less it makes. So I stick with dreamy creamy 2 %. Also, use a yogurt that you like for your starter. It really seems to affect the taste.
Finally, to make good use of your whey as a buttermilk substitute, fill your quart jar 2/3-3/4 full of whey and then top it off with yogurt. It’s thicker and works much better.
For the cost of 1 gallon of milk, I get nearly 3 quarts of yogurt and 1 quart of buttermilk and it tastes far superior to store bought. Now that’s a sweet deal!
So there’s my 2 cents, hope that helps!
Thanks for the additional info! 🙂
Marci,
Thank you & Cami for a great discussion on making yogurt using the Instant Pot! Your post tied up a lot of loose ends and inspired me to move forwards.
Decided to splurge and get the chefalarm. Worked like a charm! Particularly, love the low temp alarm. But…the cost of the Chef alarm plus bean bags & silicon whisk will take lots of yogurt batches to see a return on my investment. Always wanted a thermometer to use “remotely” for roasts and to calibrate our oven, so thanks for the referral!
So, early this AM, put my second batch of “thick” yogurt in the fridge. My first batch was successful, and delish! Can’t wait to drain & then taste this next batch this afternoon. Who knew?.
Thanks so much for posting your easy to follow directions. I made the yogurt as directed and it came out great! You made it sound so easy and it was!
Thanks so much for the post! I made this yesterday with skim milk and no evaporated milk and it was still thick and creamy after straining. So much easier than boiling on the stove top, transferring to a bowl then keeping warm with my heating pad all day! Now I can get my heating pad out of the kitchen.
Do you know if there is a way to make this yogurt with something besides milk, like almond milk ? I am lactose intolerant but would love to try to make my own yogurt.
Many have found success with other types of milk, especially soymilk. But if you want to use real milk, you can always use Lactaid milk, which removes the lactose.
You can definitely use regular milk to make yogurt. It will be naturally lactose-free. I’ve made yogurt a few times in my dehydrator but it’s tricky. My husband is EXTREMELY lactose-intolerant but he could eat it just fine. I can’t wait to try making yogurt in my new Instant Pot!
I’m on my 2nd batch of this recipe right now… it came out perfect! The nut milk bags are brilliant! The only thing I left out was the vanilla, because I wanted to be able to experiment with different flavors. I even made a ranch veggie dip with this & it’s the first time I’ve ever actually liked a dip made from yogurt. If it’s OK with you, I’d love to post a link on my blog. Thanks!
I hadn’t thought of adding powdered milk to thicken the yogurt, I strain using cheesecloth if I want it thickets, but I’ll have to give this a try.
I love the short, squat jars. Where did you find them?
Fran
The powdered milk seems to help. The short canning jars came from my in-laws basement, buried with a whole bunch of vintage jars. I’ve seen them many times at antique stores as well.
I love this recipe and the fact I can make homemade yogurt! Question about the thermometer – I have your exact model (based on the fact yours was so neat) – but mine keeps beeping because the temperature is higher when I start so it’s alerting me I’ve reached the temperature. How do you get it to “count down” to the temperature?
Hi, thanks for the great inspirational piece on home made yogurt with the instant pro, I love it. I am looking for a thermometer like yours with an alarm, but most of them don’t seem to have an alarm that you can set for a falling temperature. The one in your article on the Amazon link and the one in your picture are different and I wonder if you could tell me which one it is that you use that can do this.
I would really appreciate it as it would save me checking the milk every five minutes…
Karen
Hi Karen! If you place the inner pot in an ice water bath (I just use my kitchen sink…fill it with 5-6 inches of cold water, then add ice to the water) the cool down is very quick. I use a ThermoWorks RT600C-N instant read thermometer to check the temp every few minutes. I don’t think it takes more than 5 or 10 minutes to get down to the target temp of 115.
Great tip! Definitely going to try this on the next batch!
Hi, I have been making yogurt in my instant pot and absolutely love it. I am trying to find a thermometer like you mention in your post, however I notice the one in your pciture and the one in the Amazon link are different. As most don’t seem to be able to handle an alarm for a falling temperature I wonder if you could tell me which one you use that does this. I would be really grateful!
Thanks very much.
Karen
Glad the post is helpful for you. And I am so sorry. I thought all the thermometers counted down – but I guess not. Mine is a Polder brand. I can’t seem to find a model number on it, but hopefully a little research on that brand will help.
Kind of a shot in the dark, but have you tried (or heard of anyone trying with success) using a milk alternative like coconut milk, or almond milk?
My daughter and I love yogurt, but are dairy-free and store-bought dairy free yogurt is pricey.
Thanks so much!
Hi, I’m not the author but many of us have successfully made Soy Yogurt and LOVE IT!
Great! Thanks so much! I will definitely plan on trying it 🙂
BTW, making soy yogurt is SO MUCH EASIER and we honestly can’t taste the difference from when we used to eat dairy. Anyway, there’s no temperature watching, double cooking or all that stuff… just put in a liter or two liters, add a starter or some yogurt as a starter, push the button for YOGURT and that’s it!
By saying no temp watching do you mean just pour the chilled soy milk into the jar and mix in the starter culture? You don’t need to boil it and cool it first?
I have the older Instant Pot without the Yogurt button. Is it possible to make this recipe in it? Do you know the timings and settings? Thanks!
You wouldn’t be able to use your Pressure Cooker since the incubation temperature must be around 110-115F for the bacteria to thrive. Too hot and they die, too cold and they won’t reproduce. But don’t worry, I’ve been making yogurt manually for years. In fact, I don’t even bother sterilizing the milk or container. I simply boil my milk and wait until it cools to that temperature. Then I dump in some store bought yogurt and and wrap a heating pad around the container, setiing it to low. If it’s too hot, I simply put a towel in between the pad and the container. It’s it’s too cool, turn the pad higher. The secret is to find a way to maintain that temperature range. In about 8 hrs, you’ll have yogurt.
If you really want to use your pressure cooker, you can try using the Keep Warm mode with the cover off. Put a rack in their and a little water, making sure the water doesn’t touch the container holding your yogurt. The warm water should be able to warm the container. Play around but elevating the container higher and lower until the milk stays at that magic ranger of 110-115F.
Thanks so much for the recipe and I cannot wait to try it! Can you share information on where you procured those adorable small hinge lidded glass jars?
I found small hinged glass jars at Michaels craft store.
Oh yum! That recipe looks far easier than my old method for sure! I’ll have to put that pressure cooker on my wish list! One little note from the grammar nazi, as my children call me – in your full disclosure statement you used ‘except’ rather than ‘accept’. Reading quickly made it seem as though Amazon was a great retailer except they are not good about returns when in fact you were saying the opposite! I hope you don’t mind the correction but understand that I make several mistakes each and every day and really appreciate it when others help me correct them!
Oh my heavens Heather! I can’t thank you enough for pointing this out to me. Sometimes I hope for the day I can hire someone to proof read my posts first – I am usually writing them around midnight and I know there are mistakes! Thank you, thank you!! That is a pretty big one to fix.
It also appears the times in the actual printable recipe are started incorrectly. There is no accounting for the boil and cooling periods. Will be trying this today. Thanks for sharing!
You also misspelled manual. You spelled it manuel.
I am really interested in making yogurt in my Electric Pressure Cooker. Unfortunately, my electric pressure cooker doesn’t have a yogurt setting. I have rice/risotto or fish/vegetables-steam along with other settings. What other setting can be used?
Love your website!
You wouldn’t be able to use your Pressure Cooker since the incubation temperature must be around 110-115F for the bacteria to thrive. Too hot and they die, too cold and they won’t reproduce. But don’t worry, I’ve been making yogurt manually for years. In fact, I don’t even bother sterilizing the milk or container. I simply boil my milk and wait until it cools to that temperature. Then I dump in some store bought yogurt and and wrap a heating pad around the container, setiing it to low. If it’s too hot, I simply put a towel in between the pad and the container. It’s it’s too cool, turn the pad higher. The secret is to find a way to maintain that temperature range. In about 8 hrs, you’ll have yogurt.
Thanks for your yogurt input!
Do you have to put it in glass jars when you put it in the frigerator or can you let it cool down some and put it in plastic containers? I have an instant pot pressure cooker already and I’m trying your recipe right now with goat yogurt and coconut almond milk.
I saw the almond milk idea and was intrigued.
Could you share. Some here can’t have dairy.
Fran
Do you have to use glass jars to store yogurt?
Does your ebook have the same recipes as your Amazon book. It seems like I read some comments online that said there are more recipes in the Amazon book.
So, you don’t scorch the milk, you just boil? We use full fat raw milk (truly raw) so I’m interested in preserving the natural enzymes. Thanks!
I’ve been making Greek yogurt for a couple of years with raw whole milk. It’s very good.
I purchased my instant pot a year ago and it is my all-time favorite appliance. I use it for everything! Worth the investment for way more than making yogurt but if your family consumes yogurt this is going to pay for itself in no time and it is healthier too!. I use a strainer lined with a coffee filter for straining but these bags look great because they look like they can do the whole batch at once! Going to try one! Thanks!
I have a better quicker way. While waiting for your milk to cool, however you heat it, and I use the microwave these days, boil wide mouth quart jars. Warm up oven and turn off at 225, or use bread proofing cycle. Just not too hot. Ovens are well insulated . Pour your milk with starter well whisked in at correct temp 115-122F into very warm jars and pop into oven to sit. 2-3 hours will be plenty. No failures ever when I use hot jars instead of bowl. Screw used jar lids also boiled clean on med tight and the yogurt will keep very well. Luv me a cooker but sometimes it’s just overkill,
Do I need to submerge the jars in boiling water, or is filling them with water from the kettle sufficient? Thanks!
I think you could do that, but thermal shock could crack your jars, also boiling the jars keeps the whole setup clean and since it takes forever for the milk to cool, it doesn’t take extra time.
Heat your milk to 180-190F for 10-15min, low and slow, lift liner out and place in sink partially filled with ice water. Let milk cool to 120F. Add 1 tbsp plain ready to eat yogurt, with active live cultures, per each cup of heated/semi-cooled milk–I actually whisk some of my prepped milk into my necessary yogurt starter so it is smooth and then whisk that into the rest of my milk. Pour the innoculated milk into clean glass jars, airtight lids, and clean the liner after it is empty and return to its proper place. I fill 1/3 the way with hot tap water, check temp, heat until 125-130F, then add my filled sealed glass jars. Add additional hot water to ensure water comes up to shoulder of the jar. Turn OFF the heat, attach the lid and lock it, wrap a thick towel around it and in about 4-6 hours it will be set (classic wiggle/jiggle like gelatin, pulls away en masse from side of glass)–if not set give it more time. Let it rest on the counter, outside of the water for 2 hours (if you place immediately in refrig the internal temperature of refrig increases), then chill for at least 6 hours.
I make yogurt in my Instant Pot without the yogurt button. I bring it to temp on the stove, cool and add starter and honey then pour into jars. I put the jars in the pot with the trivet and 4 cups of waterand cover. Turn the keep warm feature on for 15 minutes and turn off. Leave it for 10 hours and then transfer the jars to the fridge. It’s in the book that came with my pot and on the Instant Pot app.