This post may contain affiliate links, which means I get a small percentage of the sale at no extra cost to you. I only recommend items I love and have had a positive experience with. Thank you!
Are you ready to make the easiest quilt ever? If so, read on to see how I made this lazy quilter’s easy quilt with no measuring or pattern required!
I can count on one hand the number of quilts I’ve made in my lifetime. Being an avid sewer since my teen years, you would think I could at least fill 2 hands. But the fact of the matter is, I lack the patience for tedious detailed work. I get bored quickly – so I try to keep my sewing projects a little more entertaining, or not so cut-and-sew-a-hundred-small-pieces-together type of projects.
However – I came to a crossroad. I really wanted more pretty quilts in my house. Just because I don’t like to make them doesn’t mean I don’t adore them. Hence, one of my new year’s resolutions came to be. I am going to gift each of my children their own homemade quilt for their birthday in 2015. The reality of this goal hit hard when I realized my baby turned 1 in JANUARY!
What is the Lazy Quilter’s Easy Quilt?
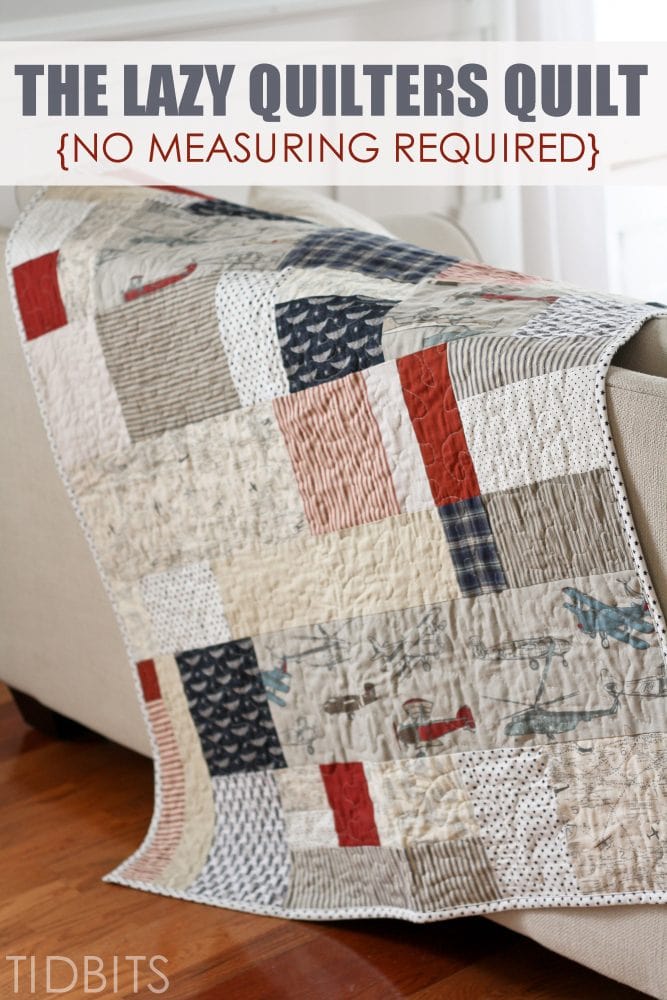
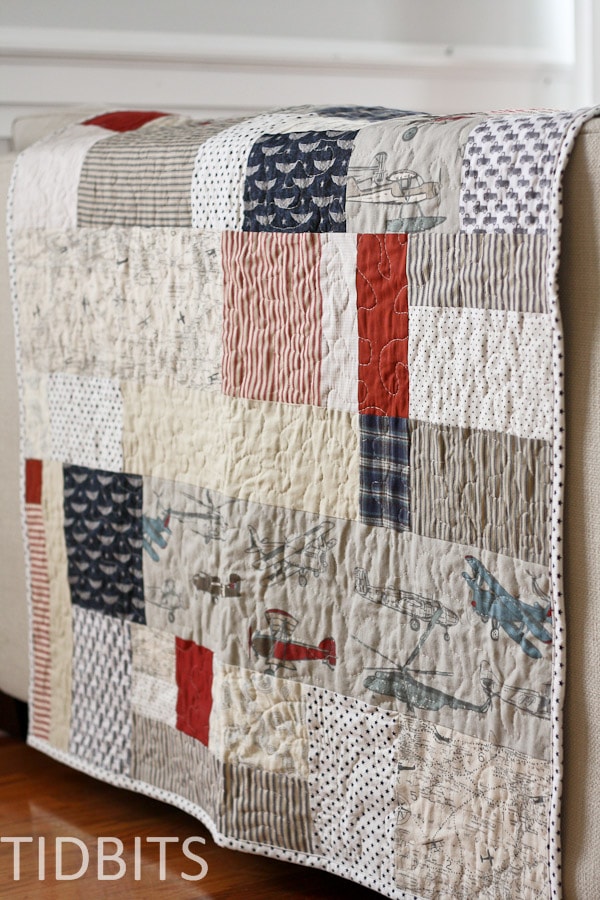
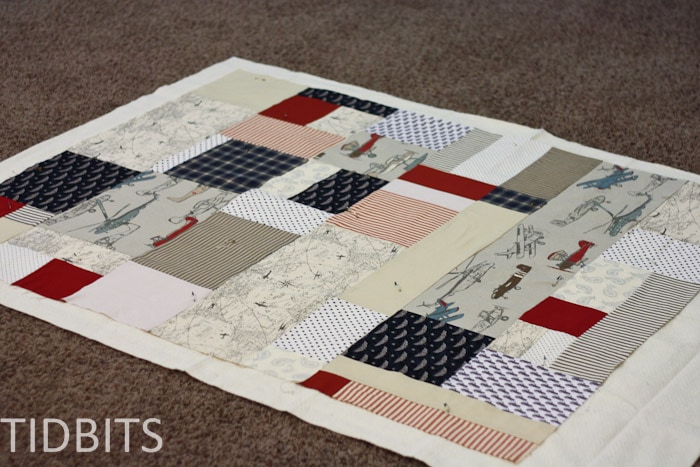
In one week, I spit out what I like to call, “The lazy quilters easy quilt” where no measuring is required, and the pieces can be as big or as small as you want. This was a fun and simple project that would be perfect for any beginning quilter!

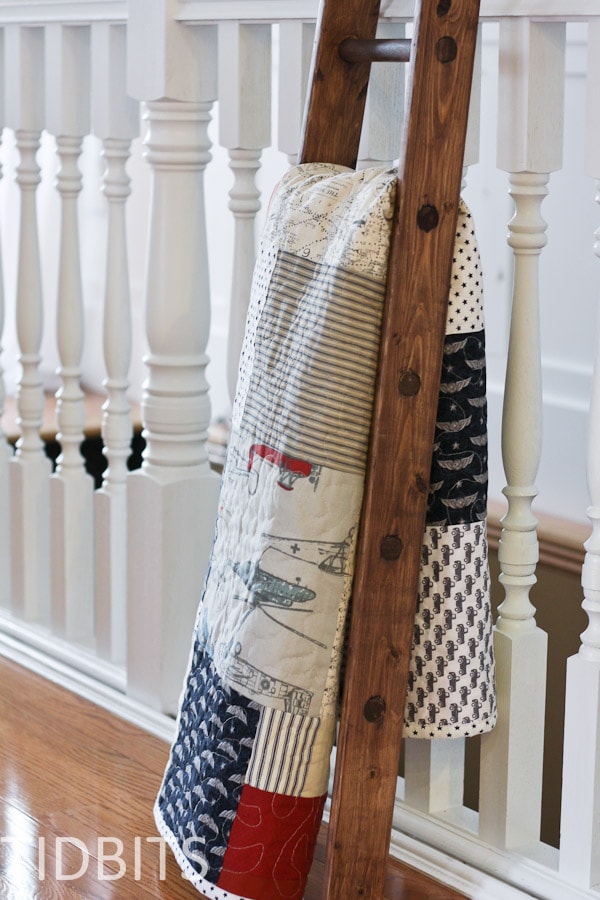
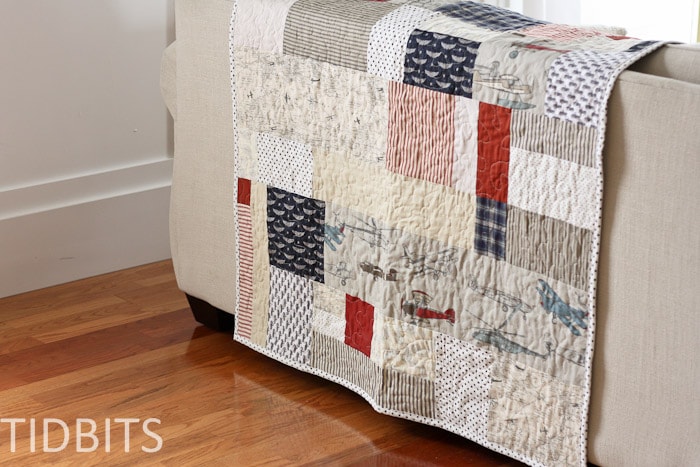
This Lazy Quilter’s Easy Quilt is much like a scrap quilt, where the individual fabric pieces are not uniform in size or shape and there is no real pattern at all. Hooray for simplicity!
This quilt came together so fast, I hardly had a chance to get bored.
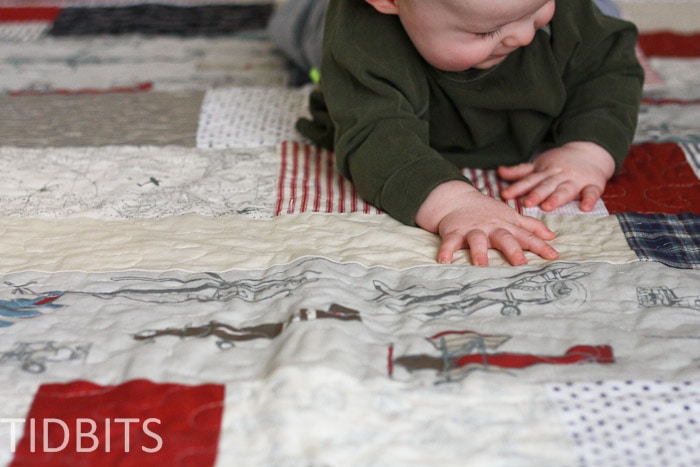
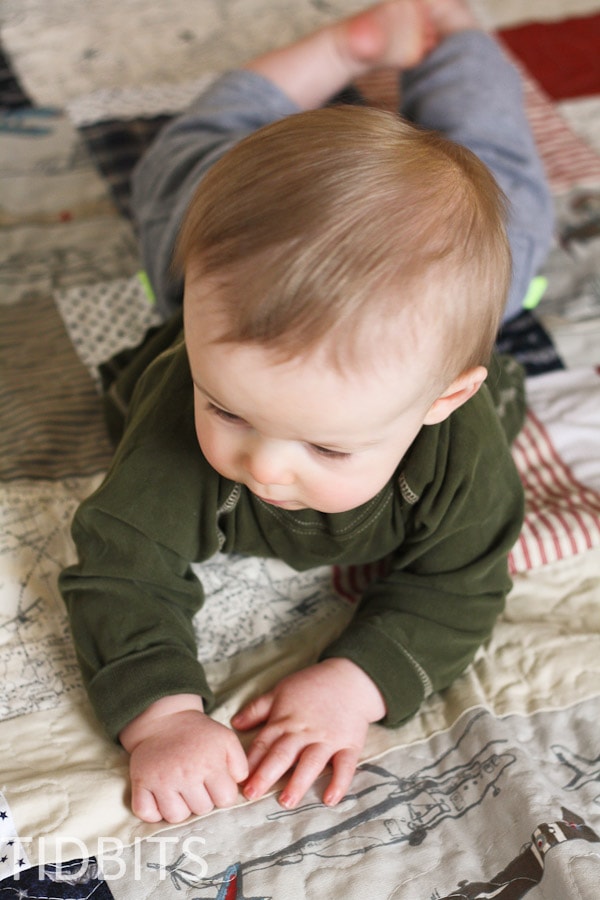
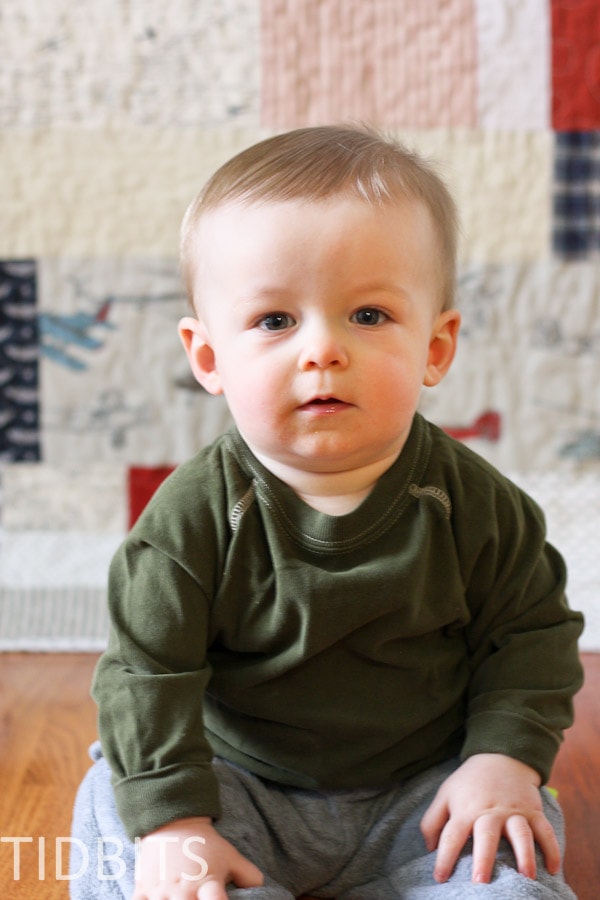
The birthday boy really loves it as well.
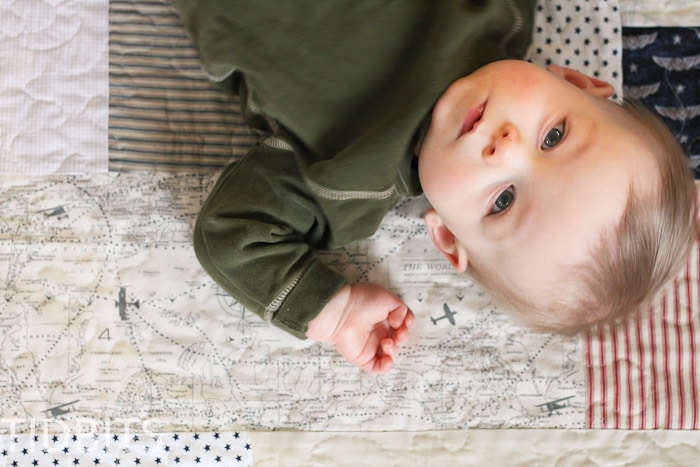
After having 3 girls before him, I thoroughly enjoyed picking out boy prints for his quilt.
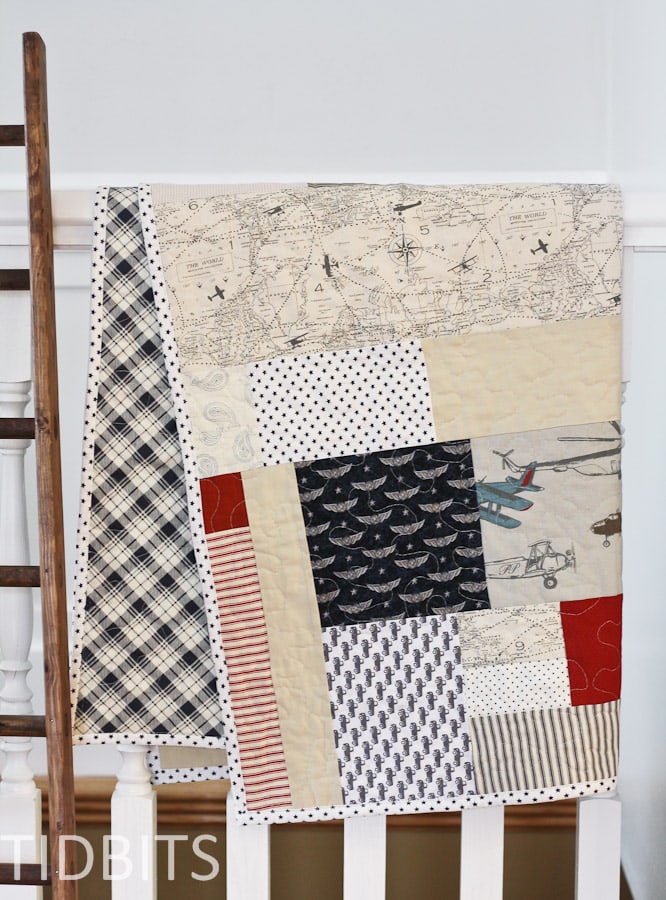
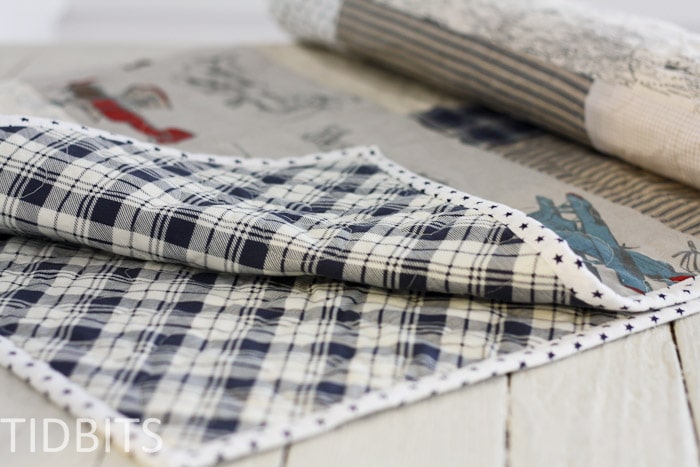
I went with sort of a vintage/neutral vibe when picking out my fabrics.
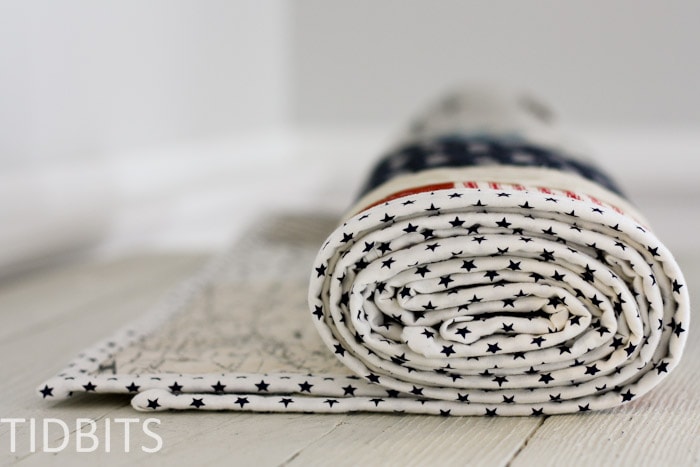
With a touch of patriotism thrown in there, for good measure.
It all began when I saw the vintage airplane fabric, and about died at its cuteness.
Everything I picked from there was to coordinate with that design.
Quilt Fabric Resources
Here are some of the fabric resources I used, if you too, are dying over the cuteness.
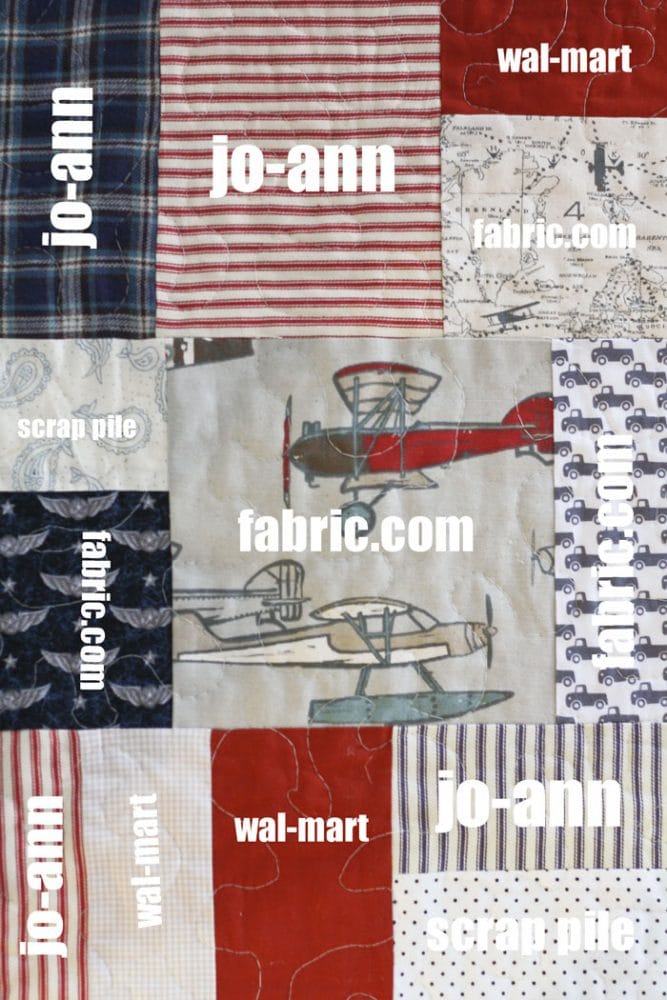
The fabrics from Jo-Ann’s were found simply by searching the store, as were the Wal-Mart selections.
Click on the titles to see the links for the fabrics I found on Fabric.com (no affiliation, just found exactly what I wanted).
(Plaid Backing was also found at Jo-Ann’s Fabric Store)
The style of the blanket goes great with his itty-bitty room (which I hope to show you shortly).

Now that I’ve learned how fun it is to sew for boys, I think I’m hooked.
In fact, sewing this quilt was so enjoyable, I can’t wait for the next birthday to come!
Now let me explain how easy it was to sew this very random pieced quilt, where I didn’t measure a thing! I made a crib size, but you could really adapt this style to any size at all, as long as you know how wide and long the backing needs to be.
Easy Quilt Materials and Supplies
Quilt Backing Fabric – For a crib size quilt, I read online that most people buy 1 1/2 yards. So that is what I did.
Batting – I simply headed to the batting section of the fabric store and bought some thin batting that was packaged as a “crib size”.
Quilt Top/Front – If you can plan out what you need, great. But I was being lazy and just collected adorable boy fabrics as I saw them. I do have oodles of fabric left over, but I’m sure I’ll find a good purpose for them. I grabbed any fat quarter bundle I loved for smaller pieces, or just had them cut 1/4 yard of any fabric I found on the bolt.
The downside to buying precut fabric online, is that on Fabric.com, it only came in 1/2 yard or 1-yard increments. I have the most left-over fabric from the selection I bought there. Which is why I recommend searching your fabric stores first to see if you can collect enough variety of the designs you like.
Binding – I used leftover fabric to make bias slices for the binding (more on that below).
Along with your quilt fabrics, you’ll also want to gather general sewing supplies. For this project, that included a sewing machine, scissors, a rotary cutter and mat, a ruler or straight edge (for cutting straight lines), thread and safety pins.
Fabric Preparation and Quilt Design
Once I felt like I had all the fabrics I wanted/needed, I washed and dried all the fabrics to reduce any wonky shrinkage after it was sewed together. This step is SOOO important! I also pressed the fabrics flat and trimmed any mess of threads after that was done.
Then, I laid out the backing fabric onto the floor. This was so I knew how many pieces I would need to cut to fill up the backing.
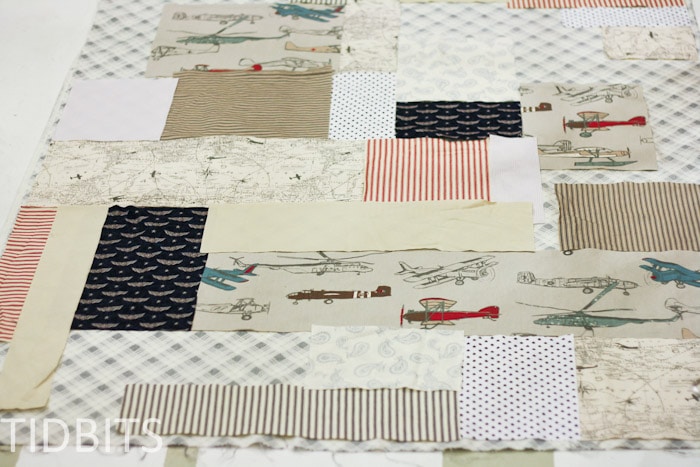
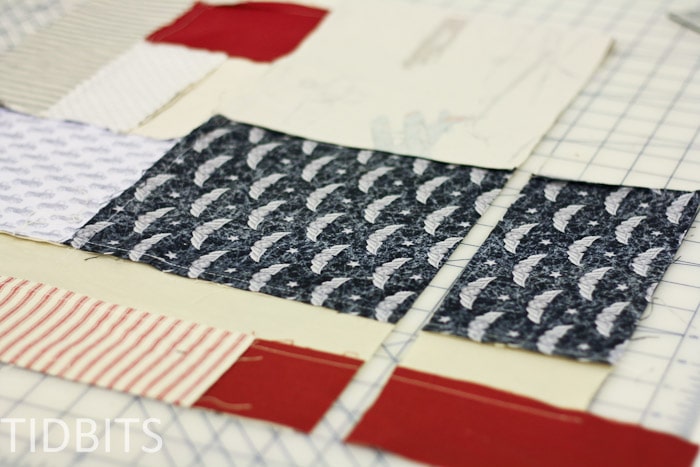
Next, I used my rotary cutter and mat to start cutting fabrics into various sized patches and laid these patch blocks out on top of the backing in a random fashion. I was sure to space the same fabrics away from each other. As I went, I learned it was okay to overlap fabrics at this step, as I was just trying to fill the whole section. I didn’t worry about measuring a thing.
Easy Quilt Sewing Instructions
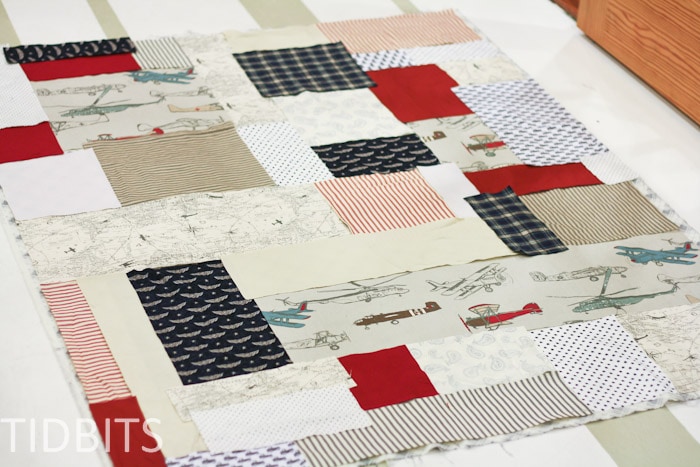
Once the whole backing was covered in fabric squares, rectangles, or strips – I began stitching pieces together with my sewing machine from the bottom up.
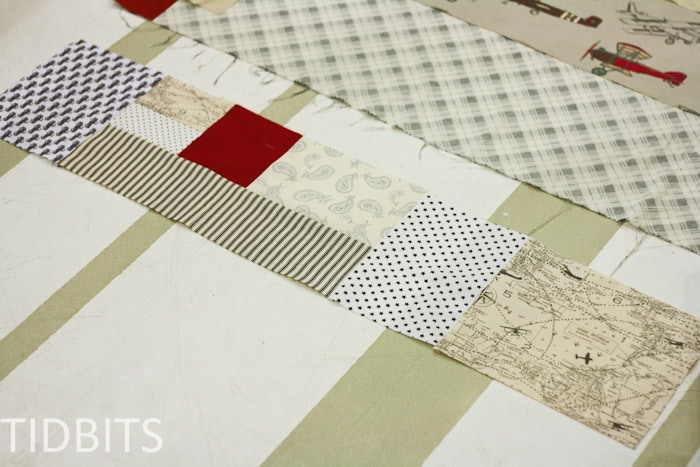
I would first look at the pieces and determine the easiest route to begin. Sometimes that meant stitching small similar sizes together, and then attaching them to larger pieces. Sometimes it worked to go from left to right. Other times, part of one side and then the other. My main goal was to form them into smaller strips and then sew the strips together to complete the top. Below, you can see one strip completed.
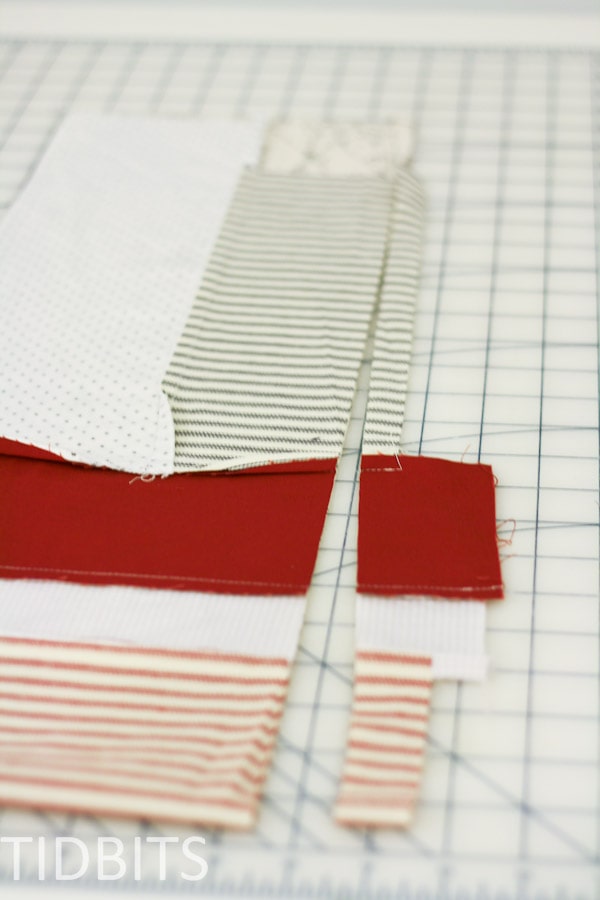
What you will run into, by laying fabrics stacked and disordered like this, is corners – like seen below.
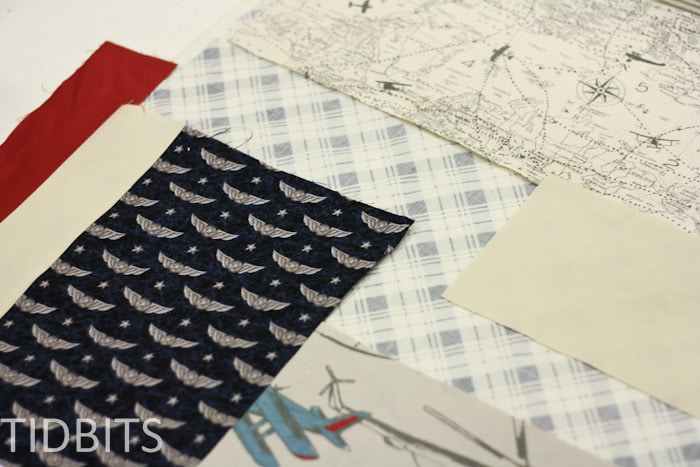
It’s possible to join that corner – but a huge pain for being a lazy persons’ quilt job.
So rather than dealing with the corners, I would slice the fabric stitched together and even up the edge where I wanted to attach the next fabric piece. This did waste some fabric, but not much. I would have to sometimes add strips of fabric to fill in a whole created by the slice, but this was easy to do as I just cut another random piece, stitched it on and sliced any extra I didn’t need.
I found this method much better than worrying about if my seams matched up perfectly and if I had the correct colors where they needed to be.
Luckily, I could even watch a movie while doing it, as it took little brain power.
It’s important to note, I ended up having to add another row of fabrics pieced together at the top to compensate for what I lost in seam allowances and by chopping off uneven edges. So be sure to plan ahead for that.
Quilt Assembly Instructions
Once the top was completed and matched the size of the backing, I made my quilt sandwich. If you are unfamiliar with that, you lay the backing right side down on the floor or table. Place the batting on top, and the front of the quilt wrong side down on top of the batting.
I safety pinned the thunder out of the 3 layers to make sure it was ready for quilting and trimmed the batting and edges, so it all lined up nicely.
Quilt Making Resources
Here is where I tell you I am no expert quilter – if you haven’t figured that out yet. But I found some wonderful resources to guide me through this quilt. Hopefully they will also be helpful to you during your next quilt project.
I did a stipple stitch at this point, to quilt it together. This was my first attempt at this quilting pattern, and I practiced for hours before I tackled the quilt. I found some great detailed instructions at Little Birdie Secrets and A Few Scraps that were very helpful in learning how to do this.
My stippling looks more like abstract trees, but I was pretty dang proud of myself for the accomplishment. I almost paid to get the quilting done, but I am so glad I didn’t!
After it was quilted, I used this wonderful tutorial for step-by-step instructions from Make it and Love it to finish off the binding. It doesn’t get much better than that! I just made sure my bias strips were long enough to fit around the entire quilt, like she directs in the tutorial.
And that’s it! This was a quick and easy project that I think would be perfect for a first quilt. I would love to hear if you plan to try this easy beginner quilt, or if you have tried something similar in your quilting adventures!
I’m now on the lookout for a design for my next daughter’s birthday. Please let me know if you have any favorite easy quilt patterns. I’m thinking a strip quilt will be close to as easy as this one!
More Sewing Projects to Try
I have many other sewing projects for you to try! You might enjoy one of these:


Love this quilt and the random way of piecing which tends to be my style of doing things. Can’t wait to make one! And your little boy is beyond adorable! What a face!
Years ago a friend and I did a consignment quilt with this process. The consignor had photos of her daughter printed on fabric… Different sizes of photos, odd pieces of fabric to fill in. It was challenging, but fun. Ended up with one piece that was quite a misfit because it stretched and kept on stretching! We hand quilted the quilt which helped to work in some of the wonkiness! Mother and daughter were pleased!
I’m so excited
Love it!
I’ve made 5 quilts in my life–all the same design, and I’m ready to embark on your free for all project! My granddaughter is pregnant and she picked your quilt on Pinterest as her favorite quilt. Thanks for all the good hints. We bought her fabrics yesterday, so I’ll be washing all of them and will begin processing the whole deal. I’m excited about it and honestly feel a bit concerned about the lack of design, but I know this will be good for my too organized brain! I’ll try to let you know how it turns out. I’m 84, and as a young mother of three sewed constantly for them and for me, but haven’t done much lately except the mending. Fingers crossed!!
I’m totally loving how your scrappy quilt turned out! It looks like such a doable DIY project. Also, I wanted to drop a quick message to let you know that I featured your tutorial on Crafts on Display, a growing community of crafting enthusiasts. You can check it out here – https://craftsondisplay.com/quilting/the-lazy-quilters-quilt-no-measuring-required-32483/
I love your quilt pattern! I hate it when quilts are too repetitive. I love the random feel! And I love your fabric choice for this. I have some airplane fabrics I definitely may try this with!
Thank you! Glad you like it!
I adore this quilt!!!! I’m searching for a quilt pattern for 8 yr old grandson who LOVES baseball. I believe this lazy design will be perfect…imperfect ????
Thanks
This is awesome! Thanks for sharing! Im a new to sewing…wanted to kearn to quilt, about to start on my 3rd quilt. So far I’ve peiced and paid someone to do the quilting. I learn by finding out what not to do, lol. The little seam ripper and I are close.
I have major problems sewing things exact, matching fancy small corners, if you know what I mean. The first quilt I did was a kit cut in strips. I was successful at making it my imperfections made it more personalized for my daughter
The second quilt was for my grandson’s 2nd bday. I found farm and zoo animal fabric that I felt he’d like. I had help with a design then changed it all up. It was truly my design and he loved it. I even made simple little animals cut out from the fabric for him to play a matching game by laying them on his quilt.
Now Im making His sister a quilt for her 5th bday. I wanted to use fabric she’d like but that she could use later down the line too. I chose butterflies since unicorns and mermaids might not be as popular at college, hahaha. Since I’m a beginner my plan is to us the butterflies as a panel in the middle. I have 3 different colors to go around it. Wonderful ladies at a quilt shop helped me choose the colors and helped design it suggesting surrounding the panel first with one color then the next and next. Now I’m Concerned that I’ll have trouble squaring things. That’s why the first 2 strip quilts made me happy. Last night I started freaking out, just a little, scare to start it for fear one of the colors that go around the panel will be off making all the colors off/;the outlines uneven. Yikes!!! Help! I think I might can try this style you made but Im afraid the small mix of colors instead of outlines will take away from the butterflies. You know the eye drawn to the colored fabric instead the butterflies panel. I guess tell you the butterflies are realistic looking, more of a water color look, not loud primary colors. Now my solid fabrics are a bit darker blending with the darkest colors in the butterflies. Ugh…I wish you were here to give me advice.
Any suggestions you can give would be extremely appreciated!
Thanks!
Katrina
Hi, I love the way you make your quilts. I am about to start on one. (LOL) I do not have a working sewing machine, (I break all of them) so i am going to sew mine by hand, I am sure it will take me months. If you have anything you can help me with by hand sewing, please let me know what it is. I also am going to have to use just random stuff, like shirts, sheets, etc. I do not have any material, I am hoping all this that I do have will work. Please reply with any help you can give me. Thank you so much, Neda Wiley
sorry, it is me again, how will i know if someone or you reply to my message? will it be emailed to me?
It’s awesome for me to have a web site, which is valuable in favor of my experience. thanks admin
I realize this is an older article, but am hoping this gets to you. I had this “brilliant” idea to make a quilt from some of my (recently) deceased husband’s shirts. Most of them are t shirts but not all. Now I’m thinking I got in over my head because I’ve only made one quilt in my life and that was a crib size for my now almost 5yr old granddaughter. It turned out pretty good actually. Anyway, I like your idea and am glad I ran across it. I’m going to try your method, because that’s where I’m stuck is piecing all the not-same size pieces (I suck at cutting even pieces). Wish me luck… it’s been an emotional roller coaster so far
Trying to view on my Android phone – your blog looks interesting, but I am so annoyed by the social media sharing buttons on the left of the page!!! They’re covering content – and between the button bar and the constant pop-ups to join your newsletter – I’m too bugged to bother looking at your content!????
Absolutely love this quilt – the scrappy, random pattern is perfect. Many people have asked about the vintage airplane duck fabric. Has anyone used duck fabric in a quilt.? Would love to hear how it turned out. I’m an Americanna lover, but that vintage airplane fabric is the inspiration piece I need. Thank you!
I love this quilt. I too ordered the airplane fabric, it’s my next project during this strange covid time. It will be quilt project #4 for me! One of them was a Lori Holt very intricate one. Took me 6 years!
In response to those worried abt not being able to dry the airplane fabric: here are my thoughts. If I take the time to make a quilt, I put a lot of time & effort & money into it, I absolutely DO NOT put any of my quilts in the dryer!!!! The dryer is very very hard on things, treat your quilts right by hanging them to dry! I’m lucky I have a railing that’s perfect for drying large quilts on. it will definitely prolong the life of the quilt.
Continue on, quilters!
Can I just say I never pre-wash the fabrics. After the quilting and binding, I toss the quilt in the washer on a hot cycle – with (and this is vital) a “color catcher” sheet in it to catch stray dye and prevent bleeding. The result is an awesomely “nubbly” quilt with puckers and texture. It also makes any mistakes in piecing or quilting magically melt away. Thought I would toss this out for first timers or busy new moms, since the mistakes seem to disappear and the quilt comes out bleed proof and textural. I also got frustrated with the pre-washing process because of all the tangled thread nests and wrinkle nightmare after removing them from the washer and having to iron them all out.
Thank you for this tip!! What is a color catcher sheet?? I don’t think the fabric I have will bleed but want to make sure.
I have been looking for a way to use up the ton of free fabric that I got from Freecycle. This is the perfect project! Looking forward to putting together some quick quilts for the homeless shelter in our community!
Hi Cami…I came across your lazy day quilt pattern and I also ordered the Airplane fabric. I saw all the questions about washing and drying that fabric but I couldn’t find any answer from you…were you able to wash and dry the quilt without any problems with that particular fabric? Thank you in advance for your response.
Saw this quilt on Pinterest and fell in love with it! Making one for my grandson who arrives in April and will have an airplane nursery. Found many fabrics to use. Interested how the heavier duck fabric washed up. I want to use for the backing. Thanks for the great idea!!
I just love this quilt. The pictures are great! I don’t mind following a pattern and cutting for precise style blocks, but this may be my new favorite way of quilting! You can pick it up and put it down and come back whenever….works for me! Love your sense of color and style!! Great job!
I love this quilt! The fabrics are darling but what I love the most is its randomness. I can’t wait to try it out. I have found it more of a challenge to make baby quilts for boys as I am more attracted to girly prints. I think I can easily use this quilt non-pattern for up-cycling men’s plaid shirts. There are so many different sized pieces once I cut up a shirt. Thanks for sharing! Great blog!
Your darling quilt showed up on Pinterest and caught my eye. I just had to make one. I am in the throes of cutting and arranging and am finding it a terrific way to use up all those leftover bits and pieces. Between mine and those that I have inherited, I haven’t had to purchase a thing. This is definitely a “pattern” I will use again.
Amazing quilt! Love the fabrics. Wanted to let you know that unless you’re binding around curves, such as scallops, there’s no need to make your binding out of strips cut on the bias.
I love love love this Quilt! I’m redecorating my 21 year old son’s room and your quilt is perfect! My son will feel right at home when he returns home from college. Your quilt is warm, masculine -but not over the top – patriotic, and altogether pleasing to look at.
Made this quilt for my pilot husband. Found quite a bit of flight fabric. He loved It! Thanks for the inspiration and shortcut tips!
Thanks for the inspiration. When I found I was going to become a first time grandma, I knew I wanted to make a quilt for the baby. I’d done some quilting before, but projects always took so long to complete. (my last quilt project was a double bed sized bear’s paw design and it took me 2 years. I love hand quilting, but speedy, I am not!) This one took one evening to get the pieces laid out, one morning to piece the whole thing together – a miracle! I’m hand quilting it, but using a sashiko method and it’s going so quickly I am pleased and amazed. Your casual, no panic method and great visuals were a godsend. Thanks again!
I love your beautiful quilt and have purchased the vintage airplane fabric to use in my design. How has the fabric held up with washing and drying? Did it get softer with multiple washings and did the colors stay nice?
beautiful quilt
I love when people are able to create quilts out of scraps of fabric. Most of them turn out pretty cute. I remember when my grandma used to make them for my siblings and I when we were little. I’ll have to see if I can buy a quilt somewhere for my little kids.
Love the baby quilt and the fabric you used. I checked out the links for the fabrics and noticed some of it was cotton duck fabric. Was this a problem since it is heavier than quilting cotton? How did you blend both fabrics ? I love the fabric you used from fabric.com but am a little hesitant to purchase it because it is not a quilting fabric. Any advice would be much appreciated. Thank you!
LindaT
Hi Cami. Just found this cute quilt on Pinterest when I was looking for inspiration for my 5 year old grandson whose father is a pilot. And THIS is it! Beautiful job!
I read all the comments and noticed there was a few who were worried about the airplane fabric. I’m assuming you have washed and dried it more than once by now ? So, how’s it holding up?
Can’t wait to get started on it… his birthday is March 25th ?
I’m bookmarking you ??
Love your quilt and your Son is such a cutie.
This quilt is really darling! Another way to get a scrappy look like yours, which I would find even easier, is to do a “Disappearing Nine-Patch,” in which you just cut squares all the same size (5″ is good) and sew them together in strips of 3. Sew the 3 strips together to make 9, then after it’s all neatly pressed, cut the 9-patch block into quarters, horizontally and vertically. take the 4 blocks and rotate them to find a design that suits you. You’ll have large squares, rectangles, and small squares that make it look like you’ve worked really hard to do all that cutting & sewing. But it’s very easy. Make and cut as many 9-patch blocks as you’d like and mix them up as you please. Make your quilt sandwich of top, batting, and backing, and quilt however you please. I like just quilting “in the ditch” with this quilt design.
I saw that note too on the airplane fabrics.
Do you have links to the other quilts you made for the girls? Would love to see your “year of quilts”.
I love this scrappy quilt Cammie! I just made string baby quilts for my granddaughters. Super easy and fun and you use your scraps on Muslim foundation.
Thank you and how wonderful! Those are some lucky grand babies!
I just love this!!!! It’s great!!
I’ve been looking for a method to do a t-shirt quilt for my daughter. She would rather it be asymetrical rather
then perfect squares. May have to try this. Thanks for sharing.
Cami, your quilt is wonderful and I want to try your innovative method! I have been quilting for over 30 years! Just two comments. Quilting is not boring or tedious, and once you get into it more, you might learn to love it. And also, pre-washing is not always necessary. I used to do it and never do any more. There are some quilters who do and some who don’t. I am too impatient to pre-wash!
Keep up the good work. Forgot to mention, your son is wonderful too!
Hello, I am still confused on how you just start sewing random pieces of fabric. Can you send me any tips?
Love the quilt, great colours. Going to try this out for a friends new grandychild due in February. Your wee boy is gorgeous.
Phyllis from Scotland
Thank you so much Phyllis! Love hearing from friends over seas! What a wonderful gift it would be for a grandchild.
Pythia quilt is absolutely precious! I have been looking for a design for my grandson, and this is it! I will, however, maki either in twin size for his bed.
Hi there! I absolutely love you quilt, and I love that you included the links to the fabrics. The colors you put together are perfect. I noticed that on fabric.com it recommends NOT drying the airplane fabric. Have you put your blanket in the dryer? Has it come out okay? Thanks so much!
This is awesome! My mom loves quilts. I have to make her one! 🙂
Good evening. I was wondering what kind of machine you use. Do you have along arm sewing machine or a standard. I have yet to attempt a patterned quilting but I really want to. Thanks!
Just a standard sewing machine. A long arm probably would have made the job easier, but I made do!
Such a beautiful piece of work, I absolutely adore the pilot fabric!
LOVE this quilt! And thank you for posting the links for the fabric… My little guy will LOVE the vintage airplane fabric too! 🙂
if you haven’t seen it already, you should look up mile-a-minute quilting. I’m using it to make a quilted couch cover. It’s kinda like if strip piecing and crazy quilting had a baby it would be that quilt…
Anyway, love this! I’ve wanted to make something similar but hadn’t quite figured out the process in my head yet.
lovely quilt, beautiful boy, thank you for sharing!! Check out a jelly roll quilt race for a quick quilt top, lots of versions all over the net. Took me longer than the hour but only because I was a bit fussy and inserted extra diamonds in between the strips! Might help with the leftover situation too as any selvedge to selvedge 2.5 inch strips will do and diamonds or squares can be anything.
That adorable quilt is almost as adorable as your little guy! I am glad I am not the only one who likes to do things the lazy way. I just don’t think tedious piecing is for me.
I love your “Lazy” Quilt. I started a quilt for my daughter years ago but got bored with the tedious piecing of all the small pieces. I have so much fabric. Maybe the lazy quilt is the way to go!
I love your quilt project! And that cute little baby boy is so precious!
I just love this! I think I would have dove for that airplane fabric too! Super cute wee boy : )
Hi Cami! I ???? this quilt and want to make something similar. I ordered the two vintage airplane fabric from fabric.com and realized they are a little heavier fabric that they don’t recommend drying, only air dry! I know you mentioned prewashing fabric but am wondering how it is holding up after finishing the quilt and washing? Thank you in advance! Just found your blog and love, love, love it!
What a great scrap buster idea!!! Your quilt is fantabulous. Makes for a quick gift too!! Thanks for sharing.
So cute, and such darling photos! As found on pinterest. 🙂
Hi
love the quilt, and I am one of those who cuts out the thousand pieces and sews them! lol
Go to ….Missouri quilt tutorials…., easy quilt ideas…you will have quilts for EVERYONE!
I learned there and I am lazy and I make quilts galore for everyone now!
Check it out! RAE
Genius idea that I want to try very soon! The quilt is cute, but the boy is cuter!
What an inspiration! I relate to you with the love of quilts, but not quite the temperament to make them. I will give this approach a go. Thanks so much for sharing!
I love your quilt. That’s the way quilts looked way back when they were truly made from scraps. I looks so snuggly and warm. Great job!
Thank you for posting your adventure in quilting, and links to get me started. It reminds me of a nice aunt sharing her secret to a great recipe! The quilt is lovely and your boy is adorable! I’m an empty nester just getting back into sewing and creativity and your project is very inspiring! I’ve been pinning many ideas from painting to crafts, but sewing is where I’ve had the most experience. I’m restoring an old quilt by patching with zig-zag stitching. It’s primitive, but I’ll get there soon…..
You are so welcome. I do love to share and love that I can do that with blogging. Your quilt restoration sounds wonderful and like it would be well worth the effort. I do love beautiful, used, old quilts! I am with you, in the fact that I love to craft but sewing was my first love. Such a fun skill to have! Thanks for coming by and leaving such a nice comment.
I love this quilt!!!
When I saw your quilt I too fell for the airplane fabric. I ordered the airplane fabric from fabric.com. I did not read the discription well before ordering. I received the fabric yesterday and discovered it was duck cotton. I am wondering if you had the same fabric in your quilt? Also, did you have any problems with washing and drying? The directions on the fabric say not to dry and am a little worried about using this in a quilt. Thanks for your help. I am a quilter and have been wanting to make a red and blue quilt. This is just the inspiration I needed. Love everything about your quilt.
I ordered it as well without reading carefully on fabric.com. I would love to know if used in a quilt by either of you and washing results? I loved the post but found it because a customer wanted a similar quilt. If you can tell me how the original quilt has held up with washing, I would love to know. Thanks.
Love the quilt and you’ve done a great job on the tutorial. Adorable baby boy! I started making quilts for my little boy and I just looked up and my “baby” is turning twenty in a couple of days!
One other thing that I wanted to mention. You should probably avoid buying Wal*Mart fabric. I have been told by many people that the fabric that they sell is what is lower grade and lower threadcount. Also, I’ve heard that they sell fabric that is used to ‘spin up’ the fabric printing, so colors and patterns aren’t uniform or full color. If you’re going to spend time, money – and most of all – effort, you should use durable, long lasting fabrics. Also, good to support your local quilting shops before they all go out of business!
Pretty sure your 20 year old baby would still love a quilt 😉 I do agree with you about Wal-mart fabric. I can definitely feel the difference. I am glad I only used it in a small measure as I ended up loving this quilt more than I imagined and I hope it will hold up for years. Thank you for stopping by!
I, like you, don’t quilt due to not having the patience for it. I have made a few baby quilts, but they were mostly pre-printed one piece quilts. I have 2 great grand babies due in October, one girl and one boy. I am thinking I may try this! Looks easy enough.
You should give it a try! You really can’t mess up a random design like this, which I was a fan of. Thinking back, I may have invested in having a professional quilter do the stippling, but we still love it. Thanks for coming by!
I simply love this quilt. Very original. Think i’ m a lazy quilter and don’t follow the rules.
There is an easier way to do these quilts. One- use a serger and it will cut off those extra pieces. Second is Sew right to the batting using methods such as stitch and flip.
i love this quilt. It’s so pretty.
I love how your colors came together on this quilt. I think my next one will be a random one like this. The red, white and blue theme did not overtake you color scheme which I think is perfect for a baby quilt. Love your Blog.
Thank you! I do love the red, white and blue combo, but it definitely has to be done subtitle to not look like a flag! Thank you for your sweet comments.
I love your quilt. This is exactly the method I need to make a quilt from my Dad’s old shirts. He died two years ago and I have been planning on making a quilt for my mom. I can/t wait to get started.
Thank you, Lisa, for the idea of using shirt fabric. I make my husband’s shirts and have lots of fabric left over. Great way to use them and create memories at the same time.
Lorraine
Thanks so much for your tutorial. I can’t wait to try one! Yours looks right out of Pottery Barn Kids. I love it!
Now, THAT is a compliment!! Just super glad you can’t see all the flaws close up 😉
My hubby always says …”flaws is what makes it ‘home-made'”
P.S. your quilt is BEAUTIFUL…and so is your boy 🙂
I love your style of quilting. I think the measuring and matching of all corners and seams up is what’s holding me back. I have only made 1 queen size (took me over 10 years to finish) which by the time I was finished I didn’t like the colours anymore, 2 twins and a wall hanging. I would love to make more… Maybe this style is for me.
Thank you! I don’t think I would dare tackle a queen size quilt just yet – so way to go! Even if it took you 10 years 😉 I loved how my “lazy quilt” was so quick. I lack patience for these things, so this was right up my ally. Hope you give it a try!
Looks great
Thank you, Kevin!
Very pretty quilt.. One of these days I’ve got to make my own.. I’ve helped a grandma make most of her adult grandchildrens quilts but have never made my own.. One of these days.. 🙂
Love the quilt tut, hoping this is one I could start with, although I want a regular bed size. My one and only was a baby quilt. The little boy is adorable too!
I love the quilt. Its adorable!
Your color and design sense are amazing. Your info is priceless. Thank you so, so much!!