This post may contain affiliate links, which means I get a small percentage of the sale at no extra cost to you. I only recommend items I love and have had a positive experience with. Thank you!
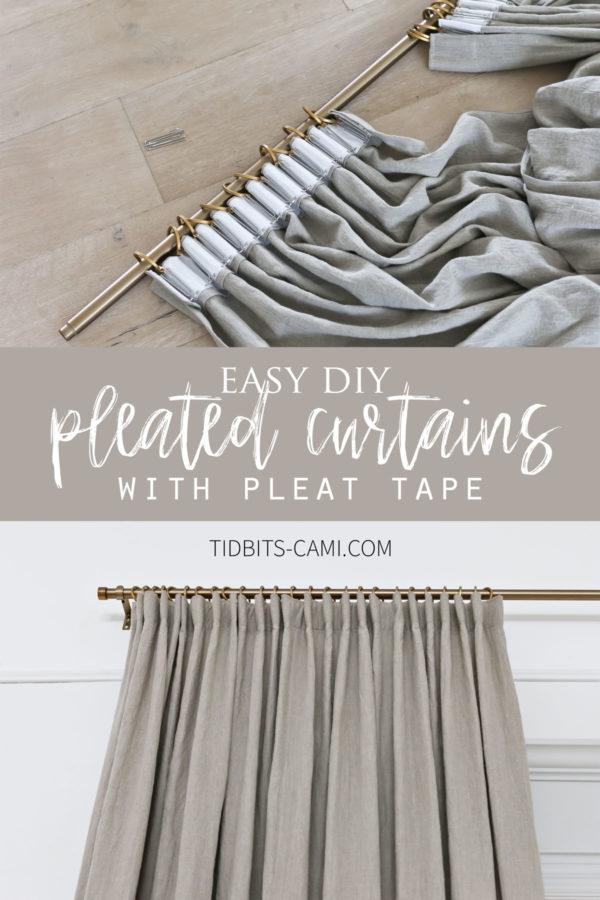
Here is my guide on how to make Pinch Pleat Curtains. Showing you how to sew on pleat tape to your fabric or curtains, to make luxury pleated drapery. You won’t believe how easy it is!
WATCH THIS POST:
Why sew pleat tape into your curtains?
First I want to clarify why you might want to sew pleat tape into your curtains. Pleat tape gives you so many options for hanging your curtains.
Once you sew in the pleat tape, you can create multiple pinch pleat looks. Double or triple pleats, euro pleats, casual pleats, goblet pleats, knife pleats, box pleats, and more.
As you can see, pleats get pretty technical. But all of these options are a major upgrade to your drapery. The majority of pleats can be done with the same pleat tape and hooks.
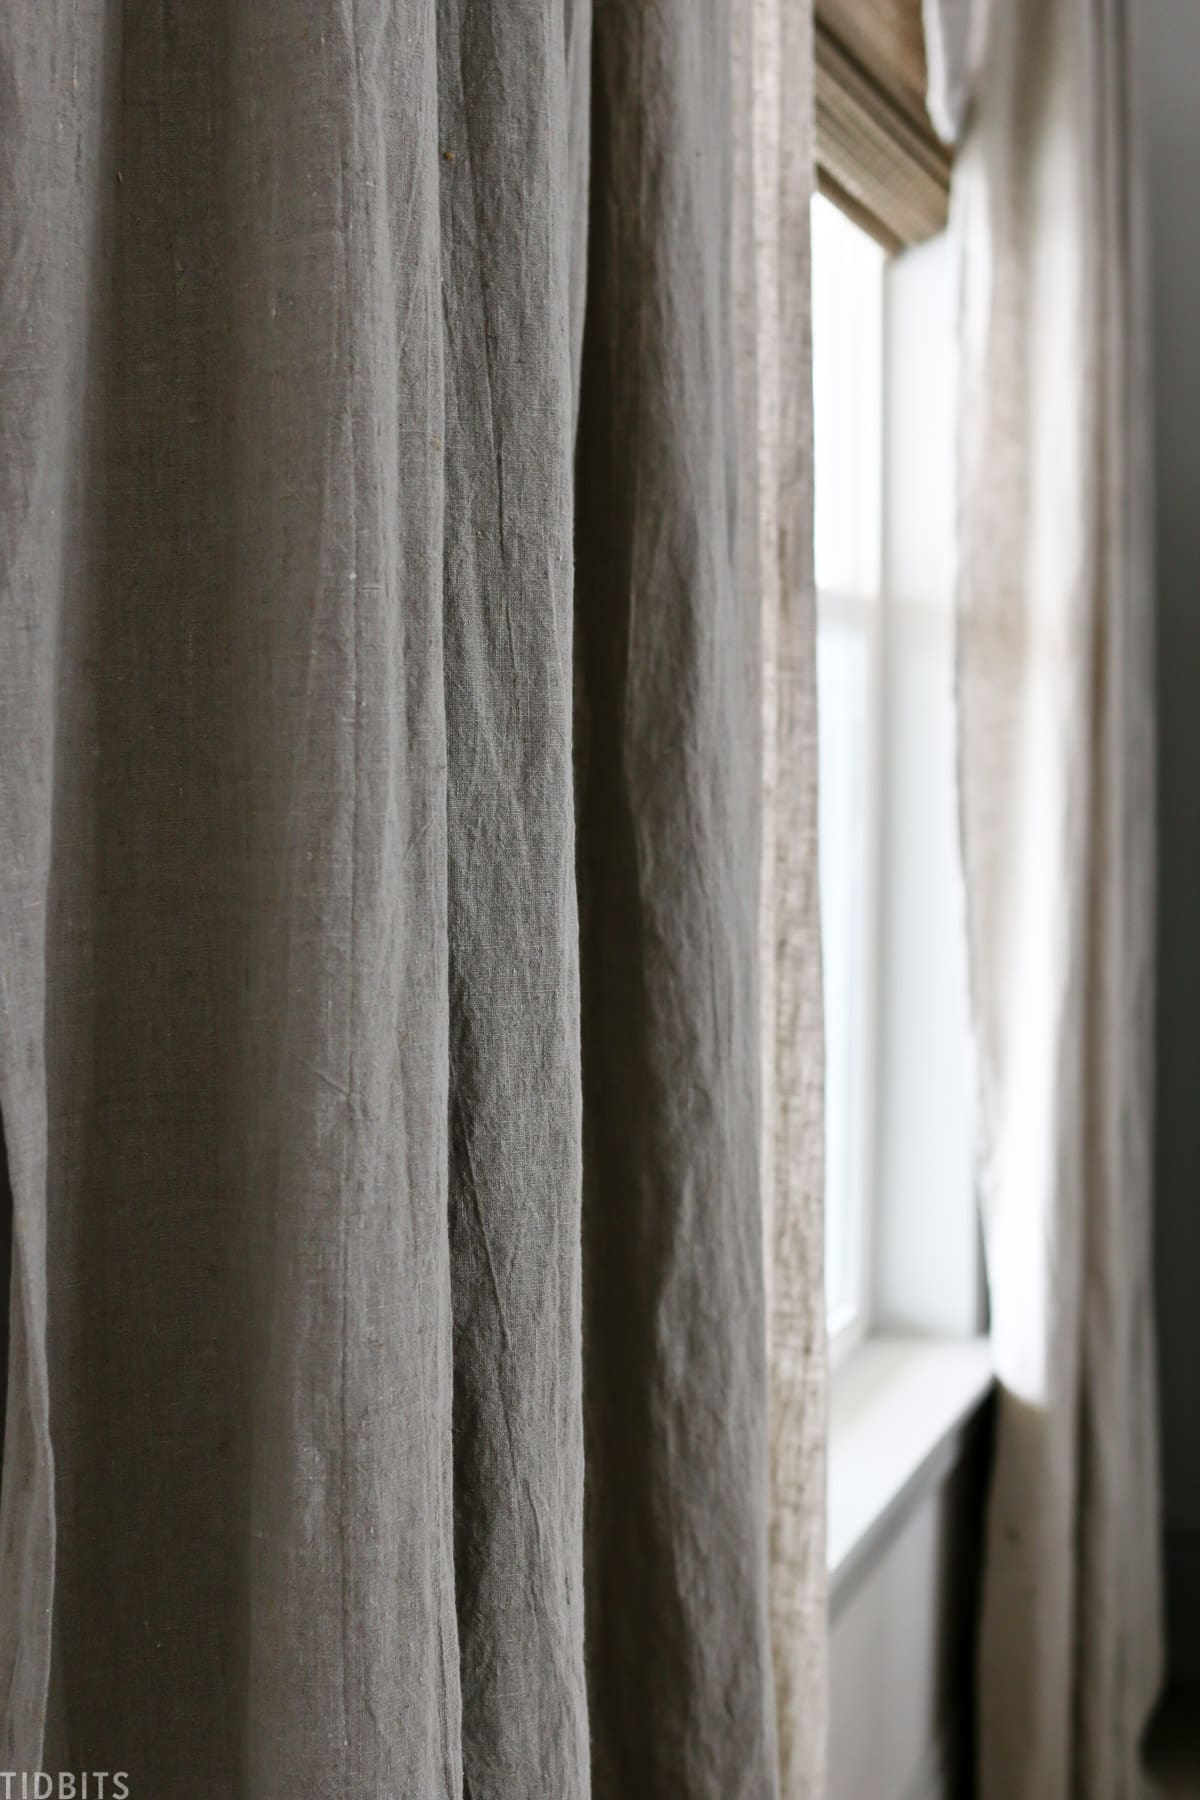
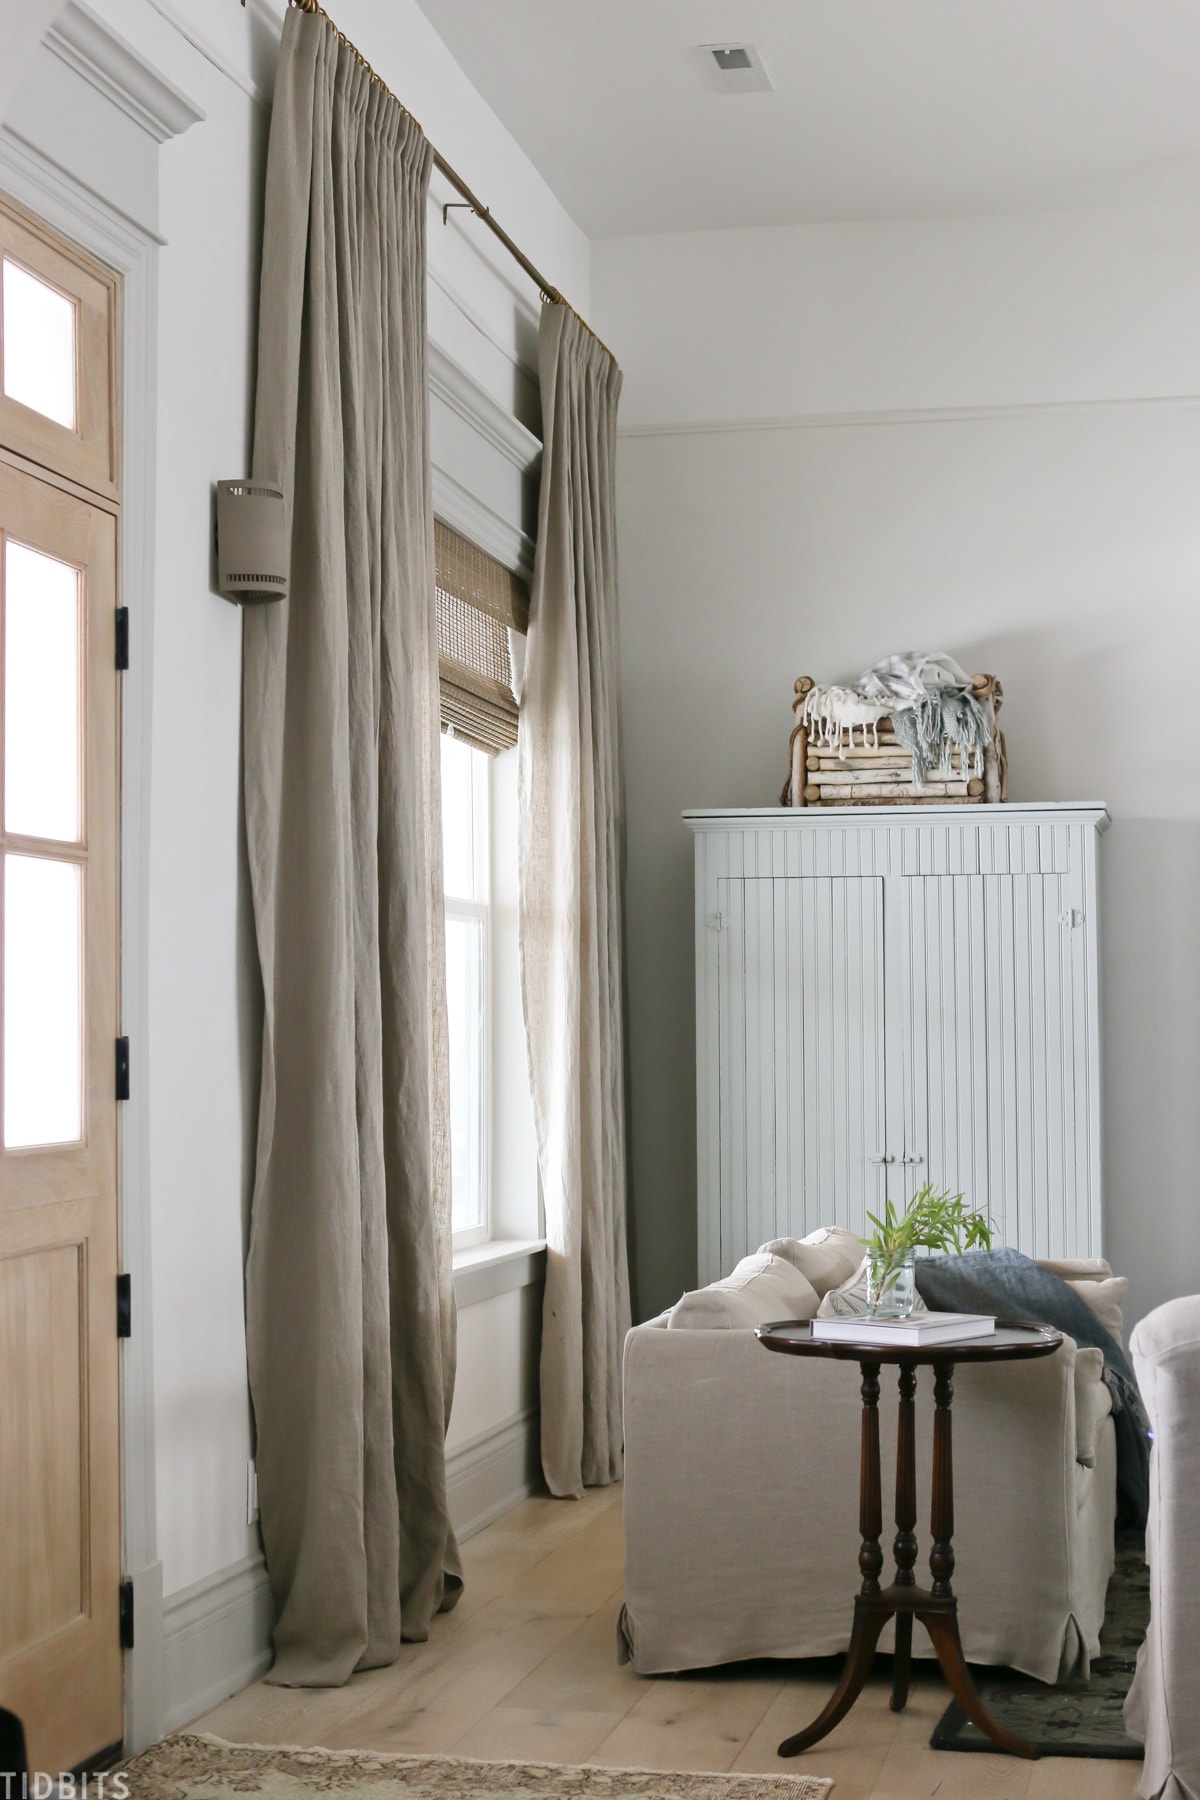
Any of these options will give detail and create fullness at the top, while also allowing the curtains to gently ripple and lay beautifully down your wall.
I much prefer this look when compared to simple gathered, grommet, or tab top curtains.
When compared to those options, sewing in the pleat tape was hands down the easiest curtains that I’ve ever sewn.
You can also add this pleat tape to any store-bought curtains really easily.
If you’ve bought curtains that just have a simple casing where you insert the rod or hang with clips, you can sew on the pleat tape to the back of the top, and create the same pinch pleat look.
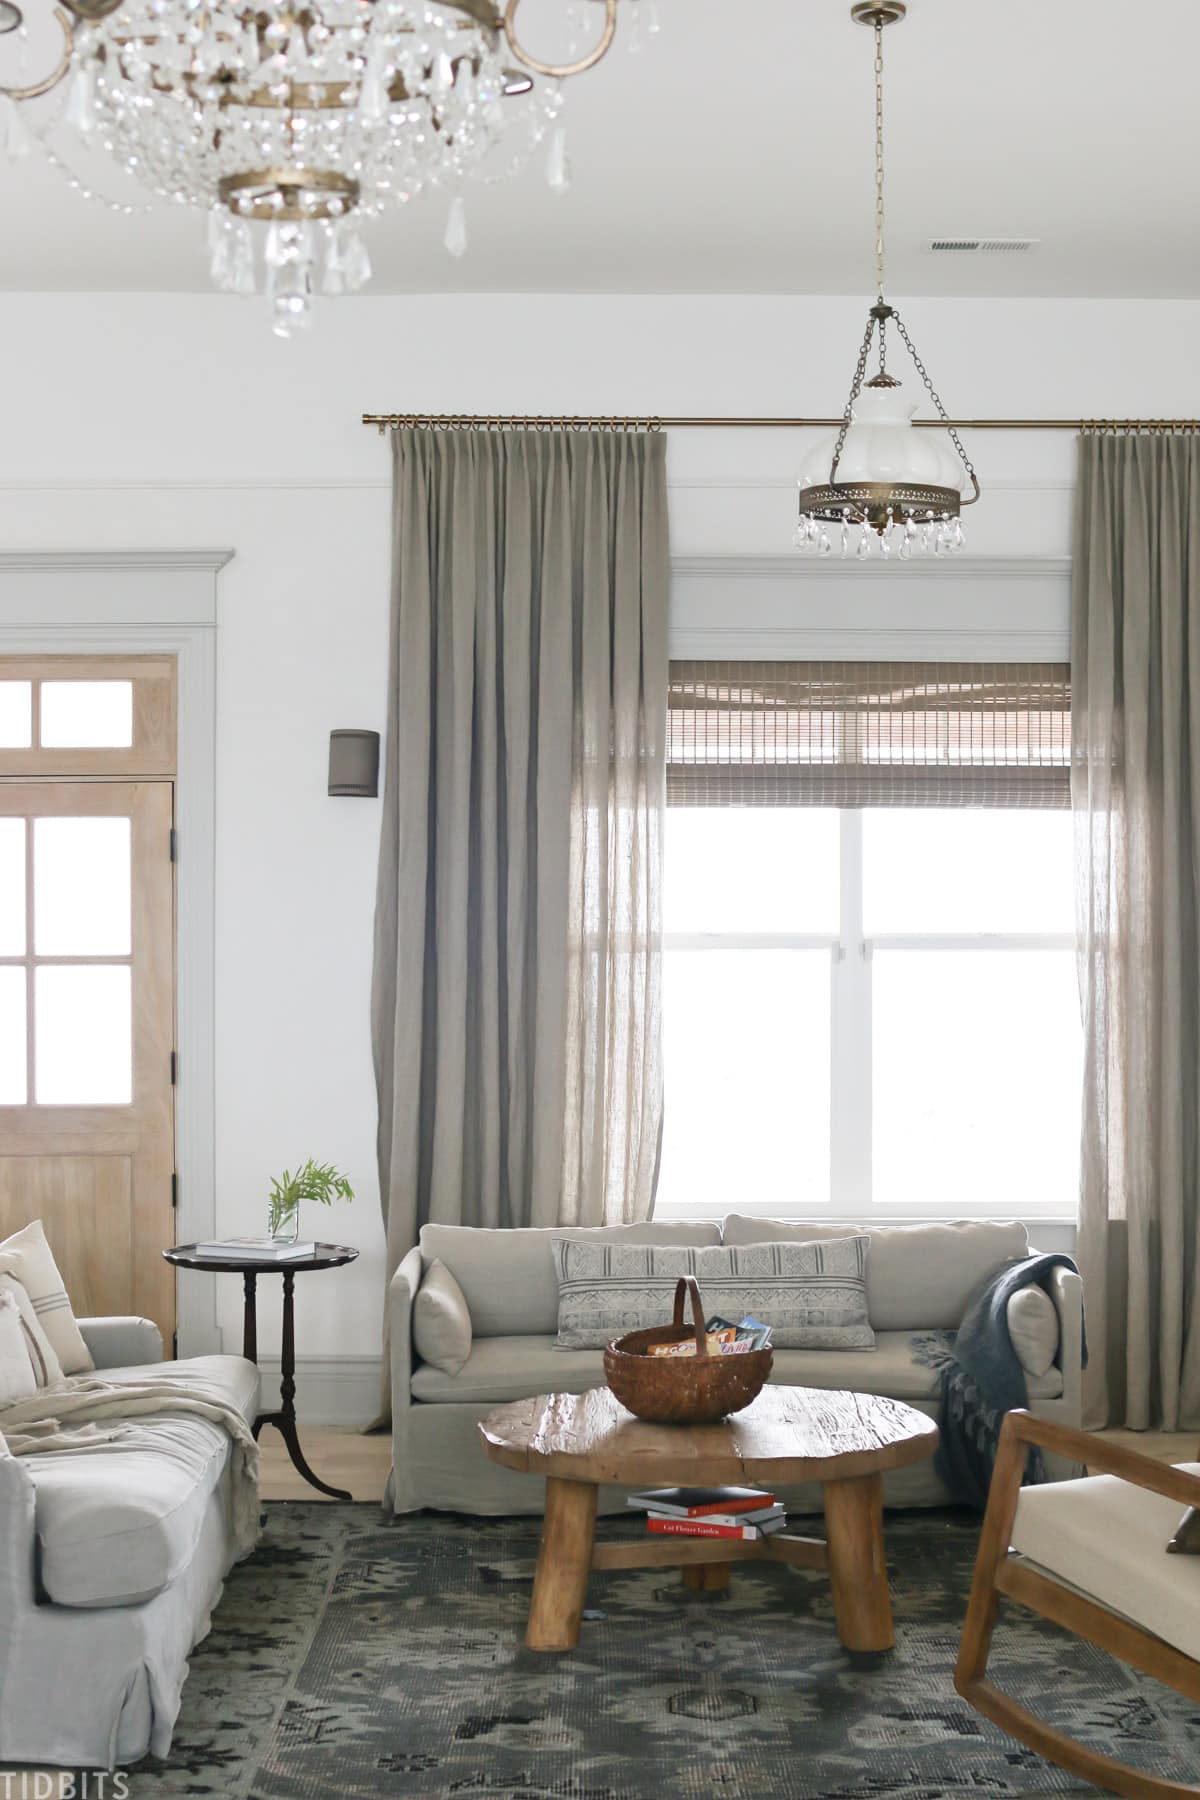
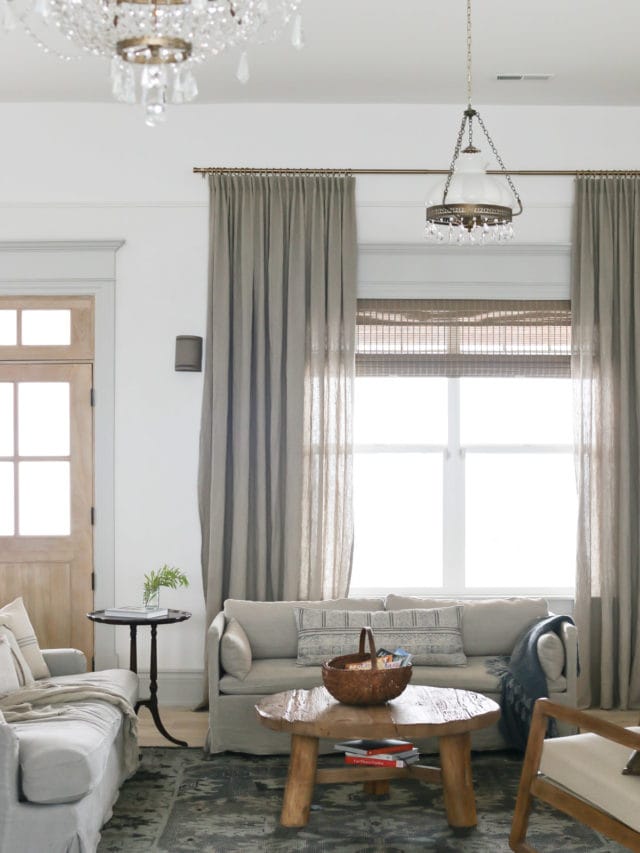
How to Make Pinch Pleat Curtains for Your Living Room
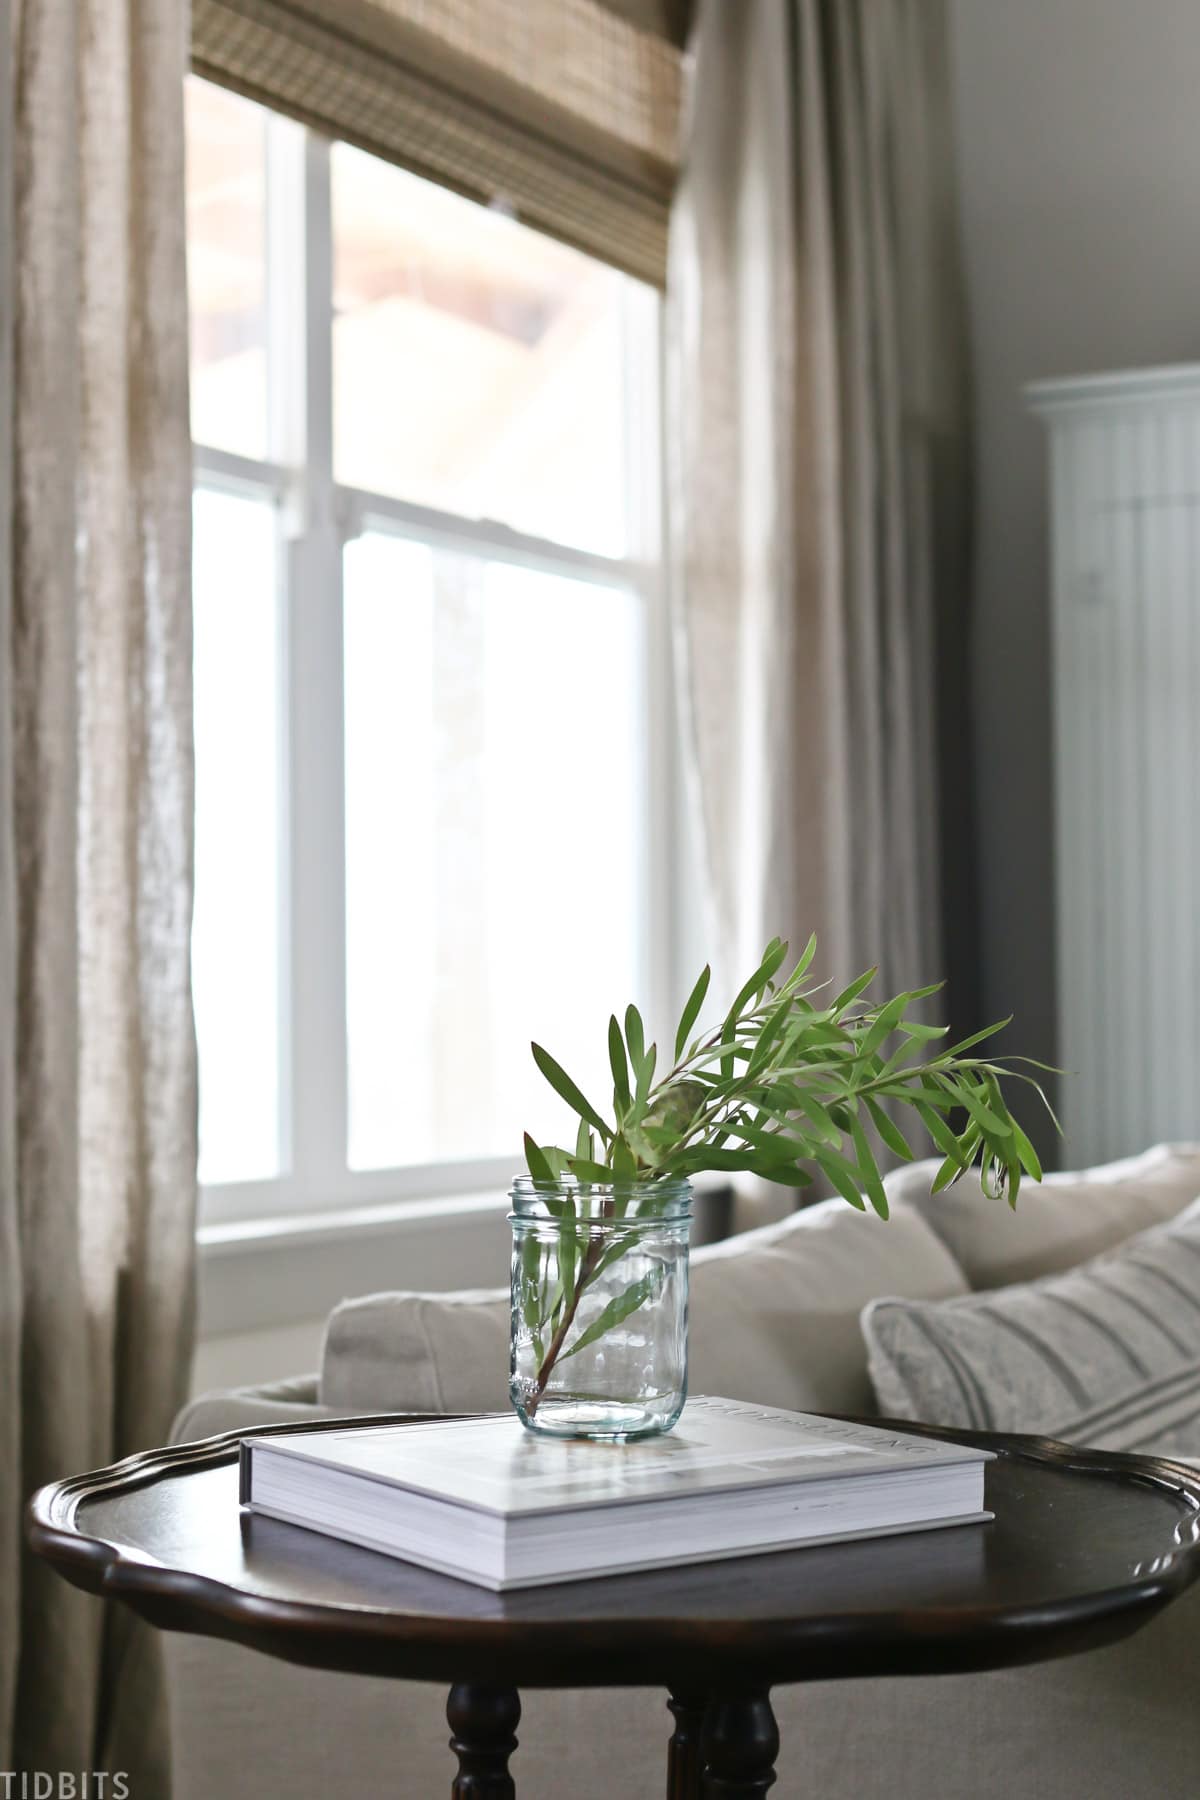
I’ve made our curtains for our living room out of fabric yardage that I bought. I purchased a heavier weight pure linen, that is a dark natural color.
If you’ve been with me for awhile, you know I have a very unhealthy obsession with pure 100% linen fabric. So much so, I recently started a new growing shop to make and sell handmade linen products to you. I just added new products and colors, so check them out!
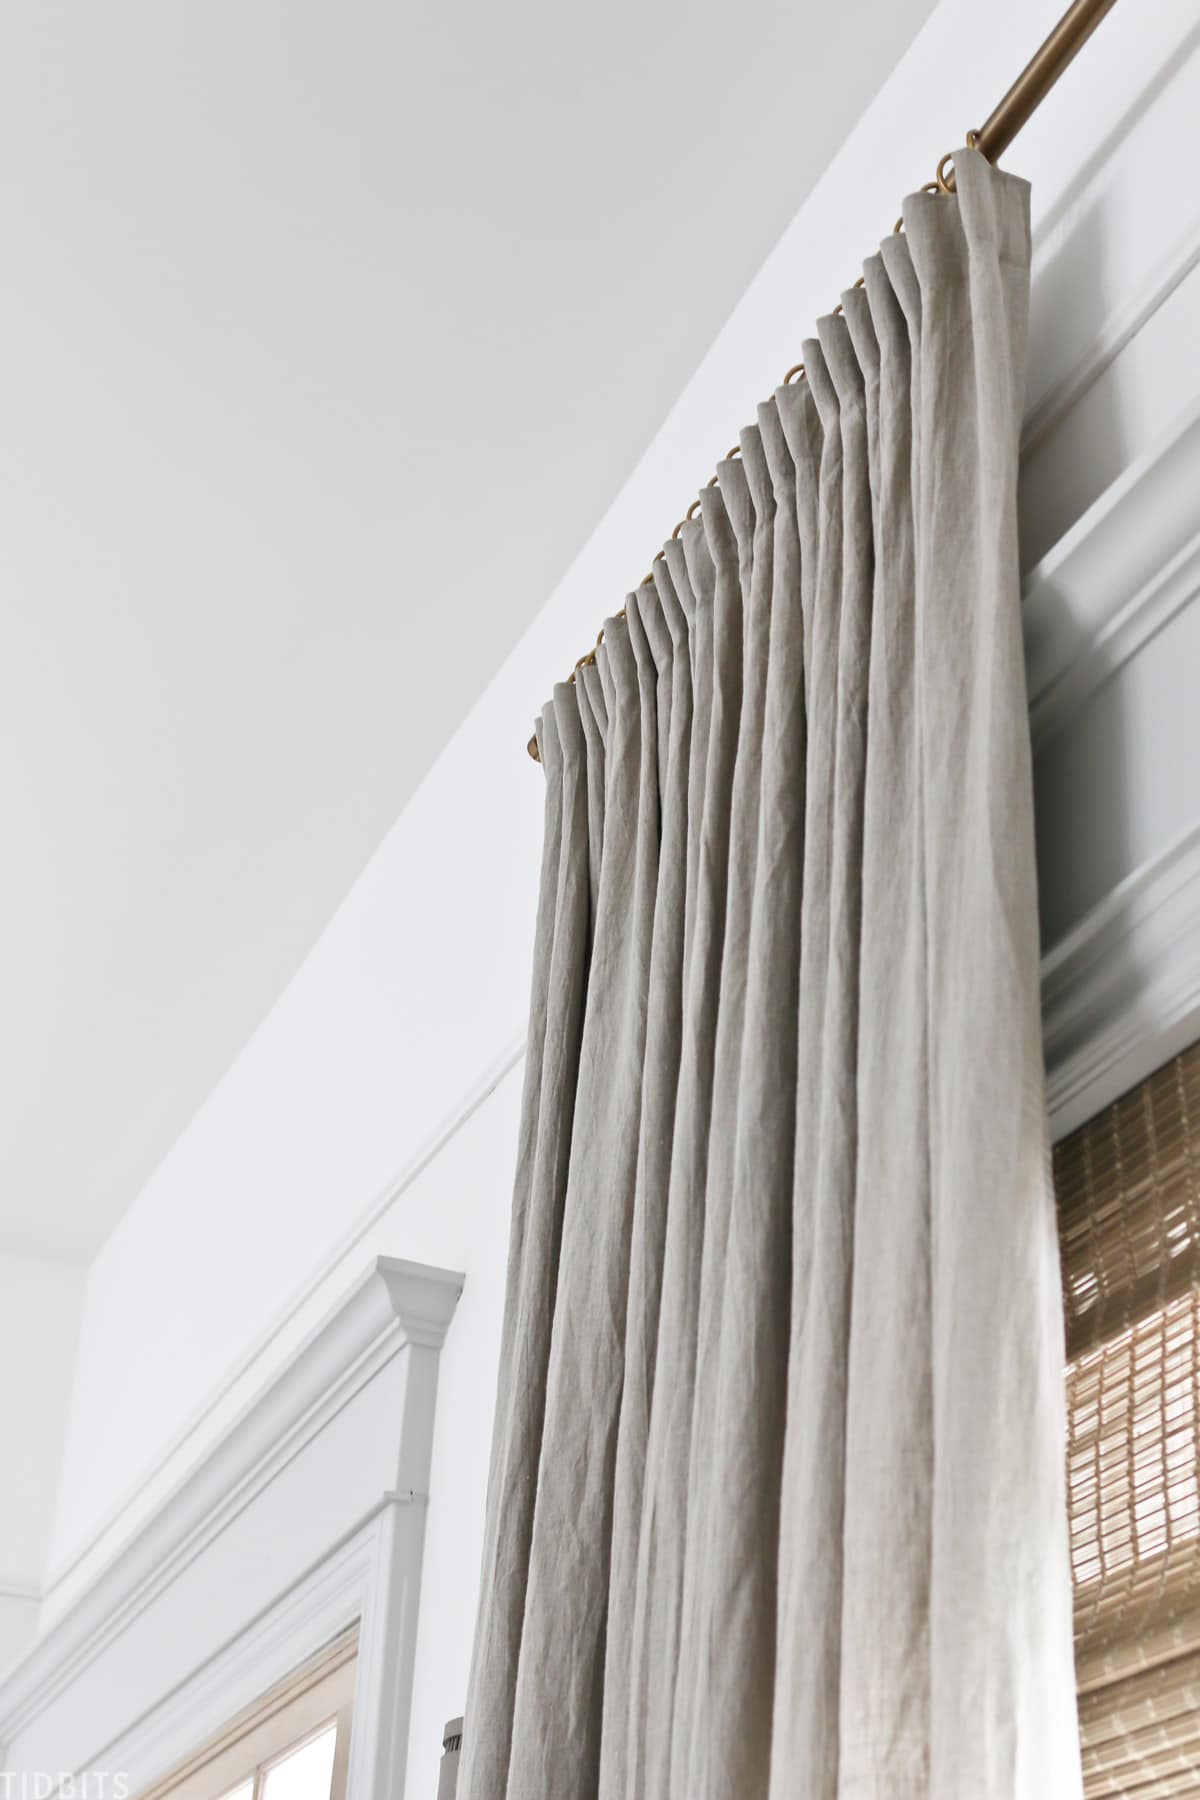
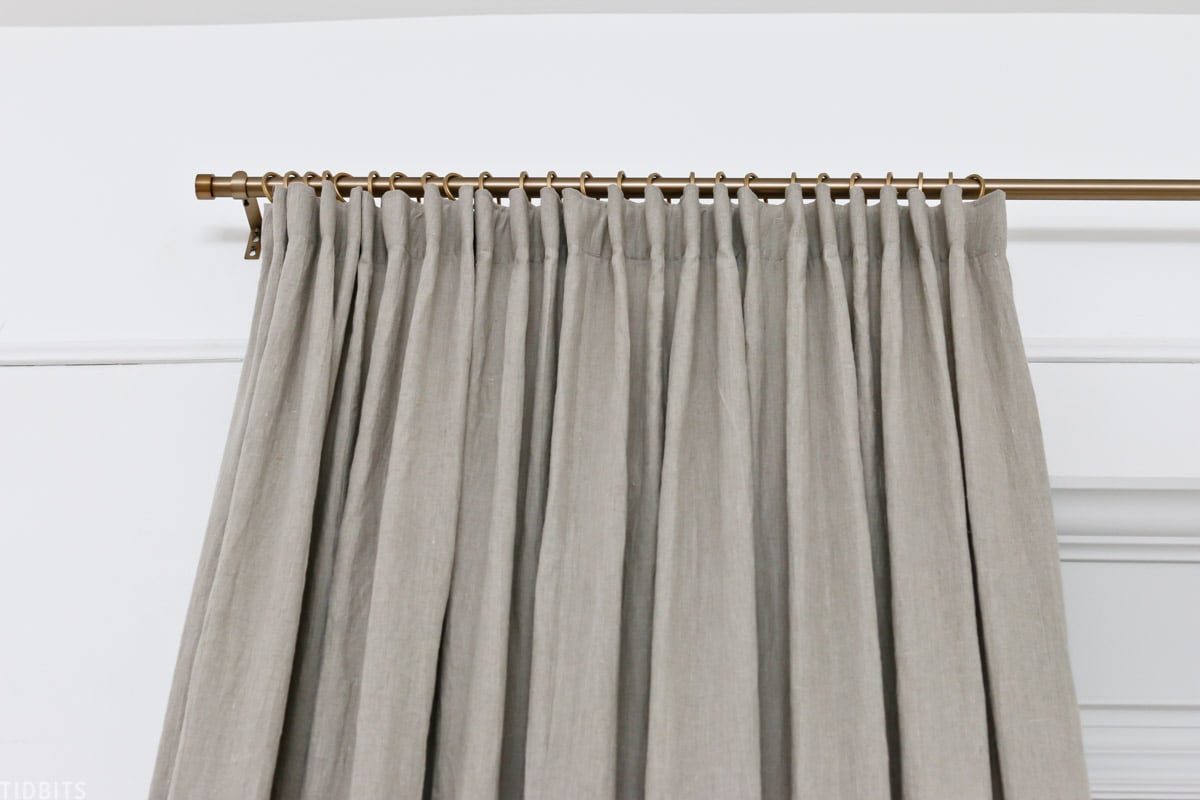
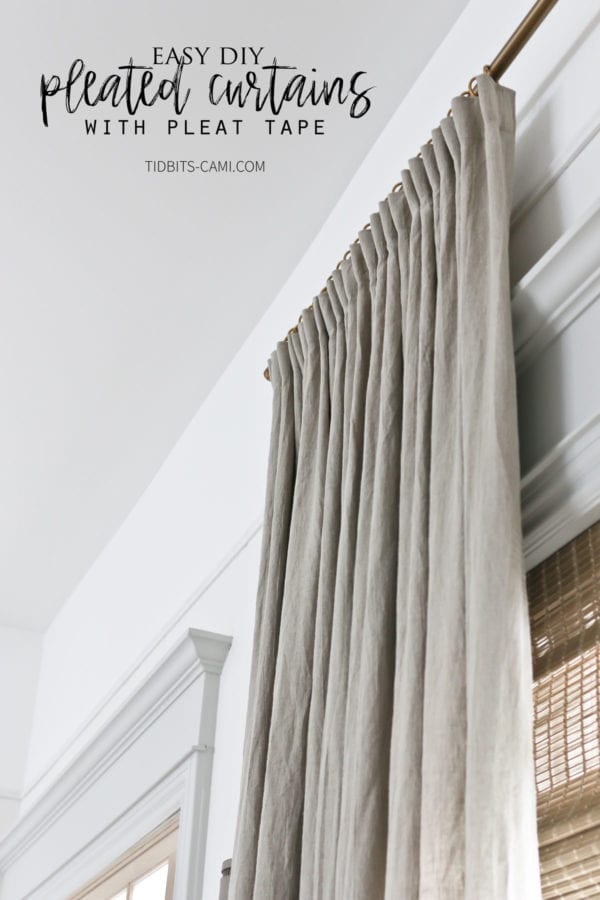
After I sewed in the pleat tape, I got my hooks and played around with them for quite some time to find my favorite look. I ended up loving this really tight gathered look, that is a lot like a casual goblet or cartridge pleat.
To create this look, I just inserted one side of the prong. Then I counted 5 pleat spaces to insert the other side of the prong. You’ll be able to see this process below and especially well in my video above.
I liked this because unlike most pinch pleats that are tightly gathered and then spaced a bit apart, it created a nice continuous pleated or gathered look.
Supplies for DIY pinch pleat curtains
Let me walk you through the whole curtain making process and supply list, so you can do this on your own.
Pleat tape
There are a variety of pleat tapes. The type I got is a very basic multi-purpose one with the pleat casings spaced about an inch apart.
You can get pull pleat tape that has strings for you to pull and make a really super tight pleated look.
But I find this basic pleat tape great for many looks.
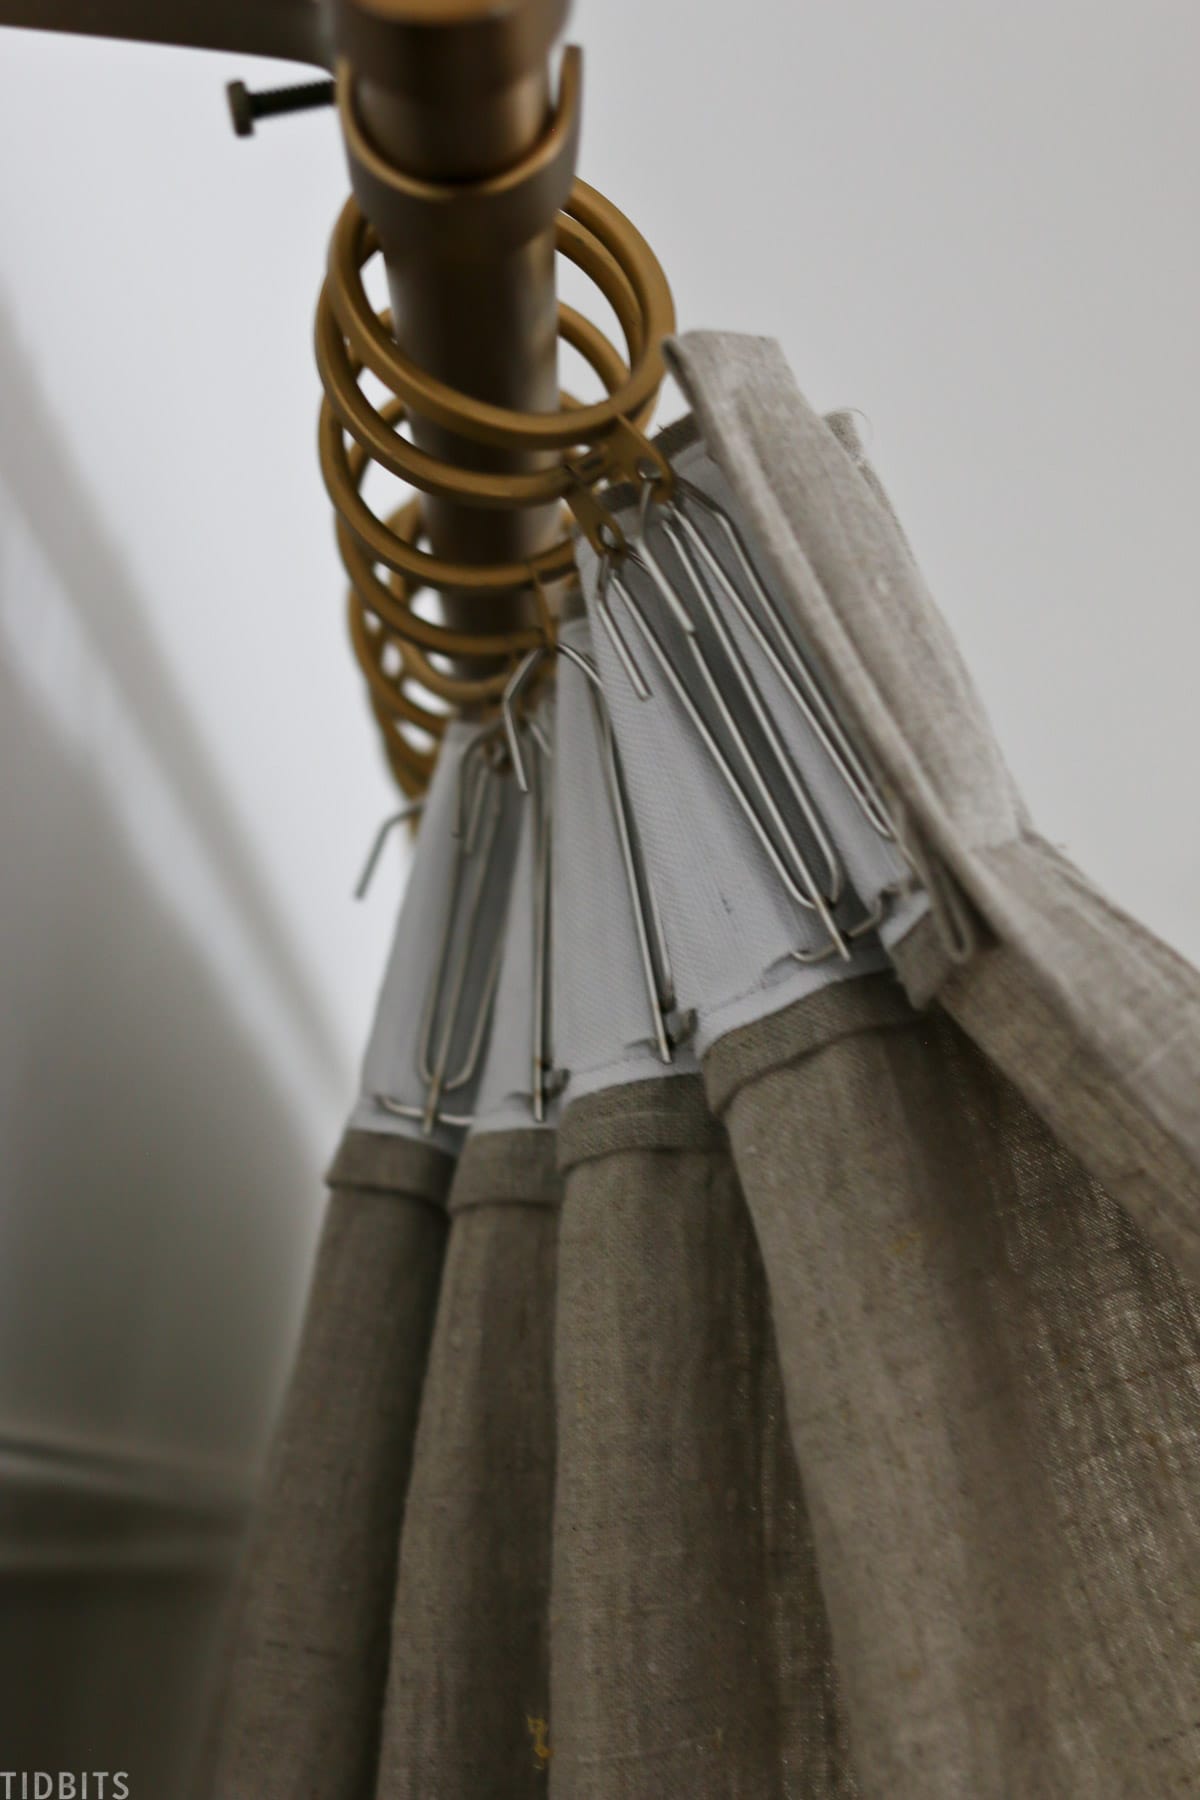
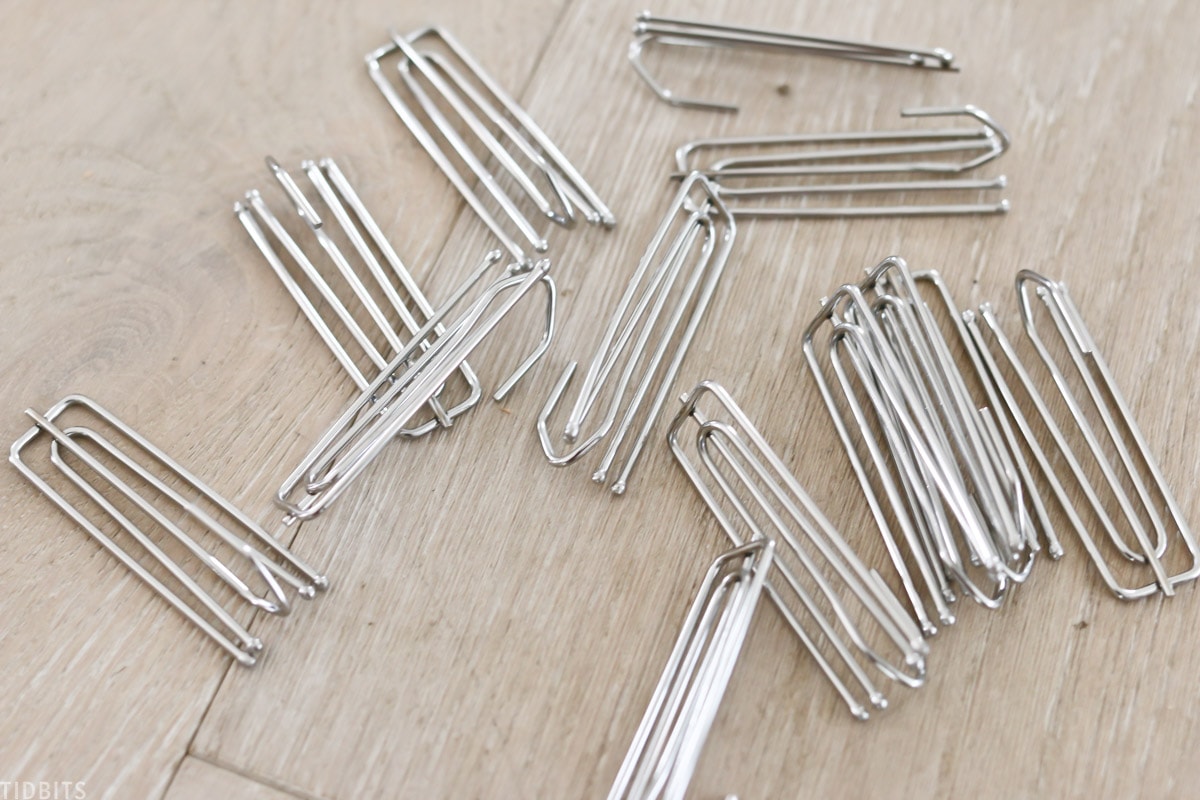
Pleat Hooks
You’ll need some pleater hooks, and again, those come in many styles. I find the 4 pronged hooks to be the best multi-purpose hooks.
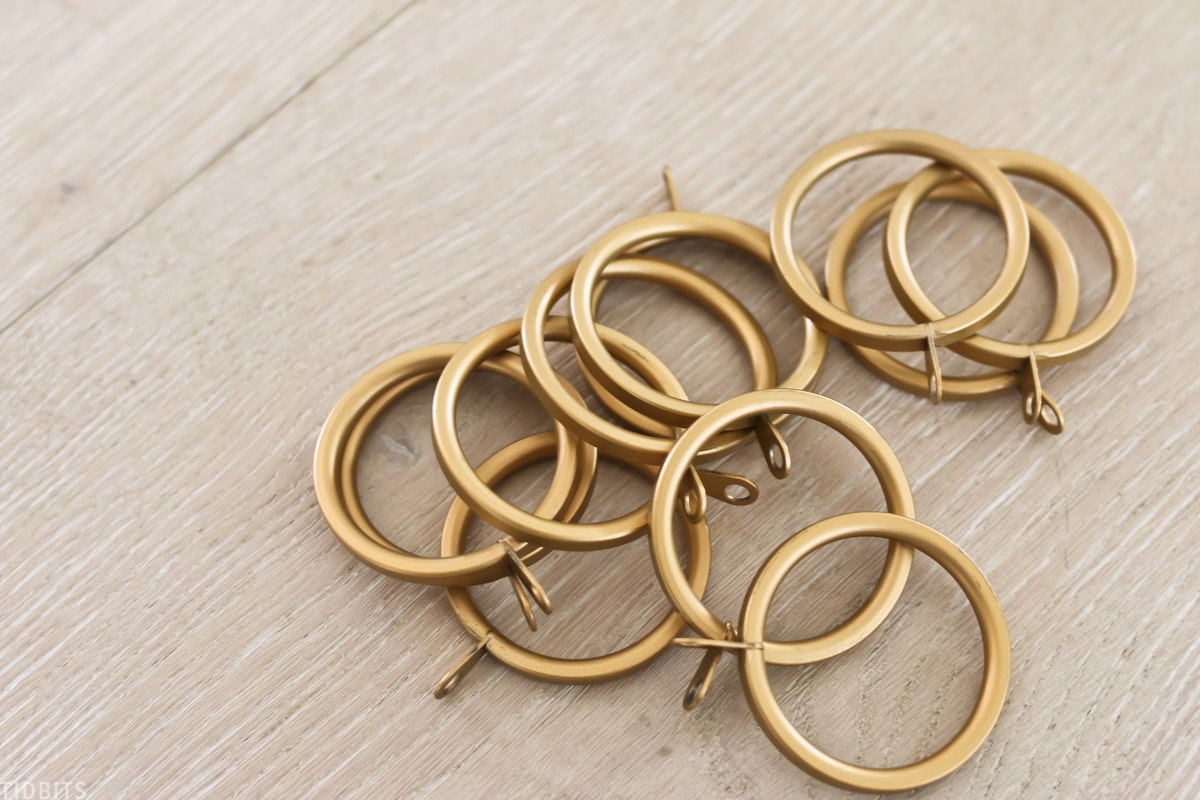
Curtain Rings
To hang with the pleat hooks, you’ll want curtain rings with a little eyelet hole, and be sure to get the right-sized rings for your curtain rod.
Fabric
Then of course you need your fabric or pre-made curtains.
Note: pleats really reduce the overall width of your curtain panel, so you need to plan for at least half the width when all is said and done.

My fabric was 50 wide and I knew half that would not be full enough once pleated. So I bought double the fabric and stitched them together down the long edge to create a panel that began at 100 inches wide.
Once pleated, I ended up with this lovely fullness at the top.
I actually just bought a half yard extra on my length and then hung them with plenty pooling on the floor and hemmed them last to the exact length.
How to Make Pinch Pleat Curtains with Sewing Machine
Beyond those supplies, you need standard sewing materials. Be sure to have your iron handy, as pressing is key to professional results.
STEP 1: Prepare fabric
I washed and dried my fabric to reduce shrinkage problems in the future when I would wash the curtains. Washing linen also makes it far more nubby and delectable.

But also very wrinkly, so I pressed my fabric really well getting out all the creases, especially on the edges.
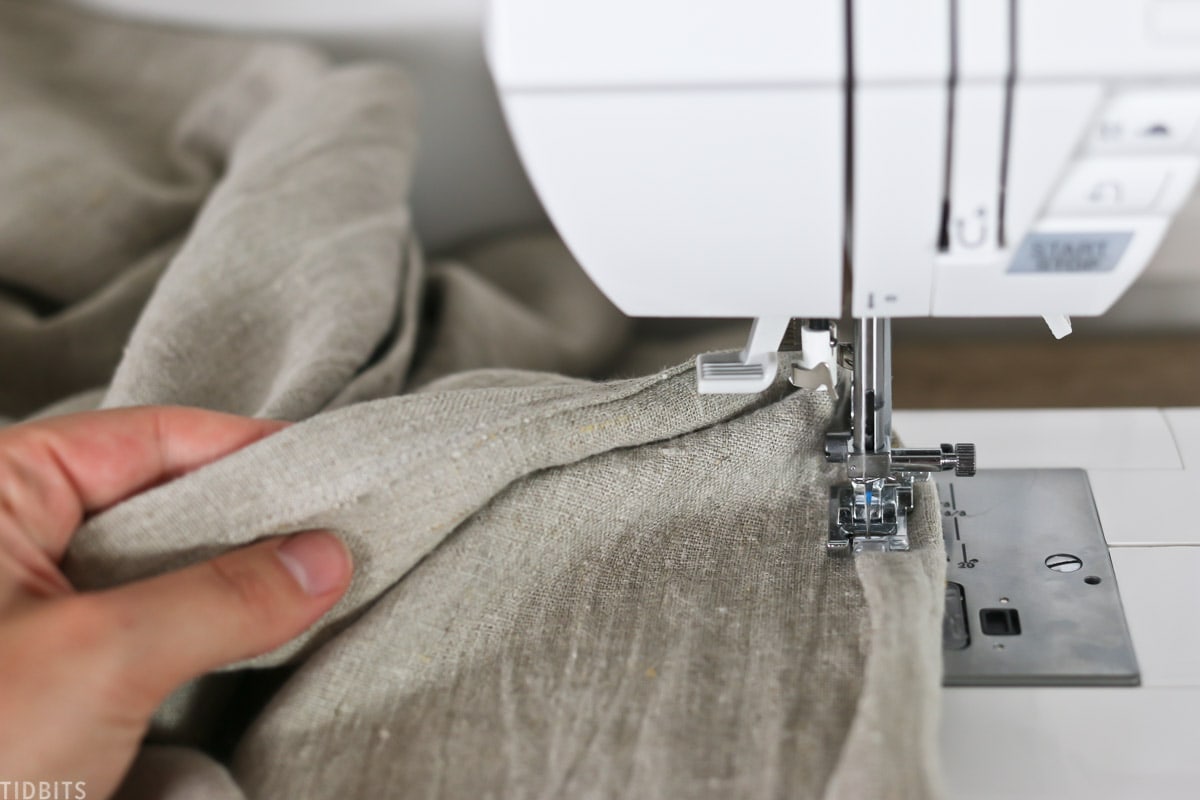
STEP 2: Hem sides
I hemmed the sides of the fabric very first, by simply turning in the raw edges to encase them in a nice hem.
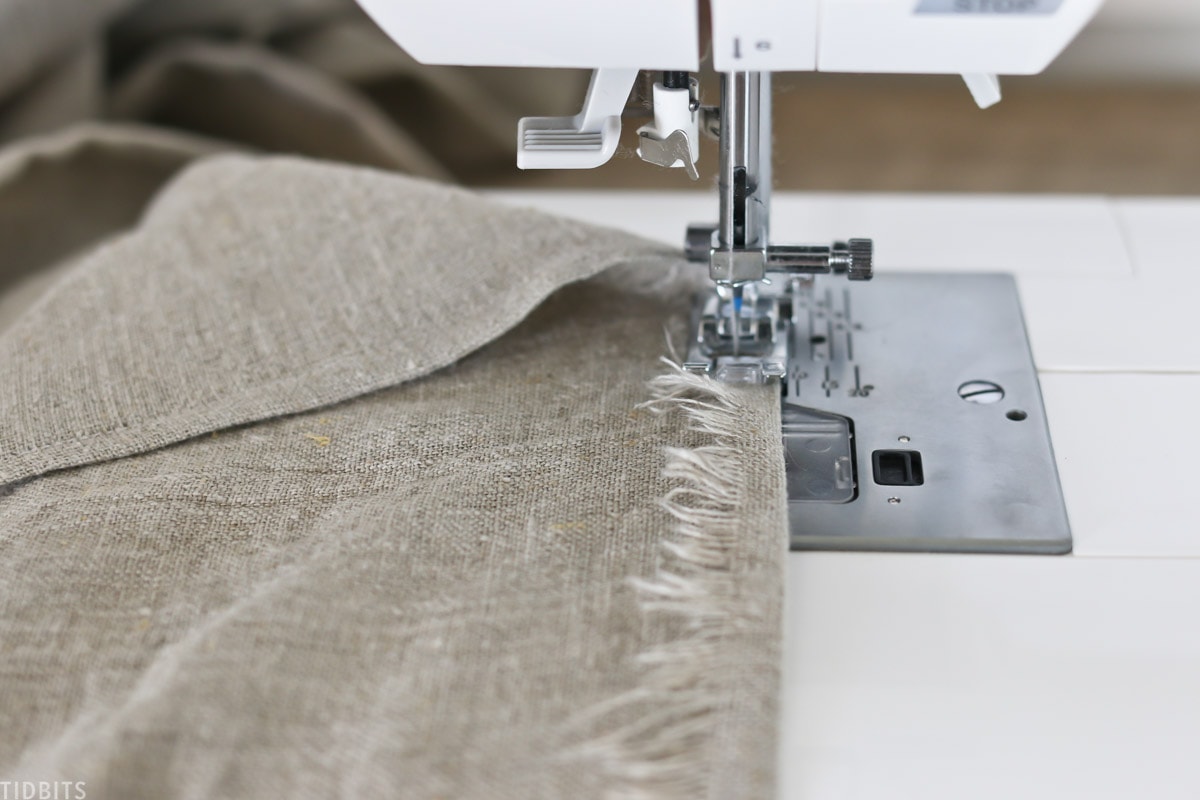
STEP 3: Hem the top of panel
I prepared the top of the curtain, where the pleat tape was going to go, by simply turning the raw edge down about ½ inch and stitching it in place. This just makes it easier to encase that raw edge before you begin to pin the pleat tape in place.
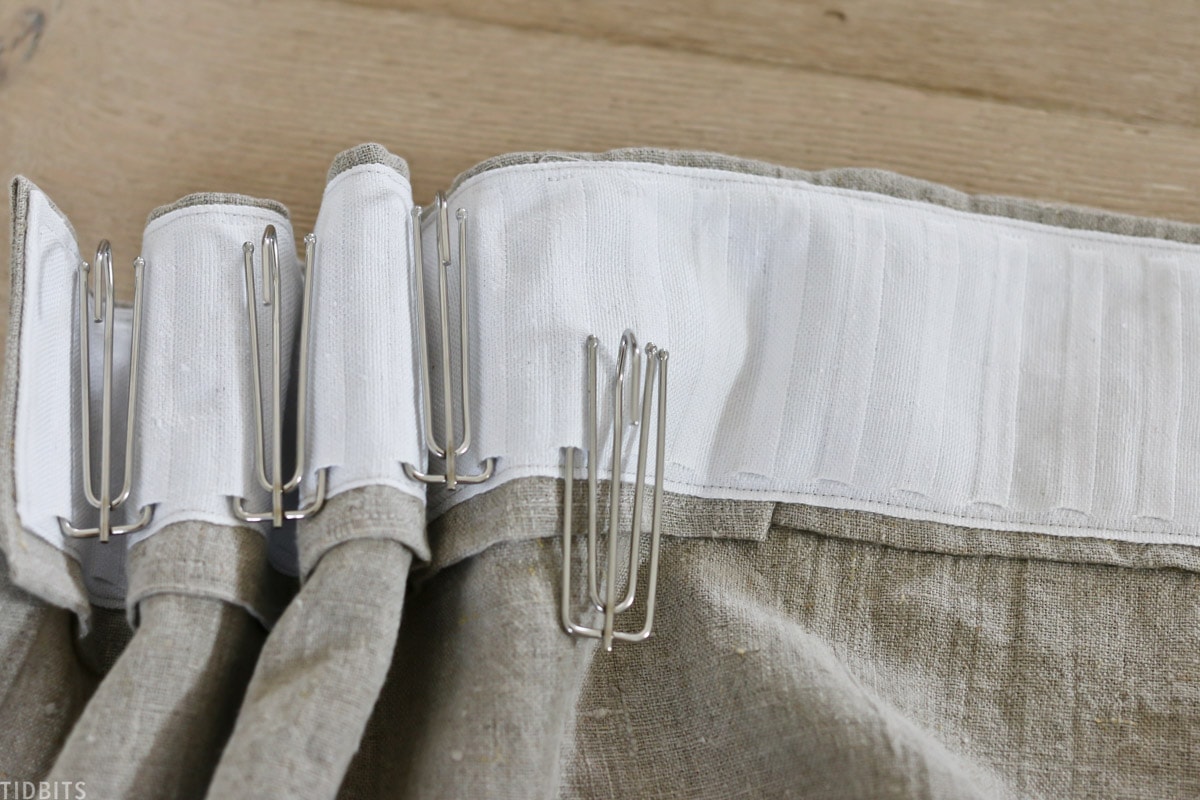
STEP 4: Pin in pleat tape
I took the fabric to the ironing board, and folded over the top edge of the panel, where the pleat tape was going to go.
Then I used the pleat tape to figure out how far to fold it over, making sure there was at least ¼ inch extra fabric at the top and bottom of the tape.
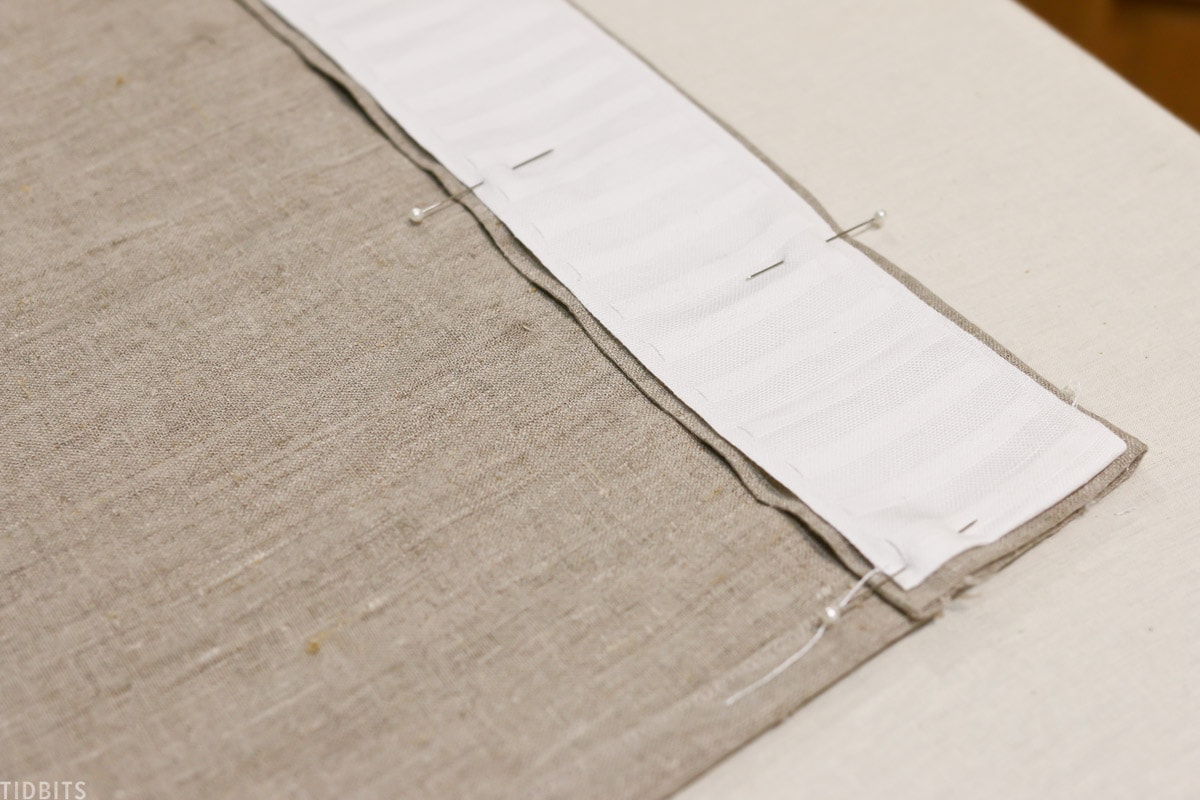
After that, I pressed that fold down as I went and began pinning the pleat tape in place. The edges of the pleat tape are just folded over so the raw edge isn’t exposed.
STEP 5: Sew everything together
Then I took the panel to the sewing machine and stitched the pleat tape in place all around the top, bottom and edges.
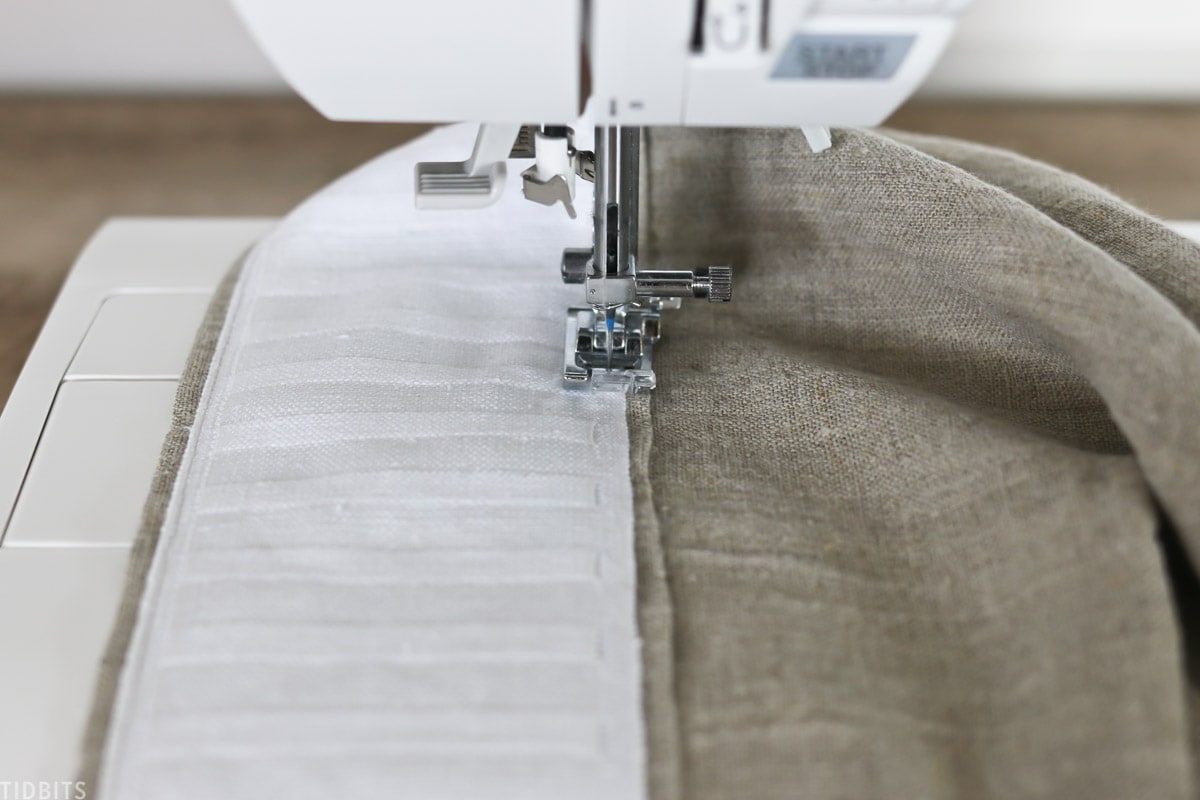
You just have to be careful not to sew the prong openings in the pleat tape, or you won’t be able to get the prongs in.
You also want it to look really nice on the other side, so do your best to keep a consistent seam allowance as you sew around.
After that is sewn in place and looking good, I recommend pressing all your hems and seams, so the panel looks very crisp and professional.
If you want to copy my same casual pleat method, I put a prong into every 5th pleat spot, and continued that along the entire panel width.
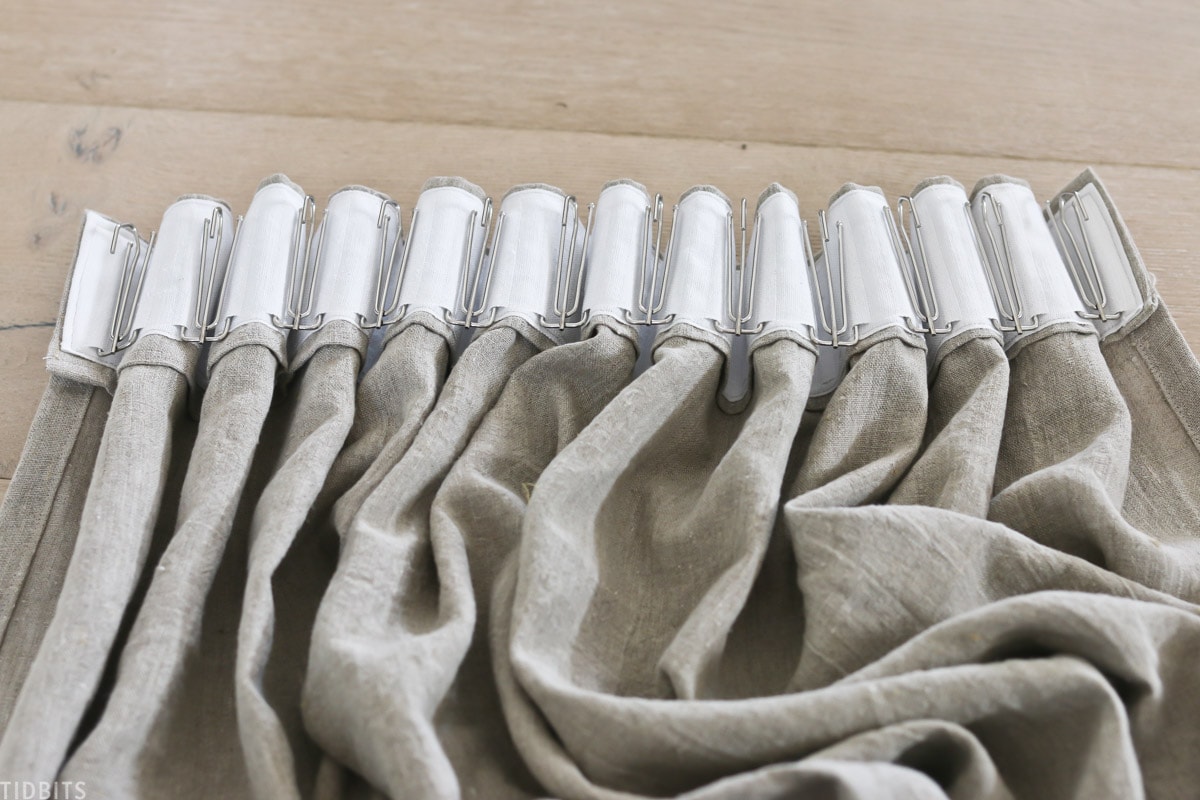
After the prongs are in place, you can insert the rings onto the hooks through the rings eyelet spot.
I found it easiest to insert the rod into the rings while on the floor, rather than trying to insert them all in place while hanging.
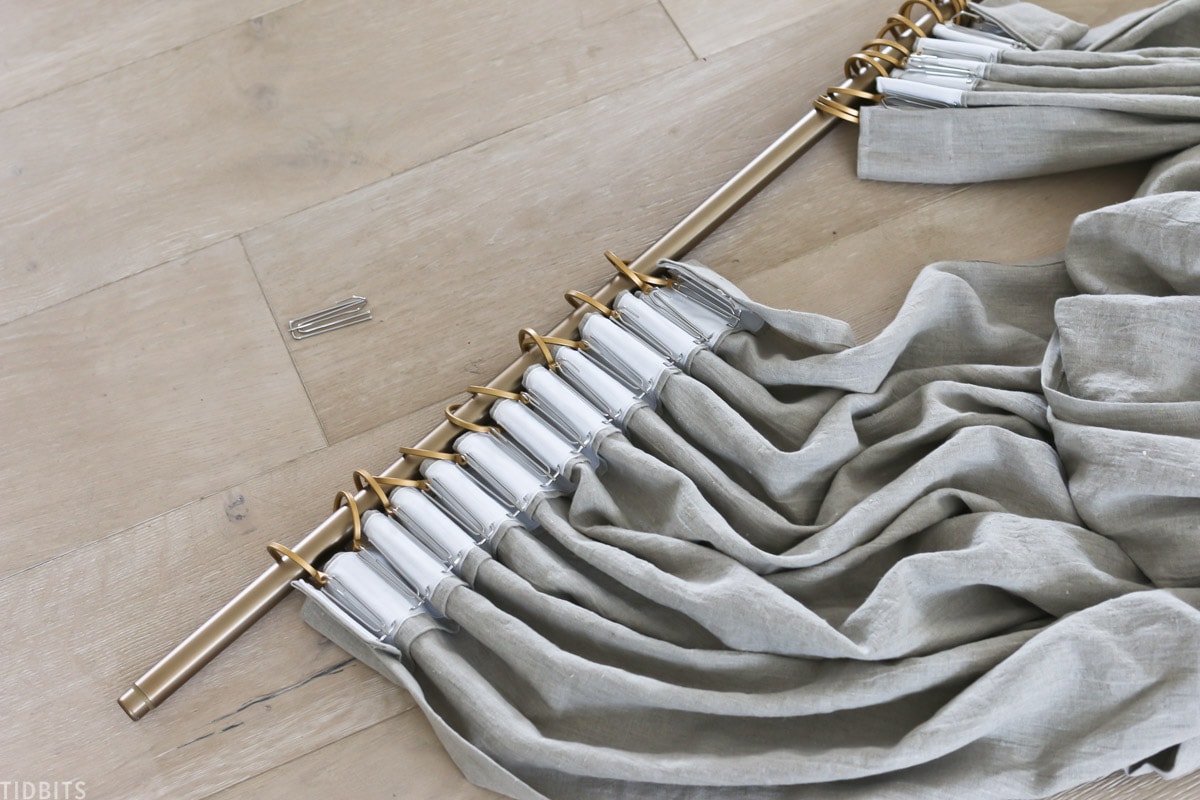
Then you can hang them up on the wall and admire your hard work!
Are DIY pinch pleated curtains right for you?
One caveat to pleated curtains… Because they are pinched together, your curtains won’t actually un-gather and close to cover your window.
They are more for looks than function, but isn’t the look so stylish and comfy?
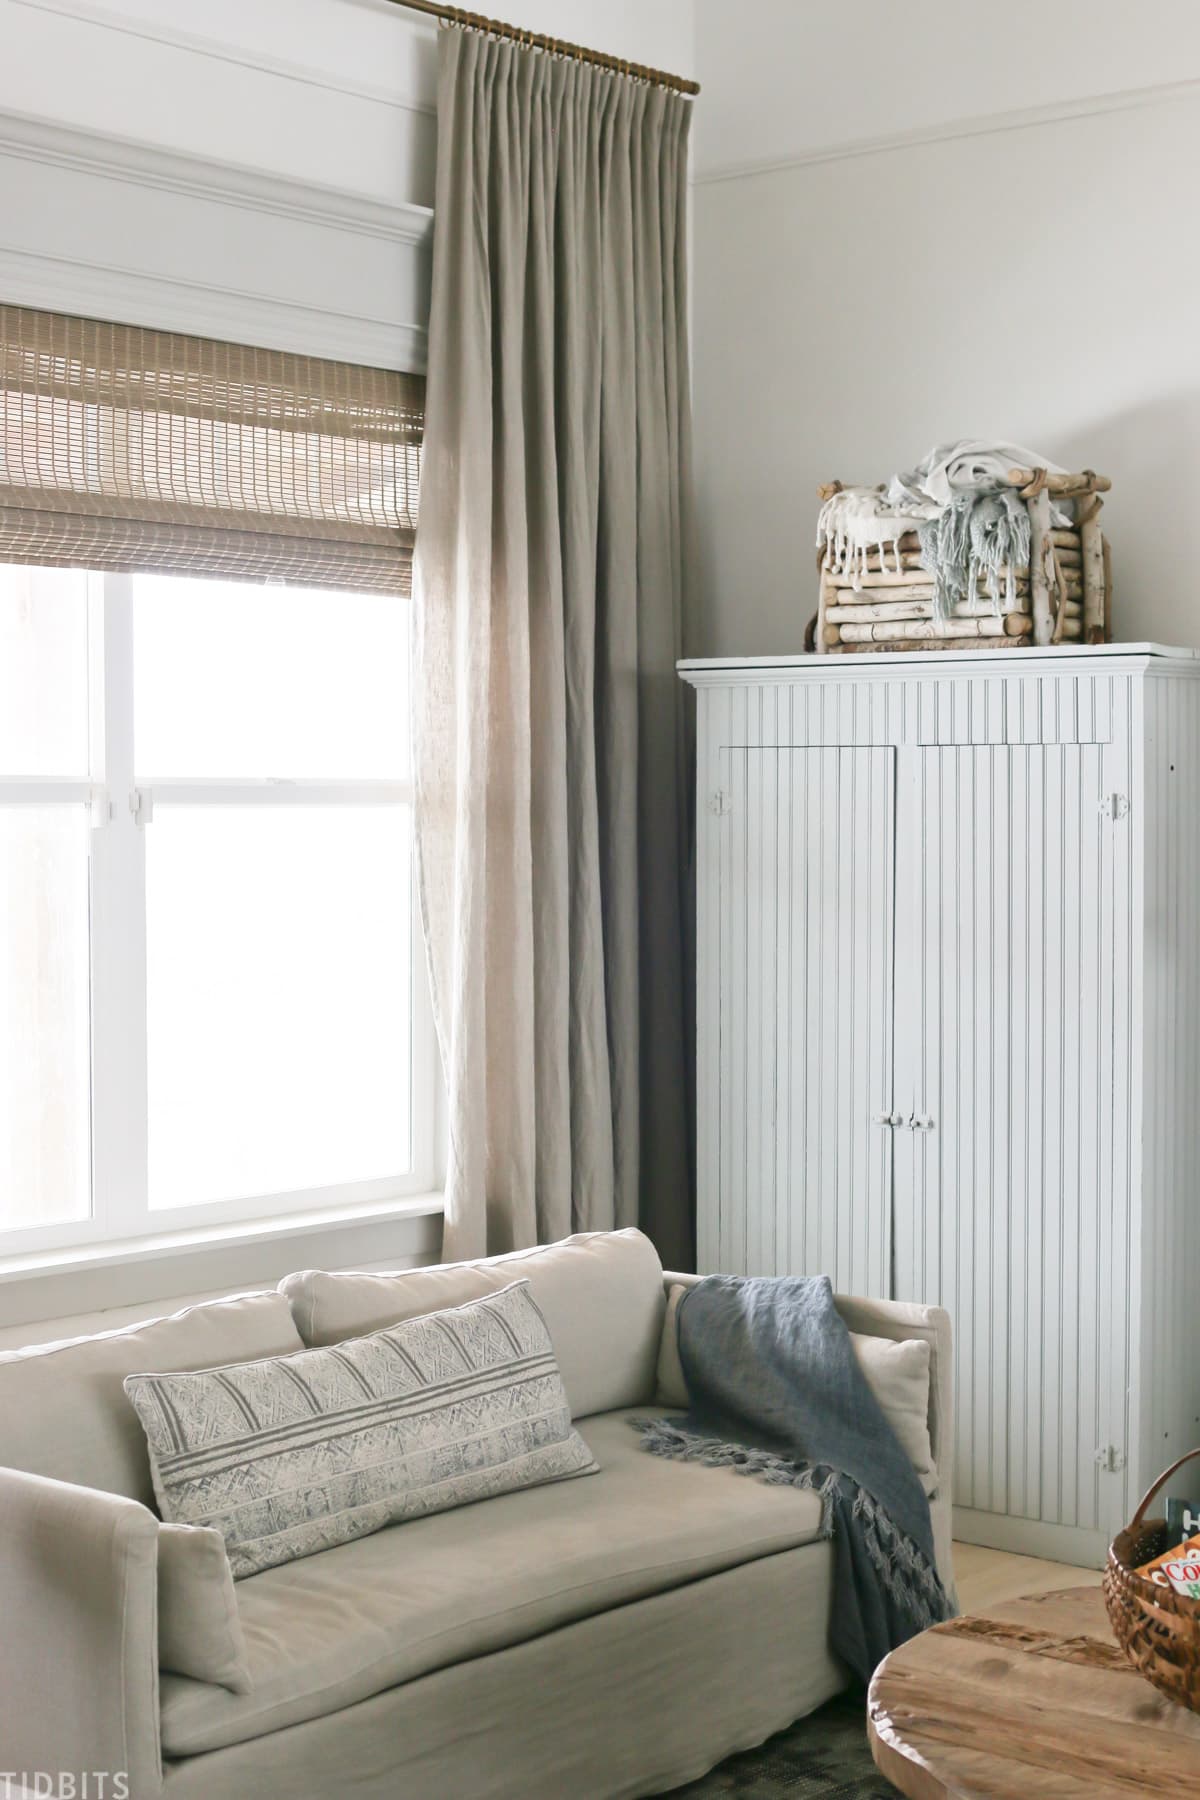
If we ever need privacy or want to filter the sunlight, we have these amazing natural shades.

I got these from Blindsgalore.com, and these are the Bali Natural Shades in Spree Studio. They easily lift up and pull down without any cords needed. I love their blinds!
I hope you enjoyed learning about how to make pinch pleat curtains by sewing pleat tape into your curtains. It’s definitely worth a try!
My living room is finally coming together, just in time to decorate for the Holidays.
Come back to watch my seasonal decor unfold, and then later when I share the living room reveal!
Check out these other home decor ideas for your windows too!
- Affordable Textured Jute-like Roller Shades
- RV Budget Blinds
- How to make a window curtain work for a shower curtain


Love your presentation and instruction!
I haven’t started my pinch pleat drapes yet but have my premade curtains ready to go.
However I have 2 questions. Why they are for looks only. Will I be able to open and close as needed? And second, I would like to add lining to the curtains. Should I do this before adding pleating so it is included in the peats? Thank you so much for the encouraging, lovely video on Youtube.
Love your post on the Pleated Curtains. I’ll start sewing my first set of pleated curtains tomorrow. I thought it was so intimidating, but with your help I’m excited to start them. Thanks again!!
I’ve been so intimidated by making my own pinch pleat curtains but after this tutorial with great photos, I’m going to give it a try. Thanks!
I’m so glad!
Making some curtains and this was just the help I needed! Thank you ???? I also love your couch could you tell me where you got it it’s just what I had in my head. Your site is so pretty.
Your post is right on time and exactly what I need. I also noticed your couch could you tell me where you got it? Thank you for all your help.
Hi Janet! I’m so glad. I got it from a company called six penny. Search on my site and I have a review you might want to read.
Just prepping my linen. My pleat tape and hooks have arrived. Seeing your tutorial just in time. Thank you very much.
hi! just wondering where the inner shade is from!
I bought them from blindsgalore.com. Hope that helps!
As above…i made these drapes to cover a tall and wide bedroom window…a looong time ago….and have forgotten the fabric amt needed…double, triple the width of the window????? Thanks!!!!April Ottavian
Great tutorial! Thank you, for providing the links and instructions. Honestly, you made my day.
Hi! I love to know where did you bought the fabric! Thanks
I would also like the link to the linen fabric you purchased. Just got into our new house and would like to give this a shot! Love the color of linen you chose! Beautiful!
Didn’t see the link for buying linen that you mentioned in video
Those curtains are so perfect for your living room!! Love them – great job!
I ordered one of your Hunter Green linen kitchen towels – absolutely love it! Beautiful linen.
Some time ago you did a write up on oils and the company you recommend for purchasing them! I can’t seem to locate it now and REALLY could use that info now! HELP??
Thanks again for all you provide us!
Hi Brenda! Thank you so much! I’m very happy with how they turned out. That oil company I love is called Rocky Mountain Oils. I love the Non-MLM concept, and they are already priced good. Hope that helps!
Oooooo, I love how the linen looks, Cami! Just gorgeous.
I have been making drapes for myself for over 50 years and find that the methods used today are so much easier for casual drapes. I always want to line my drapes and painstakingly pleat and hand stitch the tops. Glad to see pleat tape is still being used as I have another project in the works and will give your style a try. Very attractive window treatments.