This post may contain affiliate links, which means I get a small percentage of the sale at no extra cost to you. I only recommend items I love and have had a positive experience with. Thank you!
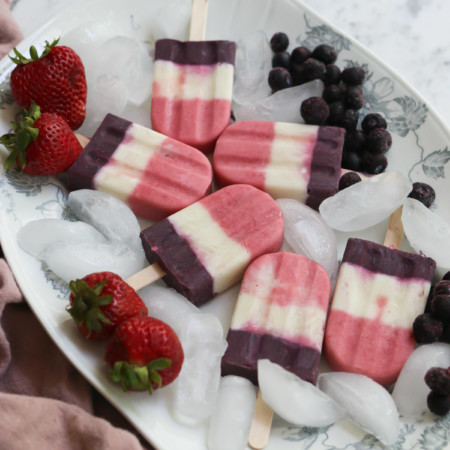
Layered homemade yogurt popsicles are a delicious and creamy summer treat. Choose your favorite fruits and get creative. So healthy and so good!

Are you ready for a super healthy, super delicious layered homemade yogurt popsicle? I hope so, because I’ve got a fantastic recipe for you to try!
With their delightful creamy texture and incredible taste, these yogurt pops are going to be a hit at your summer gatherings.
These yogurt popsicles are made with layers of real fruit blended with yogurt. You can choose the fruits used in each layer to suit your preferences. Customize to your heart’s content! No matter what you do, these are going to be delicious!
This is the prefect summer treat, loved by both kids and adults. I’ll show you how to make these healthy homemade yogurt popsicles at home. It’s easier and healthier than you might think!

Table of contents
- Ingredients and Equipment for Layered Homemade Yogurt Popsicles
- Step-by-Step Instructions
- Printable Recipe Card
- Storing Your Layered Homemade Yogurt Popsicles
- Ideas for Customizing Your Layered Homemade Yogurt Popsicles
- How do I Make My Yogurt Popsicles Creamy and Not Icy?
- Tips for Making Yogurt Popsicles
- Where Can I Buy These Popsicle Products?
- More Homemade Treats to Enjoy
Ingredients and Equipment for Layered Homemade Yogurt Popsicles
Before you begin making these frozen yogurt pops you’ll want to make sure you have the following:
- A blender
- Popsicle sticks
- Popsicle mold
You’ll also need these ingredients:
- 2 cups plain yogurt – you can use store bought yogurt or try my yummy Pressure Cooker Homemade Yogurt.
- 1/2 cup coconut milk
- 1/3 cup pure maple syrup or other natural liquid sweetener
- 2 teaspoons pure vanilla extract or pressure cooker pure vanilla extract
- 1 cup frozen or fresh fruit per layer (strawberries, blueberries, blackberries, mango, pineapple, bananas, cherries, raspberries, peach, etc.)
Step-by-Step Instructions
Once you’re got all your supplies together, follow these simple steps:

- In a blender or bowl mix together the yogurt, coconut milk, syrup and vanilla.
- Set this mixture aside in a separate jar, bowl or container.
- To make your first layer, take 1 cup of the yogurt mixture you just mixed up and put inside a blender. Add 1 cup of your fruit of choice and blend up until very smooth. You can also add food coloring or other options to create a more potent color – but I find it best to leave it out and enjoy the natural color of the fruit. You could add spirulina powder or beet root powder for a healthier choice to make a richer color.
- Fill your popsicle molds up about 1/3 of the way with this mixture, insert popsicle sticks and set in freezer for at least 1 hour.
- If you want the second layer to be white, simply remove about 1 1/2 cups of the yogurt mixture and fill the molds another 1/3 of the way up. You could also add more fruit to this layer, blend and pour.
- Let freeze again for another hour or more.
- For your last layer, blend fruit in with the remaining yogurt mixture and finish filling the popsicle molds. Freeze until completely solid.

The process of making layered yogurt pops is more effort than just one flavor of popsicle, but it is well worth the effort! Eating each layer and getting the different flavors is such a delight!
Printable Recipe Card
The layered popsicles that are pictured in this post were made using fresh strawberries in the pink layer and frozen blueberries in the purple layer, but feel free to adapt the recipe to your liking.
Layered Homemade Yogurt Popsicles
Equipment
- Blender
- Popsicle mold
- Popsicle sticks
Ingredients
Ingredients for Base Yogurt Recipe
- 2 cups plain yogurt
- 1/2 cup coconut milk
- 1/3 cup pure maple syrup (or other natural liquid sweetener)
- 2 teaspoons pure vanilla extract
- 1 cup frozen or fresh fruit per layer (strawberries, blueberries, mango, pineapple, bananas, raspberries, peach, etc.)
Instructions
- In a blender or bowl mix together the yogurt, coconut milk, syrup and vanilla.
- Set this mixture aside in a separate jar, bowl or container.
- To make your first layer, take 1 cup of the yogurt mixture you just mixed up and put inside a blender. Add 1 cup of your fruit of choice and blend up until very smooth. You can also add food coloring or other options to create a more potent color – but I find it best to leave it out and enjoy the natural color of the fruit. You could add spirulina powder or beet root powder for a healthier choice to make a richer color.
- Fill your popsicle molds up about 1/3 of the way with this mixture, insert popsicle sticks and set in freezer for at least 1 hour.
- If you want the second layer to be white, simply remove about 1 1/2 cups of the yogurt mixture and fill the molds another 1/3 of the way up. You could also add more fruit to this layer, blend and pour.
- Let freeze again for another hour or more.
- For your last layer, blend fruit in with the remaining yogurt mixture and finish filling the popsicle molds. Freeze until completely solid.
Notes
- You can use greek or plain yogurt, but you want a pretty runny consistency in the end. You could add more milk or coconut milk in greek yogurt to make it the right pourable consistency.
Storing Your Layered Homemade Yogurt Popsicles
Store your delicious layered yogurt popsicles in the freezer in an air-tight container or freezer bag. The yogurt pops can be left in the mold for storing or taken out.
If you remove the yogurt pops from the mold, I recommend wrapping them with something non-stick like parchment paper or plastic wrap. Alternately, you could just place a layer of parchment paper between each yogurt pop to keep them from sticking.

Ideas for Customizing Your Layered Homemade Yogurt Popsicles
These yogurt popsicles are extremely versatile. Feel free to play around with the ingredients to create you own custom flavor blend. Some ideas for customization are:
- Change up the fresh or frozen fruit or do something like mixed berries in some of your layers
- Try a flavored yogurt base
- Switch up the pure maple syrup sweetener for honey or agave nectar
- Try some coco powder in one of your layers and make a Neapolitan yogurt pop
- Use food coloring to intensify the colors
- Use healthy additives like blue spirulina powder for deep blue color or beet root powder for deep red color
How do I Make My Yogurt Popsicles Creamy and Not Icy?
My best tip for getting delicious, creamy textured yogurt popsicles is to use full fat yogurt. Low fat yogurt will result in more icy texture, but it will still taste great either way!

Tips for Making Yogurt Popsicles
Here are a few helpful tips for making the best layered homemade yogurt popsicles:
- Make sure to get the popsicle stick all the way down into first layer of yogurt.
- Once you’ve got a layer in your popsicle mold, gently tap it to get any air bubbles out.
- You may need to run your popsicle mold under warm water for a minute to loosen the yogurt pops before taking them out.
- If you want to make a stash of yogurt pops, remove finished pops from the mold and wrap individually so you can use the mold for a second batch.
Where Can I Buy These Popsicle Products?
If you are interested in any of the products I used to make these homemade yogurt pops, visit my TIDBITS & Company Kitchen Favorites Moonsift board for links and product details!

More Homemade Treats to Enjoy
You’re going to love these layered homemade yogurt popsicles. It’s the perfect treat for a cool, healthy, summer snack. Make yourself a batch today and tell me what you think about it!
If you want more healthy, irresistible homemade treats and desserts, try:
- Healthy Pumpkin Dip
- Healthy Banana Ricotta Muffins | Recipe
- Grilled Fruit Skewers on Top of Ice Cream
- Delicious Healthy Cake Like Brownies Recipe
- Healthy Pumpkin Pie Filling Recipe – So Good!
- Healthy Chocolate Chip Garbanzo Bean Cookies
- Kefir Elderberry Blueberry Smoothie
- Frozen Crio Bru
- Healthy Chocolate Peanut Butter Banana Smoothie Bowl (with Veggies!)
- Yummy Healthy Hot Chocolate Mix Recipe – NO ADDED SUGAR!
- Healthy Pumpkin Muffins | Quick to Make and So Delicious!
- All Natural Orange Almond Cookies
- 5 Ingredient No Bake Healthy Coconut Bars
- Healthy Pumpkin Smoothie Bowl | Loaded with Nutrition


Make milk kefir. It is so easy, and the kefir milk makes great pops and frozen treats. For some reason they don’t get icy, and the ice cream type frozen treats stay soft enough to scoop, I found some silicone molds that are easy to unmold and have built in stickles. Your layered pops are a great idea. I added some lavender and thought of your new home.
Is it tricky once the stick is frozen in that first layer to take the top off and try to pour in the second two layers….then put the top back on….seems like it could be a bit challenging?
I didn’t find it bad at all, actually. Great question!