
This post may contain affiliate links, which means I get a small percentage of the sale at no extra cost to you. I only recommend items I love and have had a positive experience with. Thank you!
Update 12/14/16: Since some have had issues with this cake fitting in a standard 7 inch springform pan, I suggest either using an 8 inch springform pan (this set is less than $10 at Walmart and the 8 inch fits inside a 6 quart pot. If you have an 8 quart pot, any 8 inch pan will fit) or a 7 inch springform pan that’s greater than 3 inches deep. If all you have is a 7 inch springform pan that is 3 inches or less deep, simply use less batter for each level, then use the extra batter to make a mini cheesecake that you can then secretly stash in the back of the fridge for yourself (this can be done in a mason jar or mini springform pan).
Let’s give another warm welcome to my sister Marci, who is gracing us with what might be my favorite recipe yet! (And I’m fully aware that I might say that every time. My food brain holds on to its latest delights). Wow your guests with this pressure cooker triple chocolate layered cheesecake . . . or make it all for yourself.
That’s okay too 😉
*This post was first seen on Pressure Cooking Today, where we contribute.
Have you ever noticed how particular people can be about their chocolate? Milk chocolate lovers gag when offered dark. Dark chocolate lovers have to buy anything and everything that claims it’s dark. White chocolate lovers think they love chocolate, not realizing that white chocolate is hardly chocolate. But everyone can at least agree on the fact that chocolate desserts will never disappoint in a crowd. Like never ever.
Since get togethers are the name of the game for the next month (or every Sunday around my house) let’s make sure we make every chocolate lover out there happy and bring the milk, dark and white together in a harmonious creamy, dreamy cheesecake made by my favorite appliance (sorry oven), the electric pressure cooker.
If you haven’t tried making cheesecakes in the pressure cooker yet, you are seriously missing out. The texture is like melt in your mouth fudge and I doubt I will ever make another cheesecake in the oven, ever.
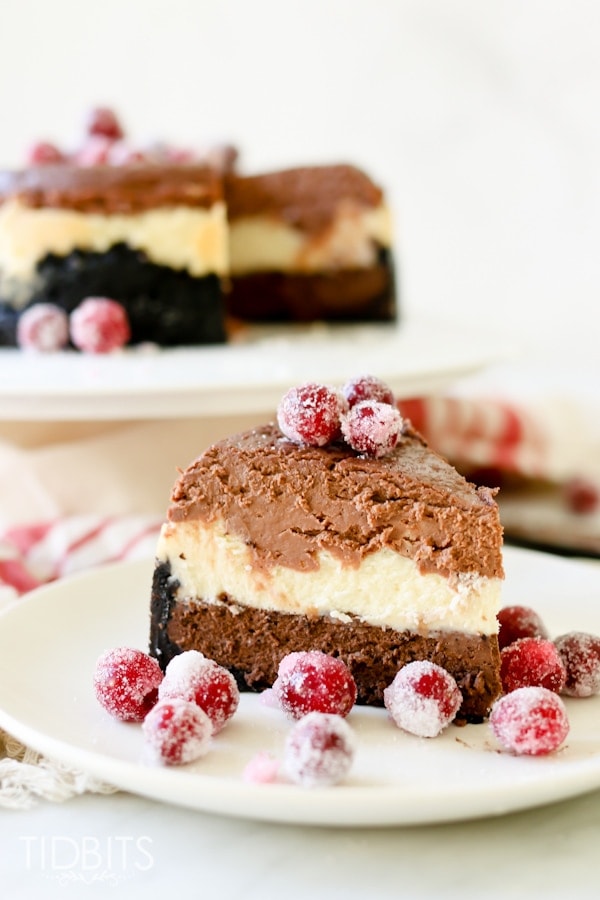
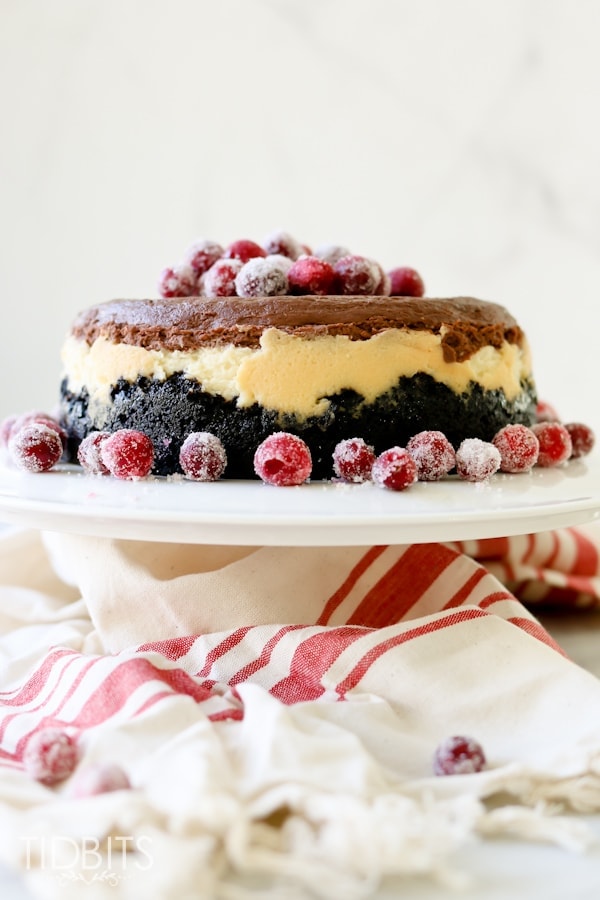
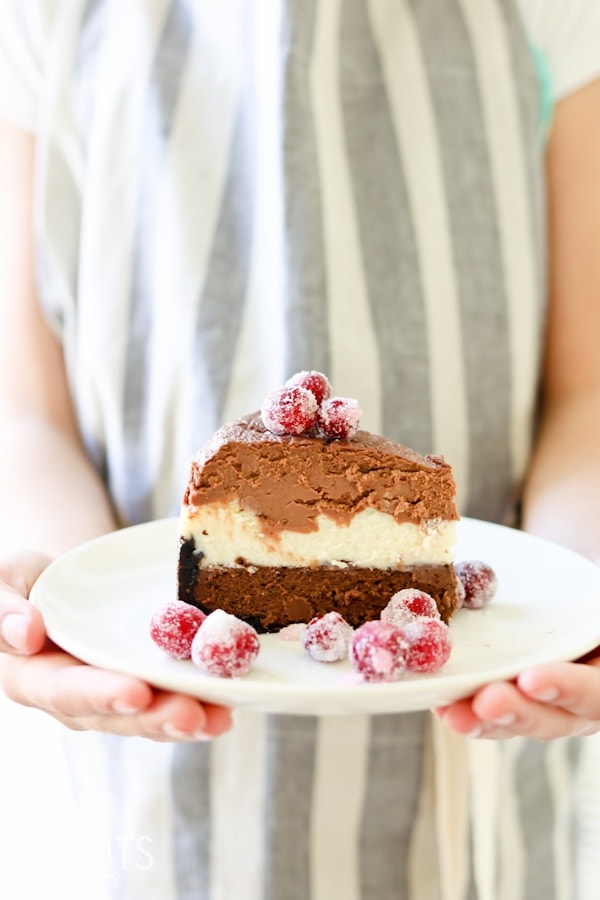
Believe me when I say this triple chocolate layered cheesecake is a complete joy to eat (eat one layer at a time? All three flavors at once? How to decide!).
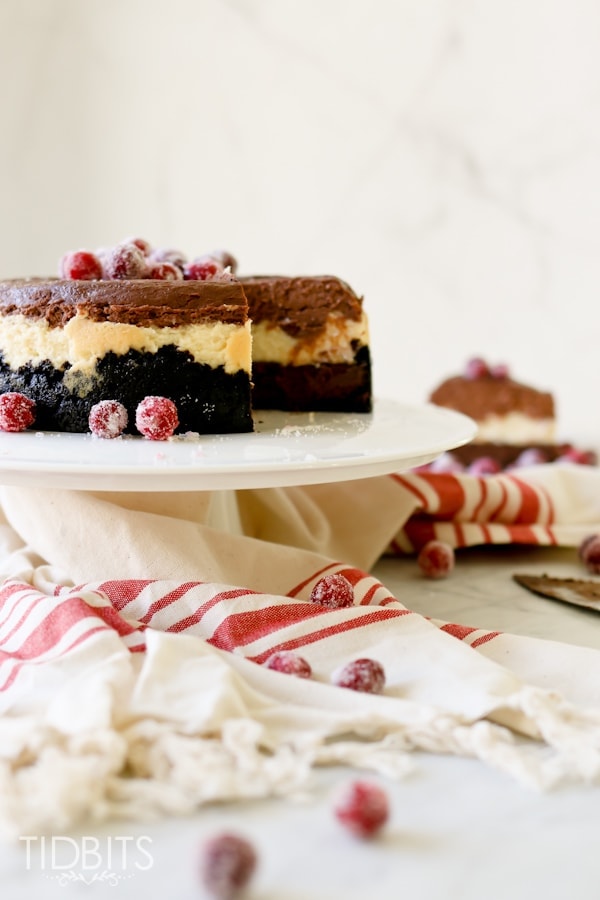
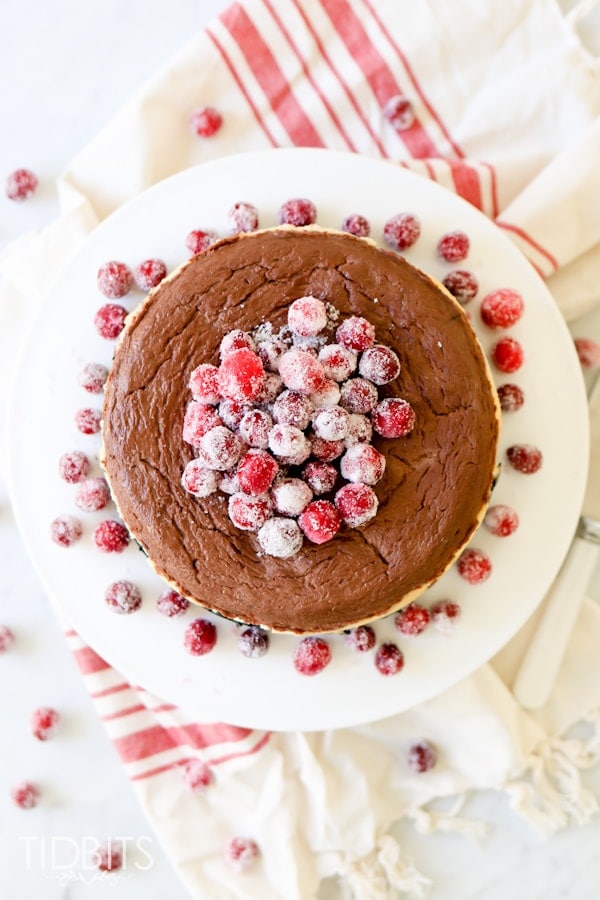
But let’s not overlook the fact that it is also show stopping and will earn you LOTS of oohs and aahs, which is always a bonus at parties! Bedazzle it with sugared cranberries (or crushed candy canes!) and display that baby on the pedestal it deserves! Happy Holidays everyone!
Want more recipes from TIDBITS? Start your search HERE or learn how to use it by cooking your way through each food group in our Master the Electric Pressure Cooker eCookbook.
Pressure Cooker Triple Chocolate Layered Cheesecake
Ingredients
- Crust
- 4 tablespoons butter melted
- 1 ½ cups chocolate cookie crumbs I just throw a whole package of oreos in the food processor, measure out what I need and freeze the rest
- Cheesecake Filling
- 3 8 oz ⅓ less fat cream cheese, room temperature
- 1 cup sugar
- 2 tablespoons cornstarch
- 3 large eggs room temperature
- ½ cup plain greek yogurt
- 1 tablespoon vanilla extract
- 4 oz milk chocolate
- 4 oz white chocolate
- 4 oz bittersweet chocolate as dark as you can find
- Sugared cranberries optional
Instructions
- Spray a deep dish 7 inch springform pan with nonstick cooking spray (could also use an 8 inch springform pan as long as it will fit inside the pot, see pot recommendations above). Line the bottom of the pan with parchment paper for easy removal of the cake once it’s done.
- Stir cookie crumbs and melted butter together and press evenly across the bottom and halfway up the sides of the pan. Place in the freezer to set (this can be done 2-3 days in advance).
- Cream the cream cheese with a handheld mixer on low speed until very smooth, scrape the bowl and mix again. Add sugar and cornstarch; continue to scrape and mix the ingredients together on low speed until well combined and smooth. Add eggs, one at a time, continuing to mix and scrape bowl as needed. Finally, add yogurt and vanilla and mix just until blended. Scrape the bowl and continue to stir by hand until smooth, if needed.
- Divide batter into 3 separate bowls (about 2 cups each). Melt the milk chocolate in the microwave for 30 seconds, stir. Return the chocolate to the microwave for another 15-30 seconds and stir until it is completely melted and smooth. Whisk into one of the bowls of cheesecake batter. Repeat with the white and dark chocolate (each being stirred into a different bowl of batter). Refrigerate the 3 bowls for 15-20 minutes so they will be more firm for layering.
- Remove the bowls from the fridge. Take the pan with the crust out of the freezer. Time to layer!
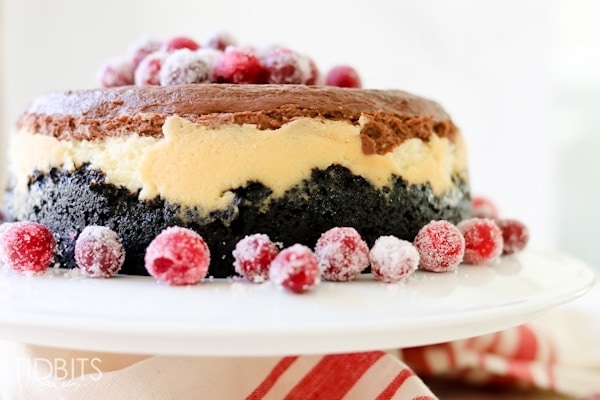
- Pour dark chocolate batter into the center of the crust and smooth to form an even layer. Very carefully spoon dollops of the white chocolate batter on top of the dark chocolate, gently smooth over the top (GENTLY so the layers don’t mix together). Repeat with milk chocolate batter.
- Add 1 cup of water to the pressure cooker pot and place trivet inside. Carefully lower the prepared pan onto the trivet. Secure the lid and turn pressure release knob to a sealed position. Cook at high pressure for 45 minutes.
- When pressure cooking is complete, use a 10 minute natural release and then release any remaining pressure.
- Remove pan from pressure cooker and let cool for 10 minutes. Slowly remove the springform ring, being careful not to break the crust. Allow the cake to cool completely and then cover and place in the refrigerator (at least 4 hours, overnight is best).
- Before serving, let stand at room temperature 30-60 minutes. Decorate with sugared cranberries, if desired.
Check out this great post about making cheesecakes in the pressure cooker.

Recipe adapted from Womans Day


Hey y’all, I made this over a five day period. Yes there were two days I did nothing. But it got done. I made the crust and threw (well, gently placed) in my freezer, covering the crust with a plastic deli sheet. (Love my restaurant supply store!!!)
Two days later I made the filling. The cream cheese was 100% room temp, but not the eggs. A five minute dip in a plastic cup filled with warm water fixed that. Then comes the chocolate. The dark was a 4 oz Giardhelli (sp?) bar with a raspberry flavor (bought for 50c at a nearby grocery outlet — my favorite food shopping haven). I didn’t have milk chocolate so I used a bar of German sweet chocolate. It was a bit lighter than the dark chocolate bar, that also was acquired at the grocery outlet for 99c. Then on to melting the white chocolate. Alas, the chips burned (too long in the microwave or maybe they’d been in the pantry too long). I didn’t want to have a plain layer — so I used my caramel flavored syrup for ice cream. All into the fridge (each bowl covered with plastic wrap).
The next day I took it all out and started layering. The chocolate layers were very thick — the caramel, since the syrup was much more ‘liquidy’ was not. This ended up making the two top layers a bit of a swirl,as the top chocolate layer sunk into the caramel layer. Before I added the chocolate layer, I sprinkled it all over with coarse salt. Then I baked according to the directions.
It came out PERFECTLY! I think I’ll be trying different flavored syrups (such as strawberry) with good white chocolate next time (and watching the melt in the microwave much more closely!).
Heather! You have my mind spinning with all the possibilities. Syrups! Flavored chocolate bars! I rarely eat dessert yet I’ve got 10 new cheesecakes pouring onto my notepad right now. Thank you so much for sharing! Chocolate, Raspberry, Caramel…I’d say you’re pretty much a genius 🙂
I think it corrected itself… I don’t see it.
Sorry, I’m not sure if you can delete that last reply I added. It was an error.
Hi. Thanks for this recipe. We don’t like dark chocolate so I replaced it with 8 oz of semi-sweet chocolate chip (I doubled the chocolate to make it darker).
I made it in the 7 inch pan. It didn’t all fit and it overflowed in the PC enough to lose most of the top milk chocolate layer. I thought it was ruined…
Then I put the leftover filling separately in 3 ramekins and cooked them in the PC for 15 mins.
When they were done, and while still hot, I used the milk chocolate filling and spreaded it over the top of the cake. By then the cheesecake was cooled a bit and somewhat firm.
When all cooled, it looked much better!
After having it in the fridge overnight, I sprinkled the top with icing sugar and then grated some cadbury dairy milk on top instead of the sugared cranberries. I looked and tasted great!
Next time I’ll try the 8 inch pan. I see that it fits in the 6 quart Instant Pot but not easy to remove. I saw some suggestions to make a aluminum foil sling that goes under the pan, on the trivet, and pulls up on each side of the pan. So we can lower the pan with it and then lift it up when done by holding the foil on each side.
To make a foil sling, just take a long strip of aluminum foil and fold it into thirds lengthwise.
Monia, you are quite the improviser! I’m glad you could make it work and your topping sounds magical! I put an update on the recipe to use a 7 inch pan greater than 3 inches deep or an 8 inch after reading your experience so thank you so much for your feedback. What 8 inch pan do you have that fits? The Walmart one I linked to works, but I’d like to find one that people can order from Amazon to make it more convenient. And I use the sling trick often, works like a charm!
Thanks for your reply. I bought a pan similar to the one you suggested. It includes 3 pans: 7 in., 8 in, and 10 in.
I found one 8 inch pan on amazon.com for $11.45 (Norpro 8-Inch Nonstick Springform).
https://www.amazon.com/gp/aw/d/B0000VZ59K/ref=mp_s_a_1_1?ie=UTF8&qid=1482118503&sr=8-1&pi=SX200_QL40&keywords=8+inch+springform+pan&dpPl=1&dpID=41KMAAK7VJL&ref=plSrch
Thanks Monia! I actually ordered that one today (along with 5 others) to find one that fits the best.
Making this know BUT:
Question…can I use chocolate bits/chips/morsels (for cookies etc) instead of regular chocolate? AND if I can, would it be too sweet?
Lisa, I never tried it, but I believe it would work just fine. And no, I don’t think it will have a big affect on the taste, it will still be amazing!
Oh good! So glad because I went ahead and did white chocolate bits and the milk chocolate bits, Ghiradelli. The dark chocolate was 80% unsweet though. Also, it seems that when I cook cheesecakes in my stovetop or electric PC, I always need to add about 5-10 min to it because they come out jiggly (a word?) in the middle. I have the fat daddio pan and it did overflowed just a tad but nothing to go crazy about. :0) Can’t wait to try!! I’m SURE it will be amazing!
Lisa, I’m so happy it worked for you! What are the dimensions on your pan? Did it look okay or did the overflow ruin it? I feel bad about that!
This was truly amazing! It was my husbands birthday cake and he could not stop talking about it, which say a lot. My pan is a 7″ Fat Daddio pan. I probably should not have mentioned the overflow as it was barely anything. For how fantastic it came out, I’ll pretend it never happened! :0) It didn’t ruin it at all. Just the usual little water on top that you absorb with a little piece of paper towel. I’ve made just about every one of Barbara’s cheesecakes but this one tops them all (don’t tell Barbara, however I do like her Mocha chocolate cheesecake). I think because you used 3 cream cheeses and it was bigger. A little more work but it will be saved for special occasions for sure! Thank you!
Also, my pan is 3″ deep. I made a peanut butter ganache to drizzle on top of each single serving. My husband LOOVES peanut butter!
Lisa, LOVE the peanut butter idea! I’m absolutely using that the next time I make it. I’m glad to hear that it worked okay in your pan. I tried it again in an 8 inch pan this week and it’s just not as pretty with the thin layers. I’ve learned so much from Barbara so she should take that as a complement. You made my night! Merry Christmas 🙂
I made some suggestions above for pan recommendations to make sure the cake fits! Check the links under the title! Some people have had issues fitting the cake inside their 7 inch springform pans.
It’s my first time baking a cheesecake and I don’t have a pressure cooker, can I use a regular oven?
Cherry, Absolutely. At the end of the post is a link to the original recipe from Womans Day. You can follow that recipe for the oven version.
I want to make the triple chocolate layered cheese cake but I only have a 9inch spring pan that will fit in my electric pressure cooker xl but I need to change the quantity ingredient to fit my 9 inch spring pan as well as the time to pressure cook the cake. Could some help me with the info? I’m very eager to try this recipe!!!!
Cassandra, You could probably get away with 1 1/2ing the recipe. I would add 10 minutes to the cooking time, check it, then add another 5 or so if it’s still really loose. I’m jealous! I haven’t been able to find a 9 inch spring form that will fit in my 8 quart pot. All the ones I’ve tried have some type of lip that won’t allow it to fit. Let me know if you try it!
Looks so pretty with the red striped towel! Where did you purchase it?
Katie, Cami says she got it from World Market 🙂
Hi. I can’t seem to see instructions about how long to cook in the pressure cooker and if it’s on high, etc.
Am I missing something? I’m reading it on my phone and I wonder if that’s the reason… Thanks.
Got it. I see the info now. Thanks
Monia, You were right, sorry I fixed that!
Any reason why one can’t use regular cream cheese instead of the reduced fat? I refuse to use anything that is fat reduced or no fat.
Yes you absolutely could use regular cream cheese. I’ve also subbed a greek yogurt/cream cheese blend I found at the grocery store once with great results.
Why don’t I see the part where it goes in the pressure cooker?
Also, what chocolate did you use?
I made my first NY cheesecake in the PC for Thanksgiving and it was fantastic. I topped it with homemade cranberry sauce.
Alison
Oh wow! Good catch. Somehow that last part didn’t get copied and pasted right when I was writing the post, I fixed it! I’ve used both Baker’s brand as well as chocolate chips and they both worked great. And that’s an amazing idea for a cheesecake. I’ve got tons of cranberry sauce left in my freezer. I will have to give that a go! Thanks again!
Amazing. If I put in 1/2 pint mason jars, do I reduce the cook time? Could I lay the lid on top so I could stack in the inner pot? Great Christmas gifts if I can figure out!
Gina, That would be a good lookin Christmas gift! I’ve never tried it, so I can’t guarantee this would work, but if I did it, I would cook for 20 minutes and instead of putting the lids on the jars, I’d just put a trivet on top of the bottom row and stack more on top of that. Let me know if you try it! I’m inspired and I think I might do the same for girls at work 🙂