
This post may contain affiliate links, which means I get a small percentage of the sale at no extra cost to you. I only recommend items I love and have had a positive experience with. Thank you!

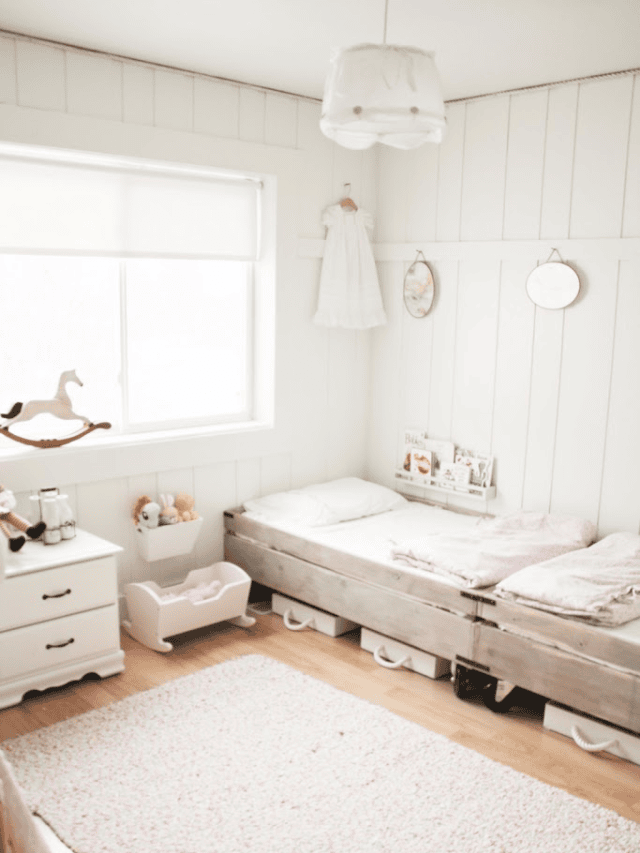
 We had a twin bed in there and a crib, plus a dresser and nightstand (not seen). That pretty much took up the whole room. They never played in there. It was just a dark sleeping room.
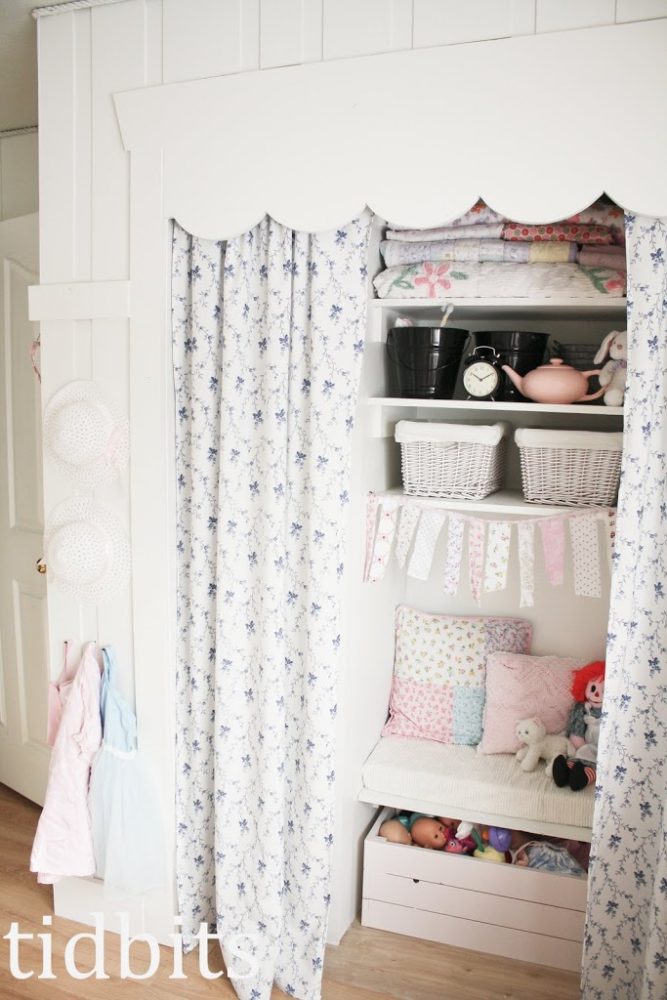
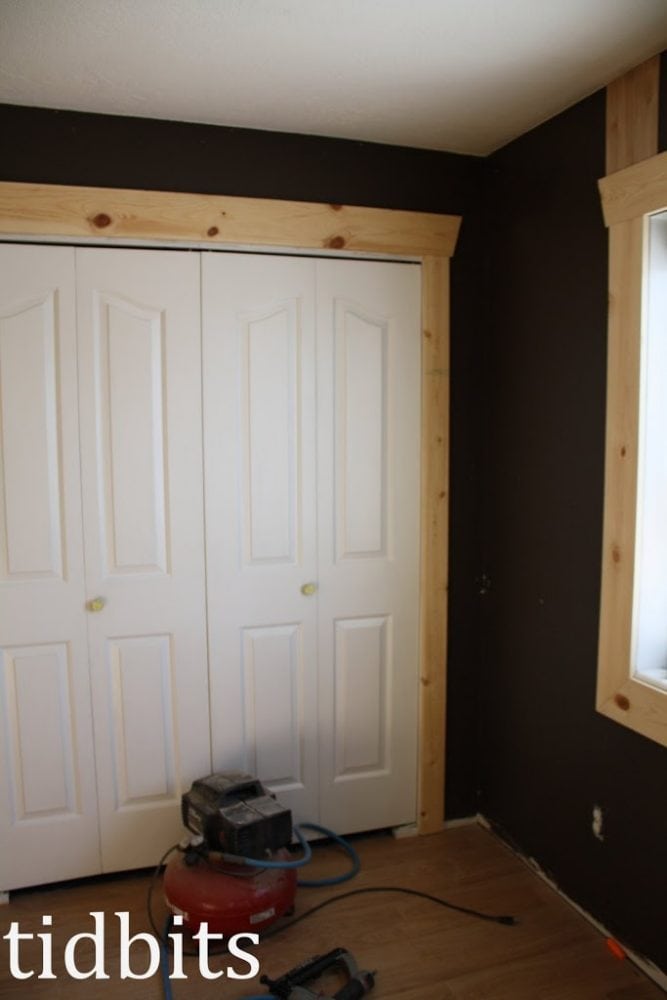
He also cut me an adorable scallop to frame off the closet. Now it is a sweet little cozy spot with some fabric scrap bunting.

As always, we did things as thrifty as we could.
And as homemade as possible. That is how we roll.
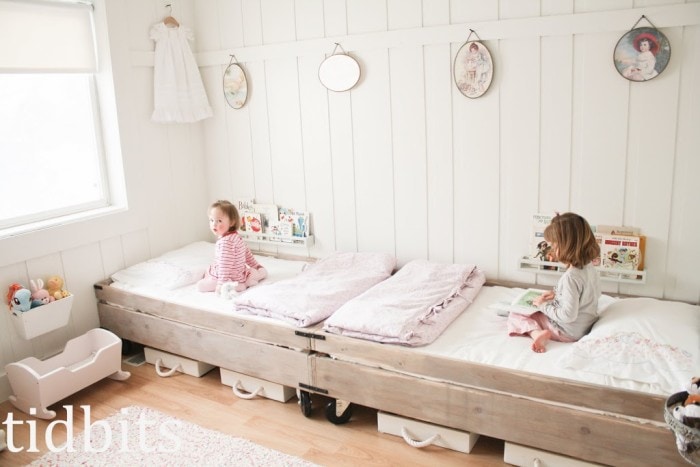
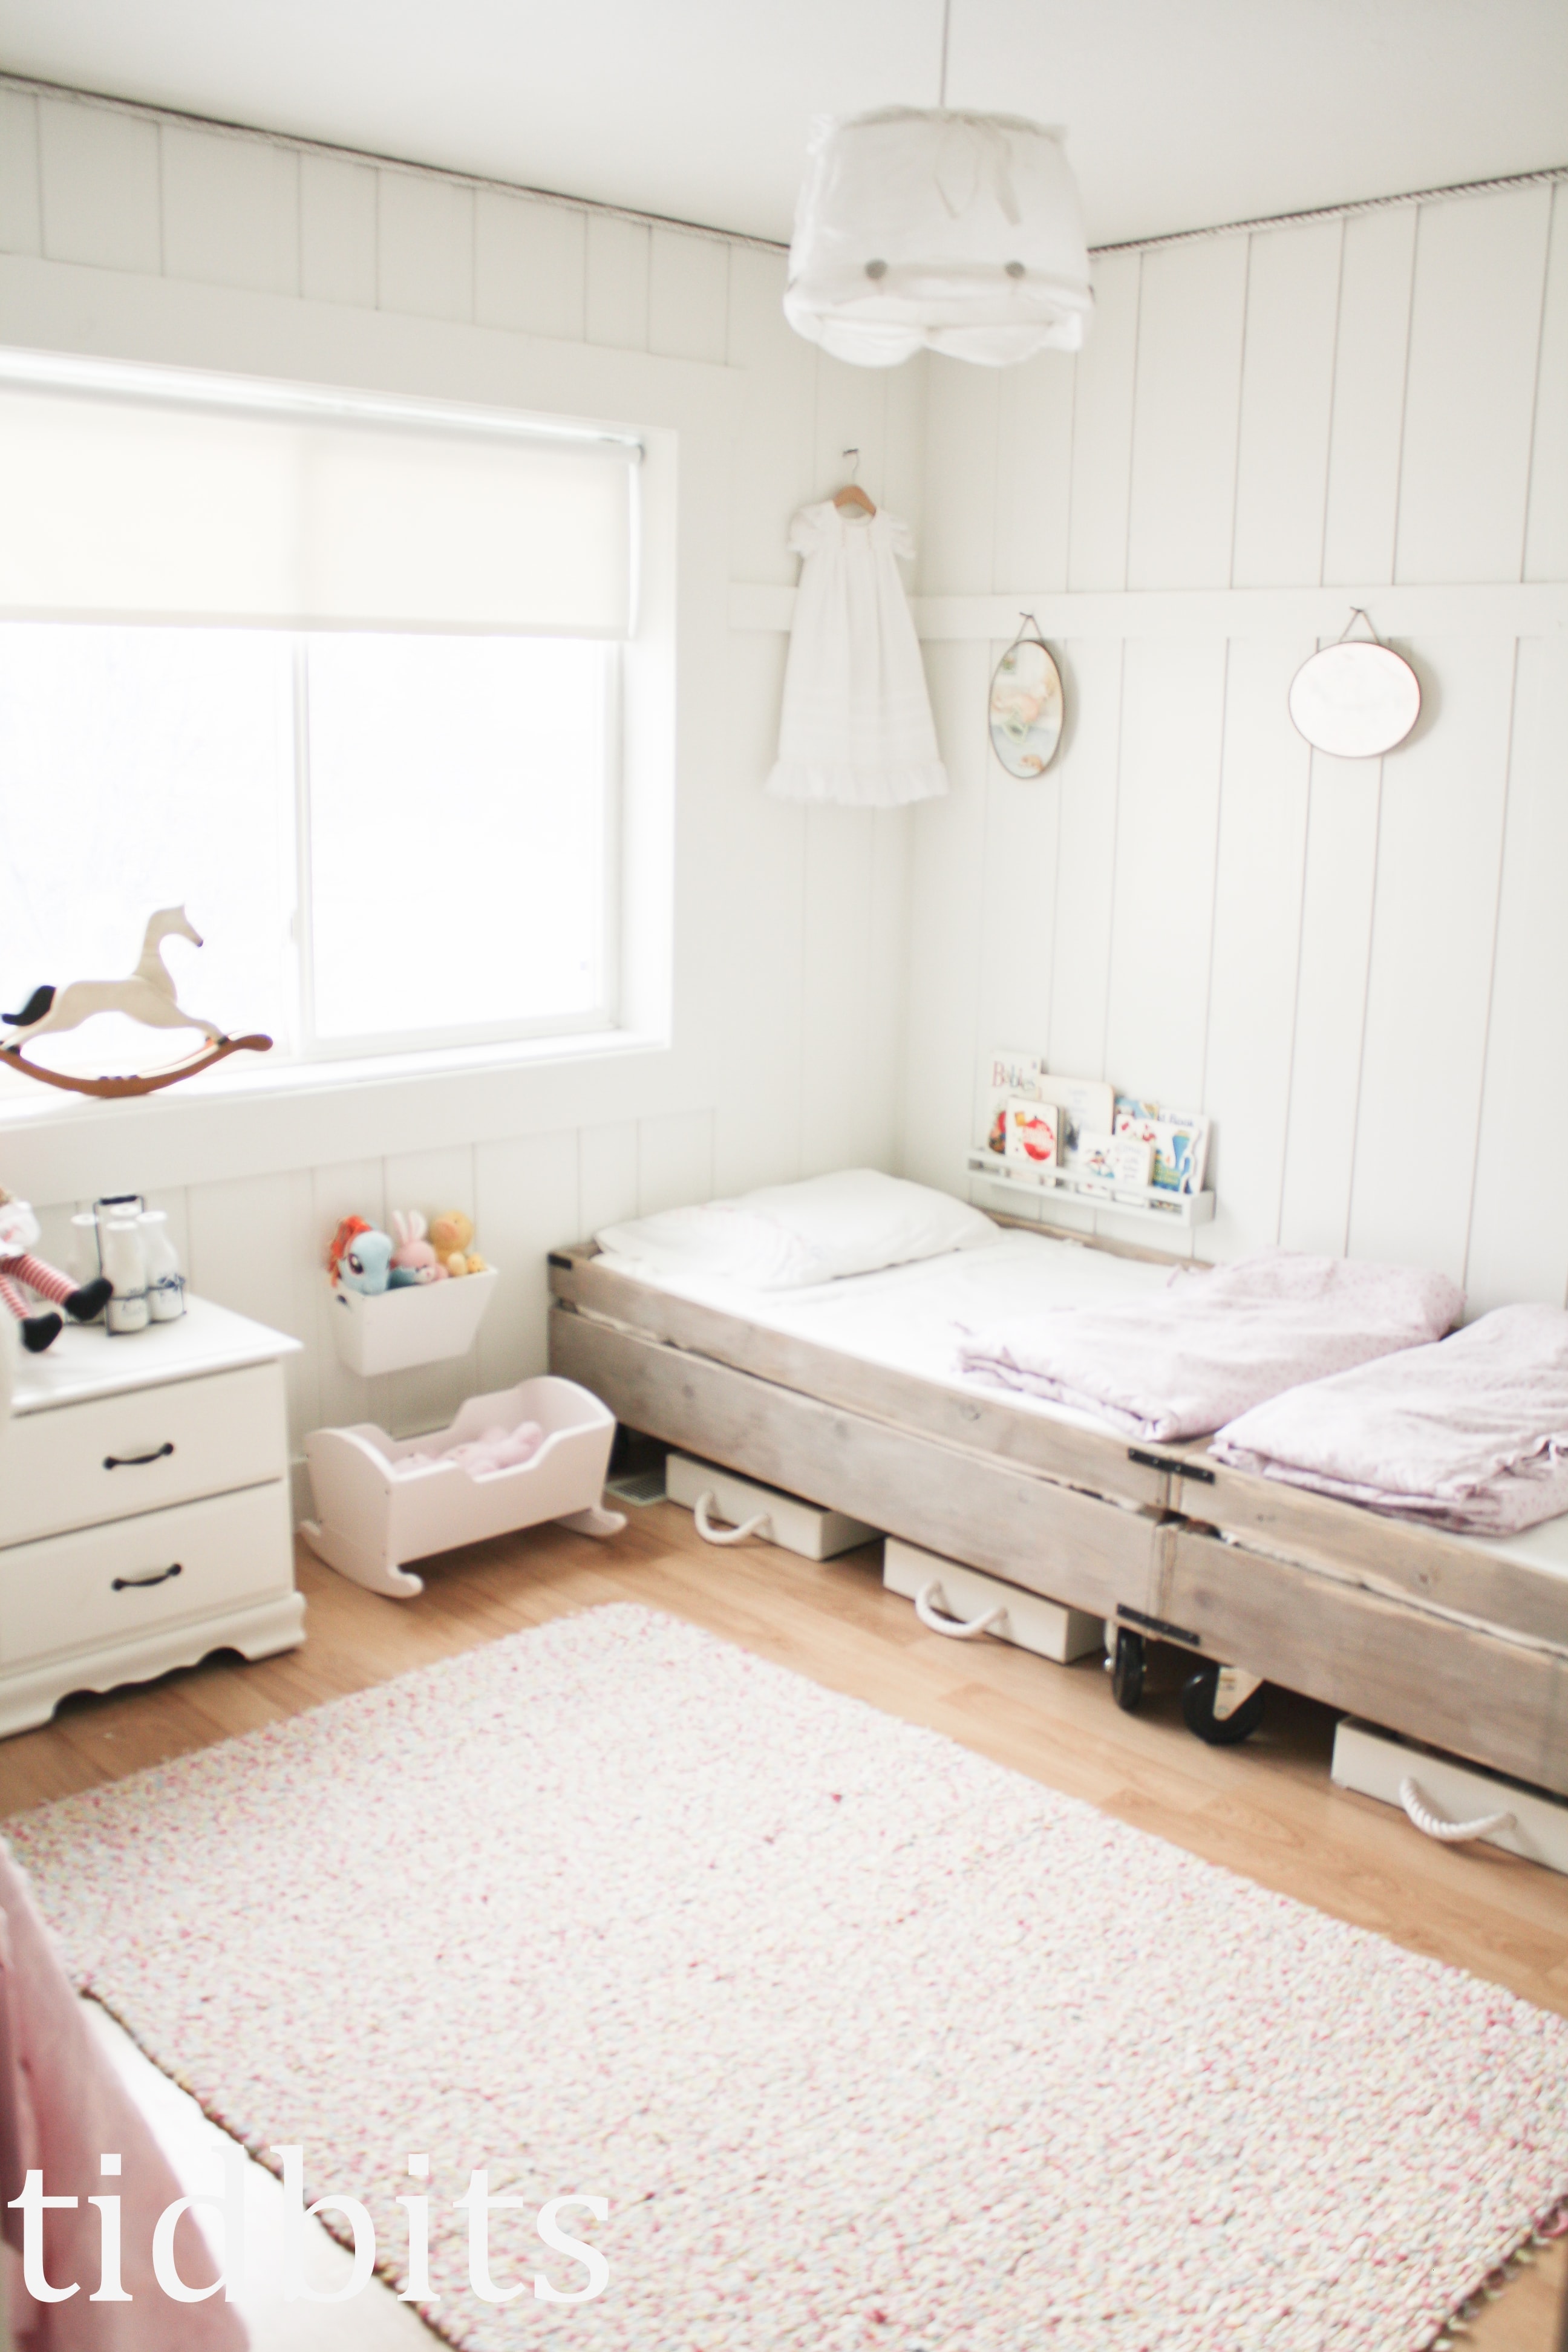
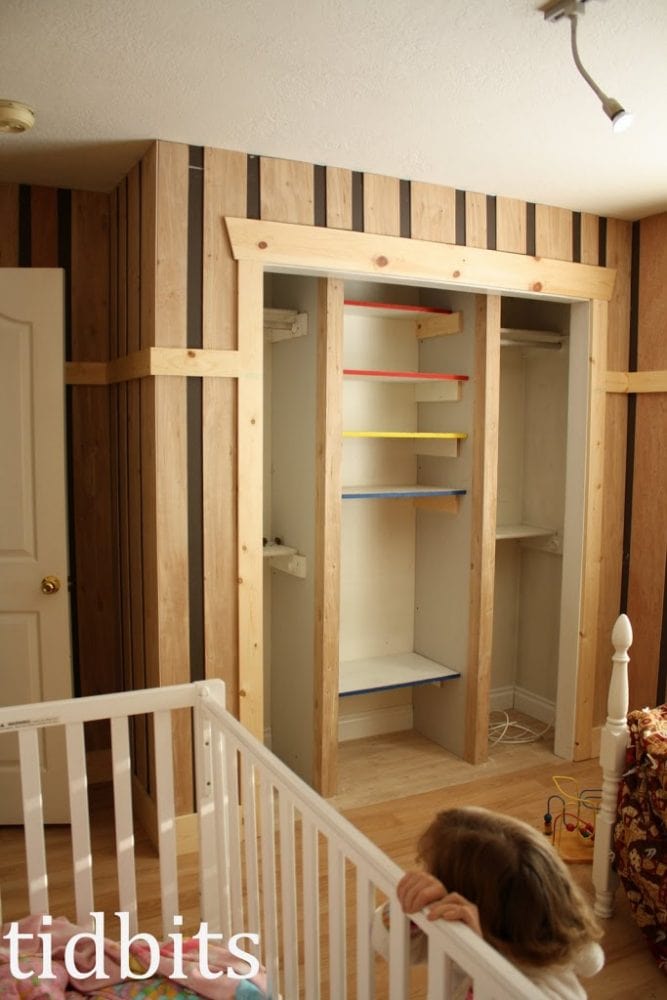
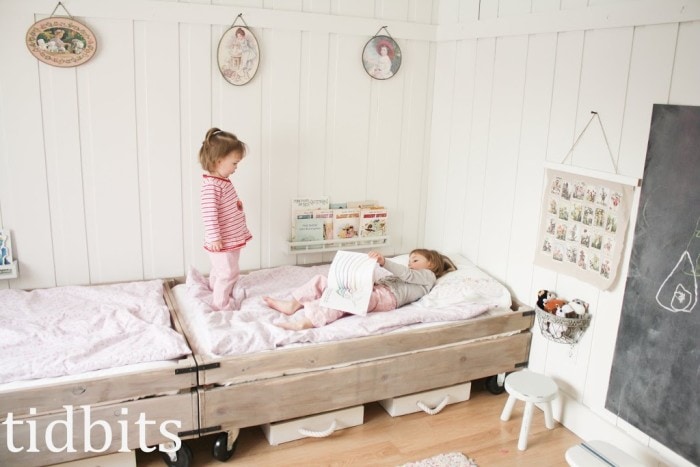
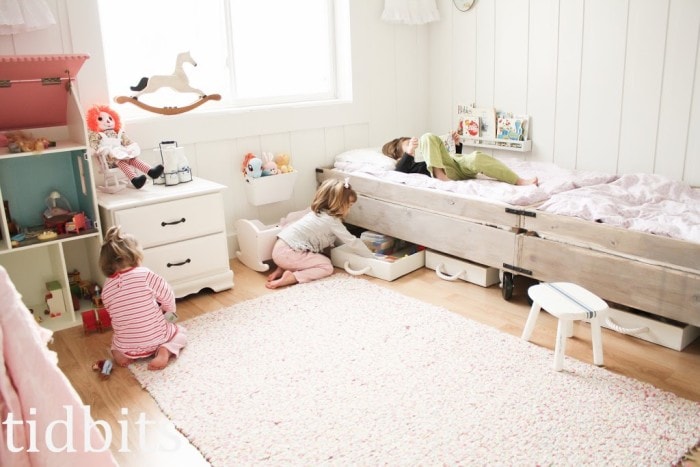
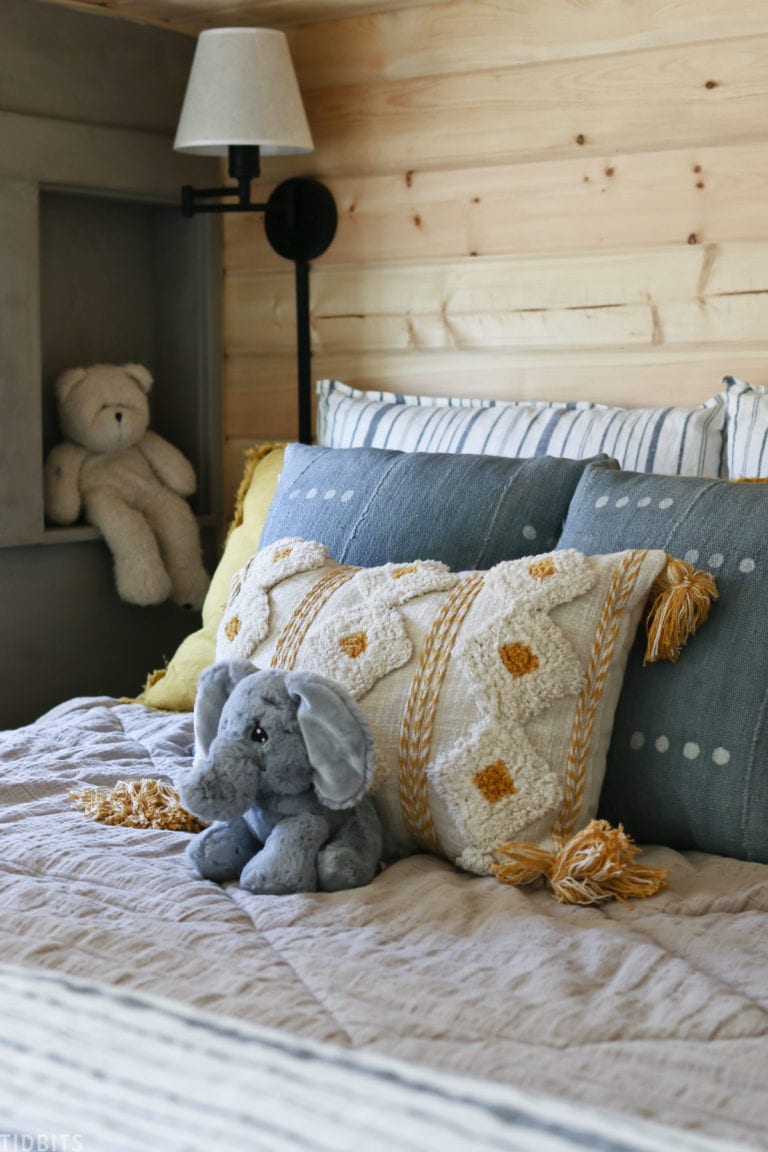
I think the beds are the real eye catchers. They came about as I was trying to solve a few problems with the small space. I knew it would open the room up to put the beds along the far wall, but that meant each bed could only measure 63 inches. Twins are 73, and cribs are too small for my 4 year old.
In comes my hubby and Ikea to the rescue.
I told my love I wanted beds that looked like crates on wheels. Then came a hesitant, “Oooookay dear. Whatever you say.” (I’ll give you more details on the beds in the next post).
Then I told Ikea I wanted adjustable mattresses. And who knew they had already read my mind and had just the thing in exactly the perfect size.
Then I drug my girlfriend 2 1/2 hours away to Ikea so we could go get them.
I was one happy woman.

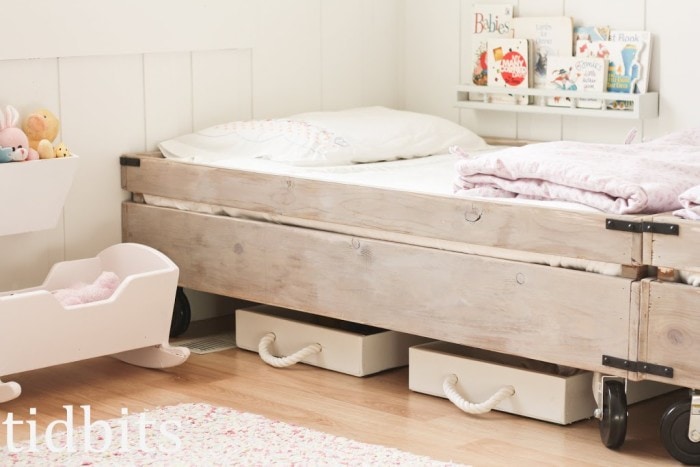
But of course my genius husband took it one step further. You can reach under the mattress and lift up for storing blankets and out of season clothes. It is great.
All in all both of the beds cost 60 dollars for the wood and $140 for the mattress’s. That is a steal.
While I was at Ikea I snagged their 4 dollar sheets and 3 dollar white fleece throws. I had to hem the sheets from the bottom to fit the bed.
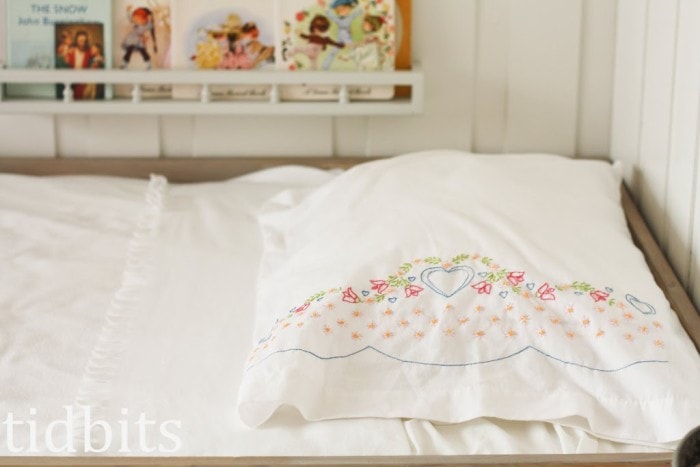
The pillowcases came from my mother’s vintage linen’s that have been passed down. Not sure who made them, but somewhere along the lines of grandma or great grandma.
The comforters were made by me. I cut apart an old twin comforter we’ve had for years and covered it to make a down comforter. Then I basically sewed a big pillowcase with ties for the duvet cover. Both came together for $15, the price of the fabric for the duvet.
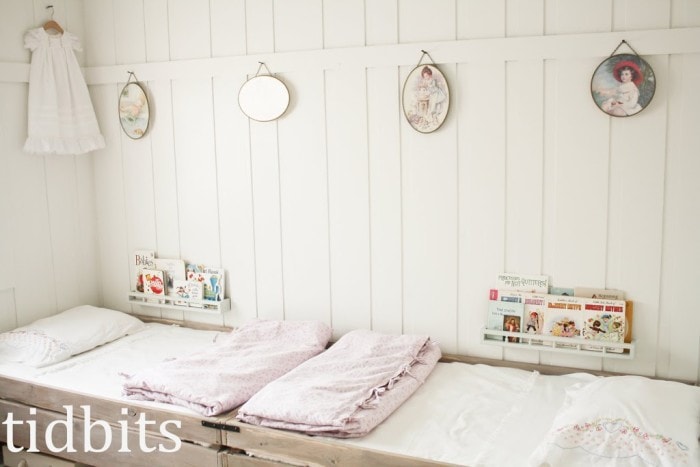
We fold them up on fancy days …
and lay them out on realistic ones. Either way, I think they look great.
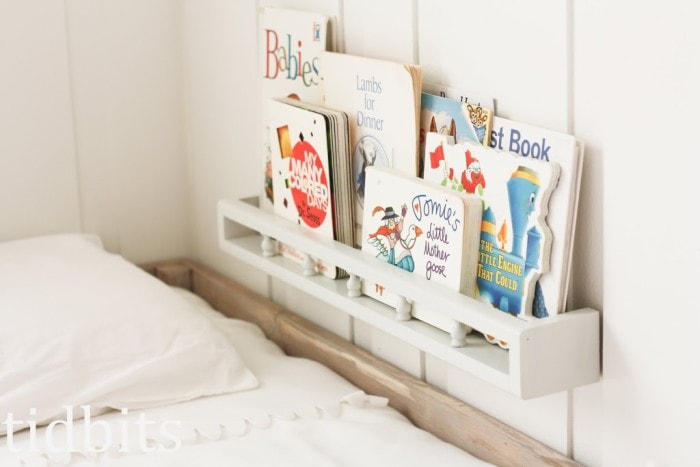
My mom gave me some old plate racks she didn’t like in her house any more. I painted them Benjamin Moore Gray Owl, and used them for book racks. Thanks mom.
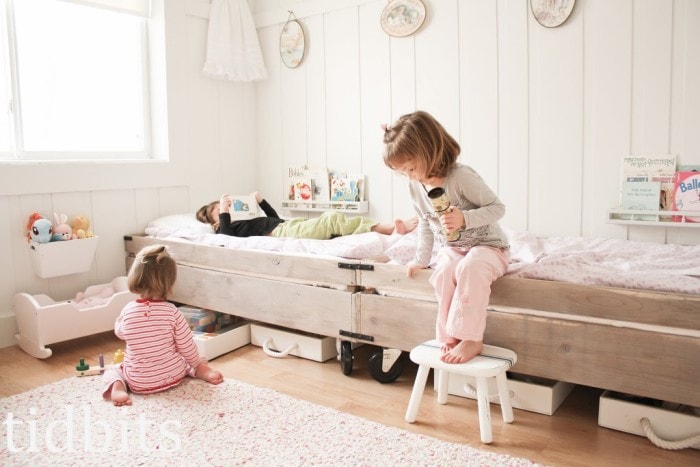
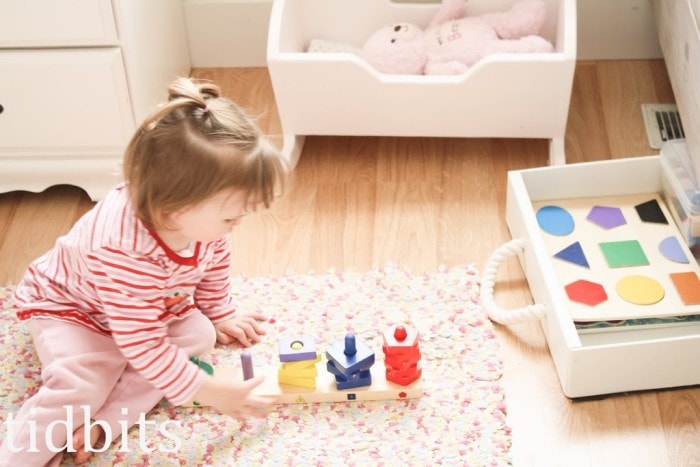
All the girls think the beds are pretty fun. The 2 year old has taken awhile to adjust to a big girl bed. She likes to explore at night time. Yikes.
I’ll add here, the rug I found at a thrift store for 8 dollars. Love it and it washes great right in my washer.
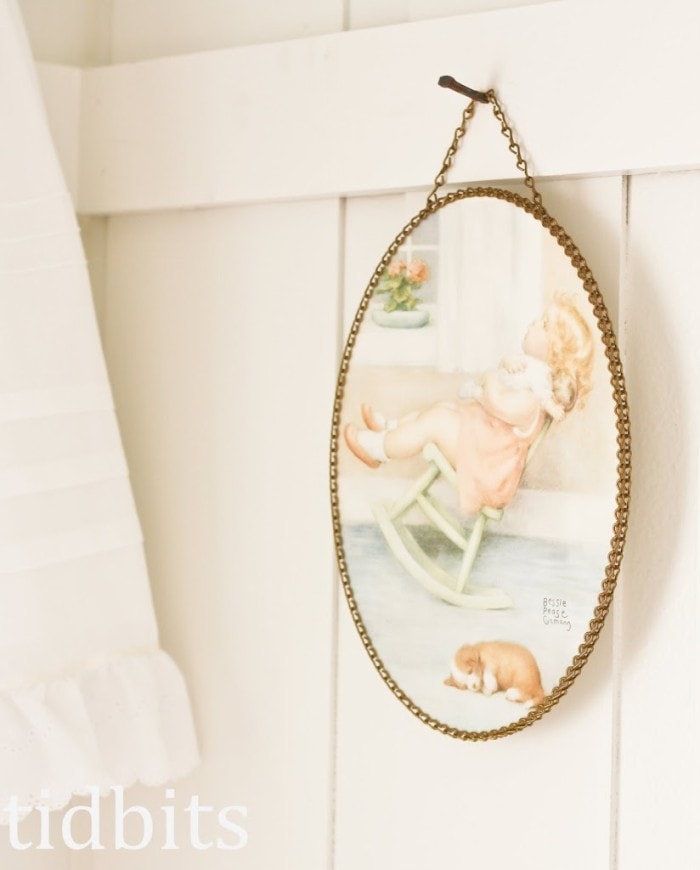
Above their beds are these cute frames I’ve been working on collecting for years. They are kind of hard to find. The above Bessie Pease was the first one I fell in love with at an Antique store. I’m so excited to have a cute place to display them now. The frames are old Victorian Flue Covers they used to use to cover the holes from old stove pipes . . . . . . I think.
I hung everything with old rusty square head nails. They are buggers to get into the wall. You should see my thumb.
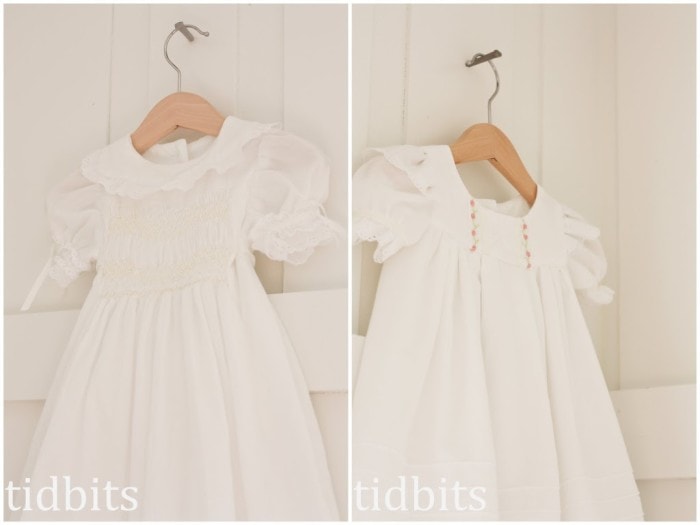
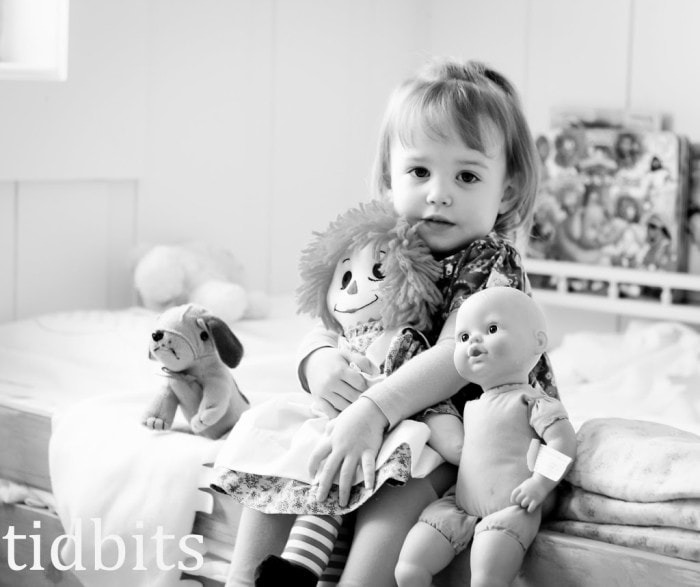
Their baby blessing dresses made from their grandmother are also on display. It seems a shame to stick those in a box.
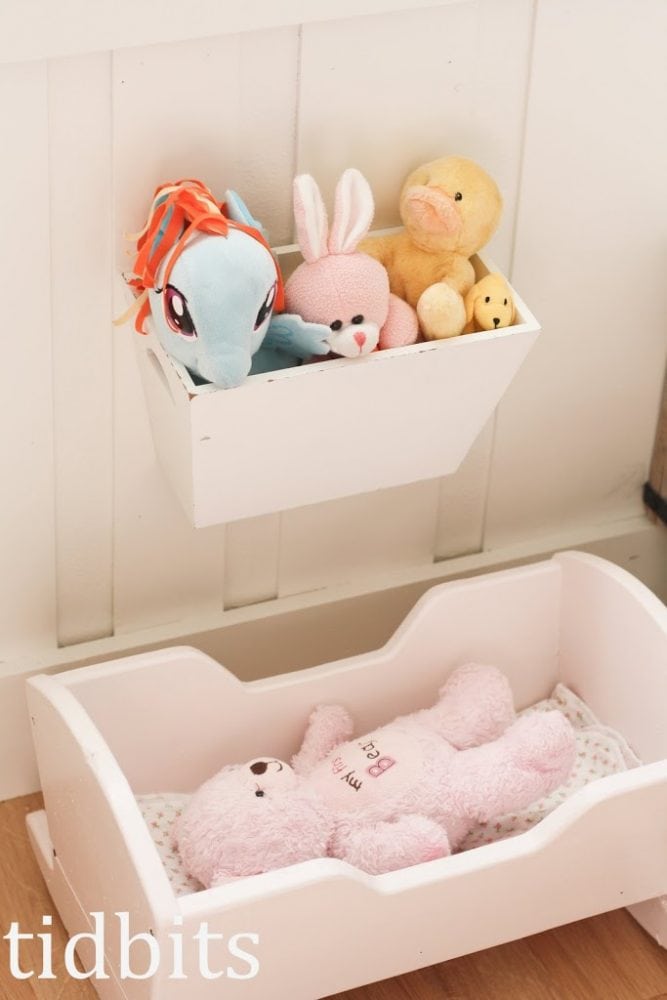
We needed a place for friends, and the thrift store again delivered with a $5 cradle (painted, of course) and a $2 box screwed onto the wall.
On the other side we used a rusty old planter for her friends, and my husband made that stool from scrap wood.
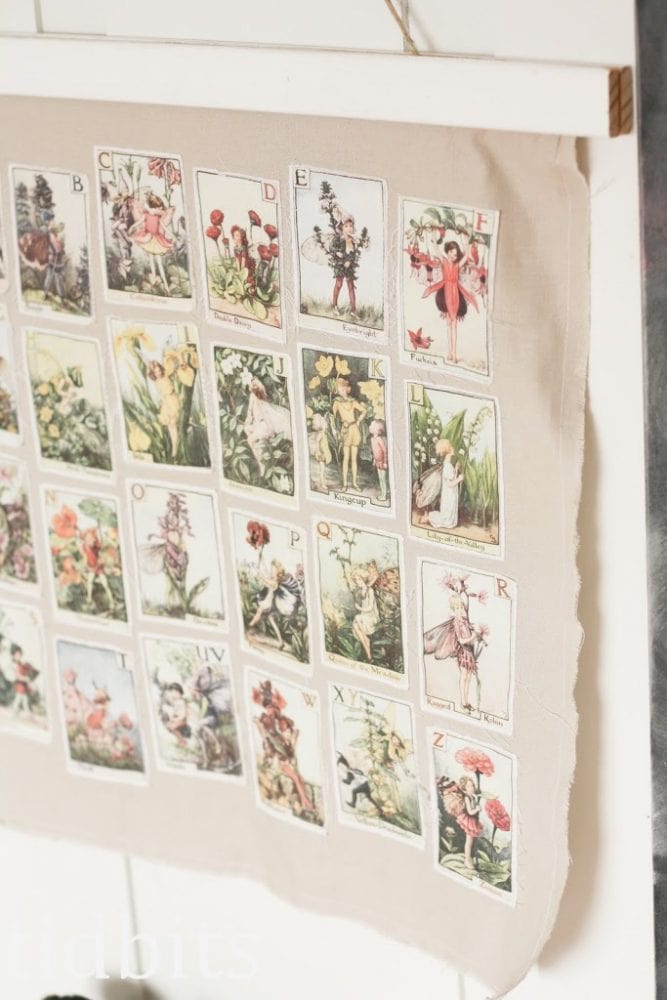
I wanted some alphabet art, so I found these vintage fairy print off’s on Etsy and fell in love. My girl loves fairies. I simply printed the fairies on some fabric paper you can put right into your printer (Joann’s). Then I cut and sewed them on some soft brown linen with all the raw edges exposed. The hubs screwed it into 2 pieces of wood.
$5 dollar Alphabet art.
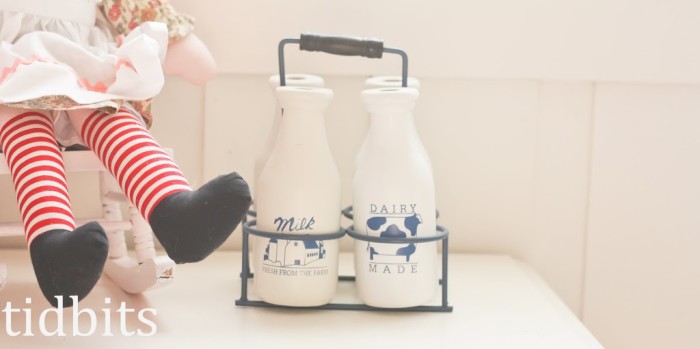
The Raggedy Ann’s also came from their grandmother when they were born, and I couldn’t pass up the 8 dollar wooden milk jugs from an antique store. That was a splurge 🙂
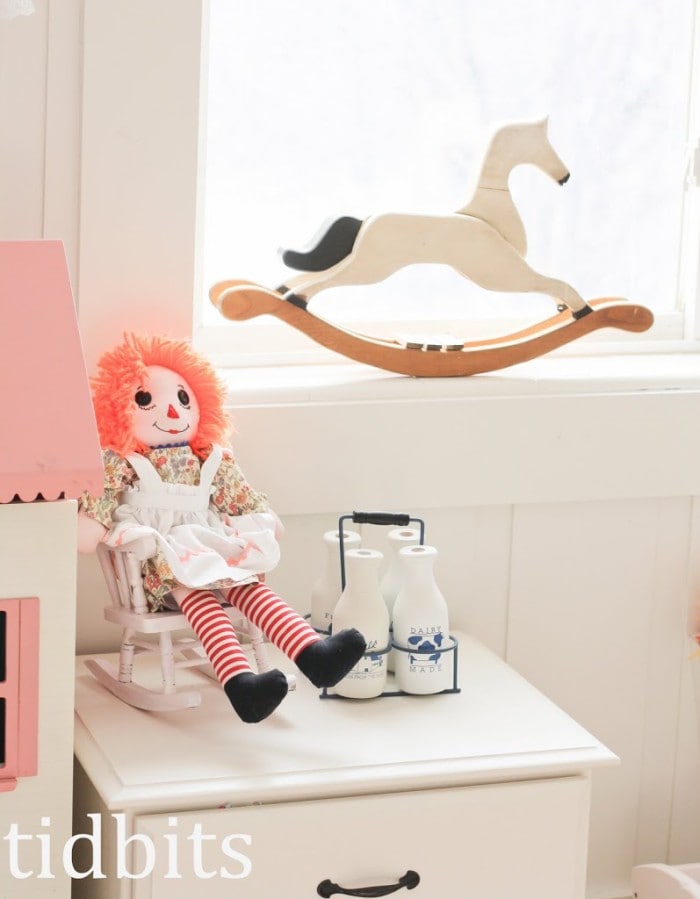
The horse was a $1.50 from ……you guessed it……a thrift store. I planned on painting it white but then fell in love with the browns when I put it in the window.
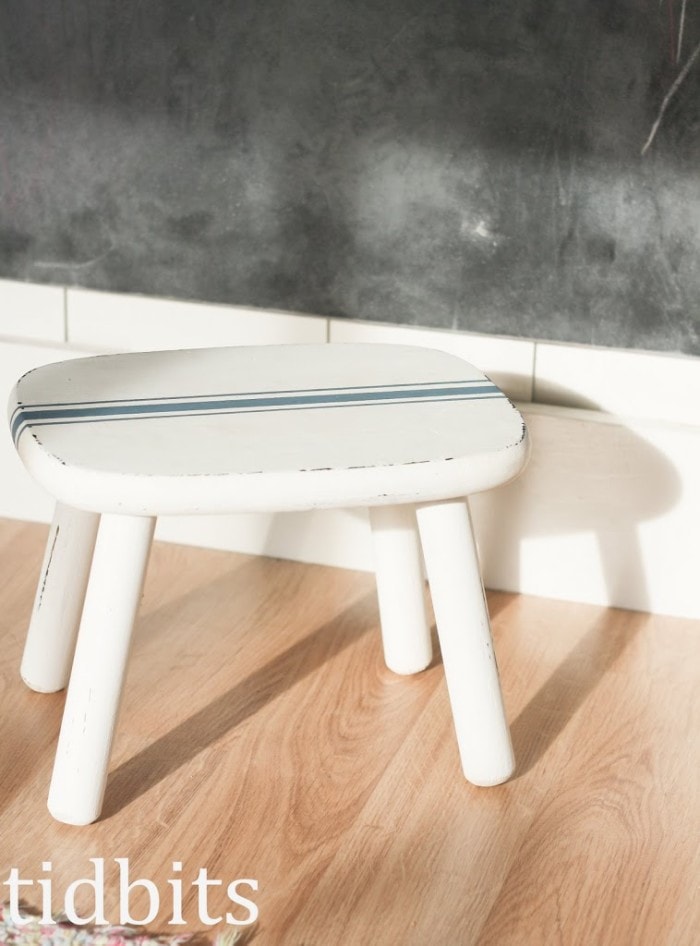
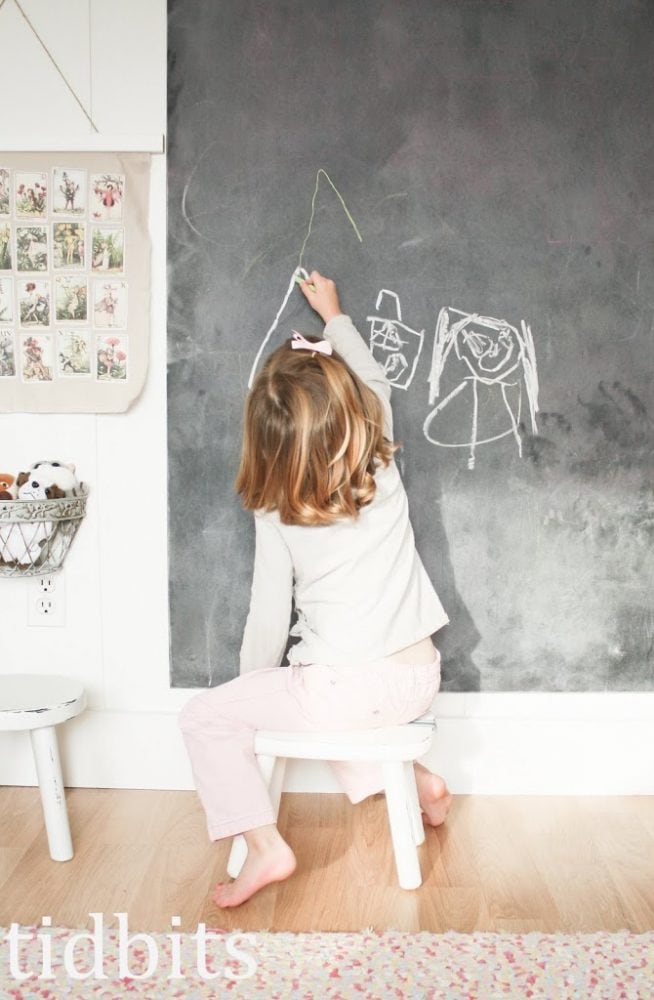
This 3 dollar stool needed some white paint and some grain sack love. And as weird as this sounds, I think that stool is my favorite thing in the room.
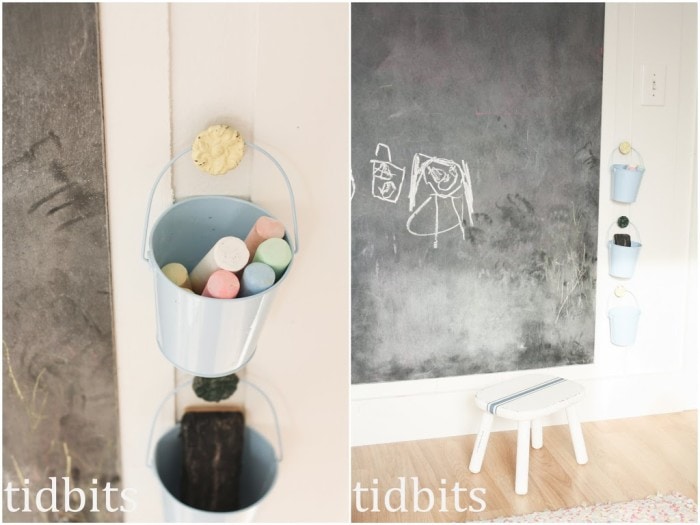
I love it when they plop down on it to draw on their chalkboard.
The chalkboard – love/hate relationship. We’ve enjoyed some fun classroom play, but I haven’t enjoyed the chalk mess.

In the cozy spot, I made the patchwork pillow, and my mother-in-law/girls grandmother made the beautiful crochet rose pillow. I love how her mad sewing skills and love touch all parts of this room.
Hang in there – I am almost done.
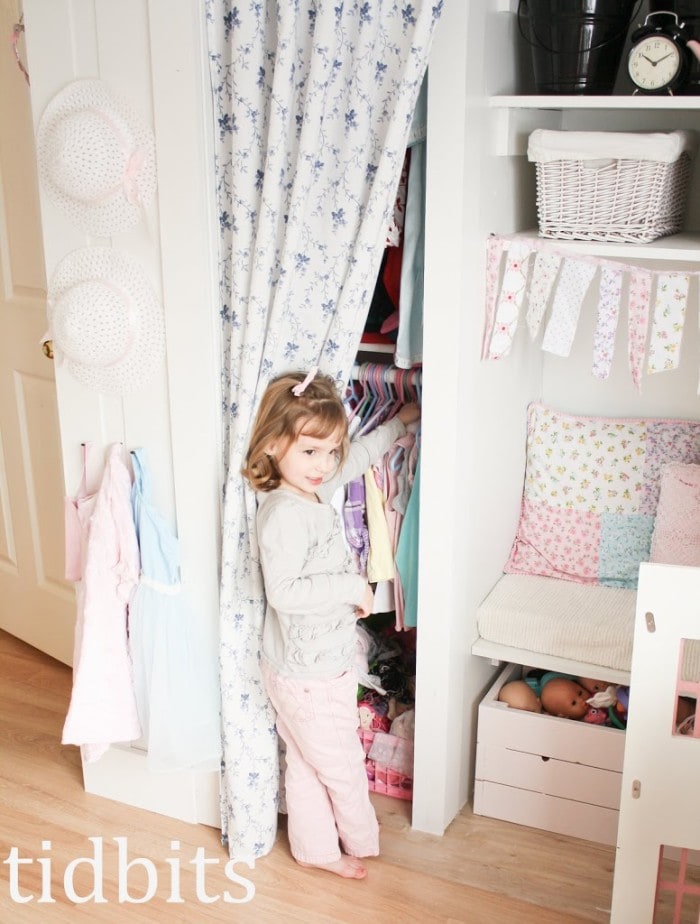
Behind the curtains are their well hidden clothes, dirty hampers, and a few toys.
The curtains were made out of a $2 thrift store king size bed sheet.
My husband also made the toy box crates. And he has plans for those posted previously here.
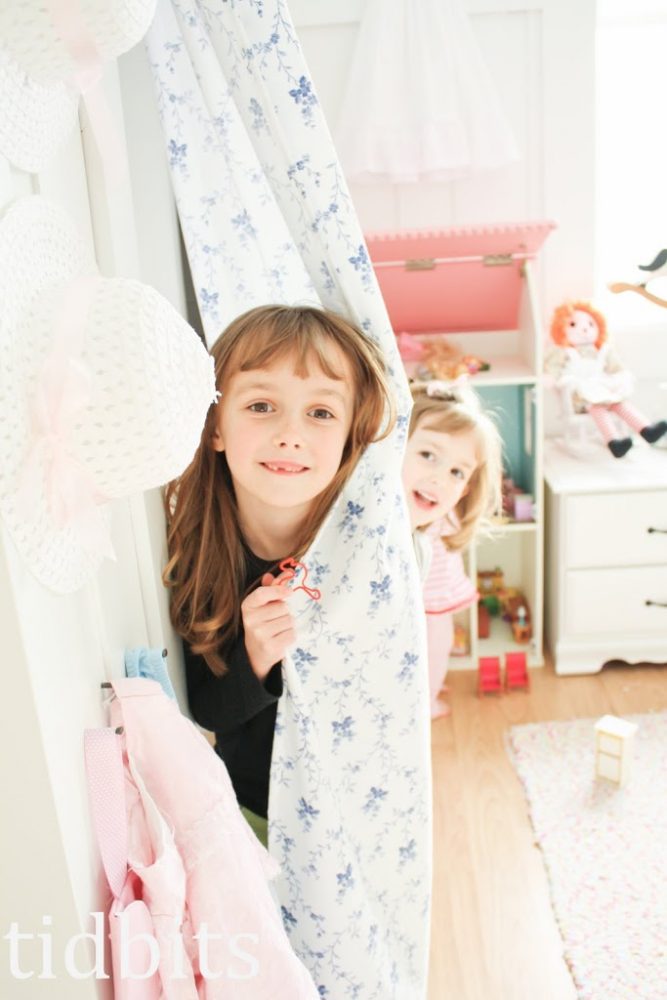
My girls love having some dress up clothes and hats at their reach. Little do they know, I was just trying to color coordinate. They tried to put a snow white dress up there and it got the boot pretty quickly.
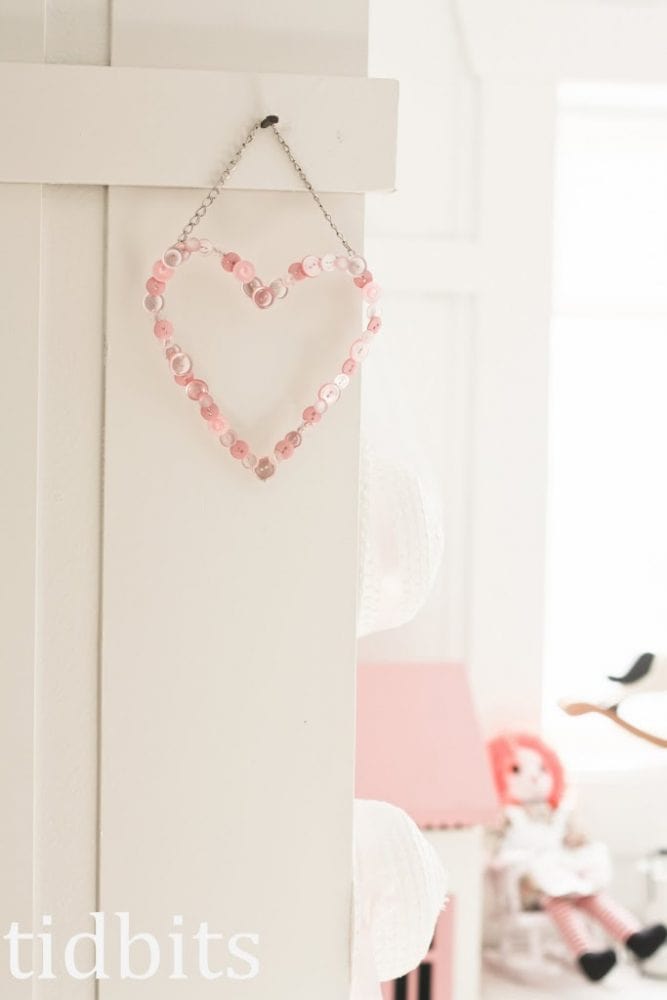
I saw a button heart on Etsy here, and just had to make one myself. I love how it looks on the white wall.
We needed more storage in the room so my husband made these boxes out of scrap wood and a rope handle to slide under their bed. They hold toys and their socks, panties, slippers, and such.
Finally I will mention the doll house. Found it at a garage sale for 15 buck a few years back.
I hope it doesn’t bother you too much when I mention all the cost and thriftiness of the things we use for our spaces.
I’m just out to prove that you CAN have a beautiful home for cheap.
I’m also determined to use the small spaces we have to their full potential. This room used to be so crammed, no one went in except to sleep. Now 3 girls can play in there at the same time and have plenty of options.
It just takes a little creativity and smart organization.
And maybe a little help from a handy man and Ikea.


Omg! It looks amazing! Such a lovely room.
Omg! It looks amazing!
I just typed an insanely long comment about how obsessed I am with all of your house but then lost my post some how so will shorten it this time around:) I am truly inspired by your house! Can you share the name and brand of pink and blue paint you’ve used in the kids room on the doors?
I had that Besse Pease print in my room growing up and it’s just so cute and when we got rid of it I never thought I’d miss it! Now of course, seeing it again, I miss it.
I love this room too! Great idea to build those beds with built in storage! We have a new shared room that’s tiny but I think sadly, tinier than yours with less functionality.
just love it!!!
We are moving to our own home soon, and I am getting a lot of inspiration from your blogs. I love how pretty the girl’s room turned out- so functional with lots of creativity put on it; with style and yet on your budget. Love those precious finds from the thrift store! I hope I can achieve that too. Thanks for sharing.
I love the way you do things so thrifty and handmade. It is my favorite part. It is perfect, just perfect. Fantastic job you two. I could not even pick a favorite except your clever use of space, storage and home made love mixed in.
I think its funny, how, out of all the creativity in the room. Your favorite is the stool.
Cami, first I have to say that you are so creative! I am in awe of your talent!
Even though this is a little girls room, several ideas can be used for other rooms as well.. especially if someone wanted to decorate in a chabby chic sort of way. I love how you shared all the thriftiness. When I saw the fabric used for the closet, I thought, “she must’ve bought that from the fabric store”.. and then to find out it was a $2 sheet from a thrift store? Wow! There are so many things I love about this room; the walls, the closet, the decorations.. to many to list.. and above all the creativity! Thank you so much for sharing it!!
Thank you! I think she is pretty cute too 😉
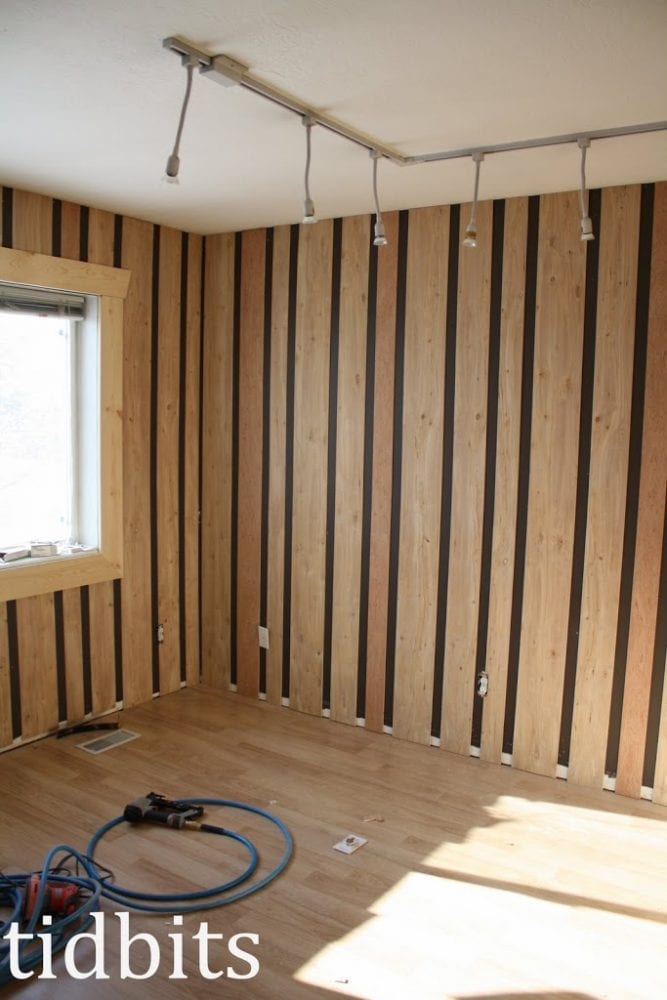
Well, that was a sweet comment! Thank you! I was trying to think of some way to do planks – but make it a bit unique. I still love how they look!
You are a genius! Such imagination and talent. This is a precious room. I think both rooms are perfect. I wish I had them in my house. Your girls are too cute. Loved seeing their rooms and their cute little faces.
I’m drooling 🙂 I love, love the alphabet art (you should sell these!) and having been wanting to add a cute place for her books (currently in a basket on the floor). I think I could scroll through this post 10 more times and still find more inspiration each time.
I absolutely LOVE it! You did an amazing job. The beds are super neat and the walls looks awesome! I adore what you did with the closet. I’m showing it to my hubby so he can do that in our daughter’s room. Looks like a trip to Lowes tomorrow 🙂 I also like the under the bed storage. I think I’ll be taking the bedskirt of my daughter’s bed and build boxes like you did. Perfect way to store toys and such. Three of our boys share a room and I also try to make the most of the space. I’m totally doing the book storage thing! They love to read in bed so it will be perfect. Thanks so much for showing a thrifty, creative way to do a kid’s room. With 6 kids, we stretch every penny. You gave me a realistic plan for a beautiful room!
i love the beds! do you mind sharing what size the front boards and wheels are? thank you! found you through pinterest!
This is amazing. I love the beds and all the little details but I must say my absolute avorite thing is the walls. I wanted something coutry-ish for my bathroom and was going to do beadboard but I think I like this much more. Thanks for sharing.
Thank you so much for sharing these lovely photos of this lovely tiny room. We will be moving to a new house and my little girl is going to have the tiniest room in the house. I have been searching the Pinterest world looking for some inspiration and the color of this room is what I wanted. I love how bright, cheery and fun this room is. And not to mention how happy the girls are in this
Beautiful. Lots of good ideas here. I love your thriftiness.<br /><br />I must tell you, though… A 10×12 bedroom in my neck of the woods would be enormous. And it looks like you have full height ceilings. Consider yourself very fortunate!
I love it! my girls share a room as well so I am totally going to add some of these ideas to my hubby's project list 😉 And I love the thriftiness aspect – thanks so much for sharing!!
Wow! What an amazing makeover! Love all the thrift mentions – I have just gotten my husband hooked on garage sale-ing in the summer. As our kids continue to grow and our house does not, this definitely gives me new ideas! Does your handyman contract out? 😉
So lovely! You have given me so many ideas – thanks!
You have given me great inspiration. When we move soon the girls will be in a room that is 9×13 and I have tossed the idea back and forth about how to situate their beds. Love this and love that dollhouse! Thanks for sharing
Absolutely amazing transformation into such a beautiful shared spaced…Totally inspiring! Was searching Pinterest for ideas for my girls and this is just amazing…Thank you for taking the time to post all the details – I really appreciate it! Love, love, love…
Oh wow! You and your husband did a fantastic job here! Your daughters can't hide the happiness towards their new bedroom. It's beautiful! Using space-saver fixtures was the best idea you had. I find the bed and the closet fascinating too; they offer comfort and function for your kids. Hitting two birds with one stone, yes?
What a beautiful little girls' room! I love all the details, such as hanging up their blessing dresses, the button heart and storage areas for their bedtime stuffed animals. So sweet.
Love it. Like always.
I love this room! I love the planked walls and the BEDS!! Amazing. Found you through Better After.
Once again you've amazed me! Wish you'd just come do my house for me! It is great to see all you are doing! Thanks for sharing friend!ungsalsa 2908
I love everything about this room. I've been debating putting my son and daughter into the same room. This gives me some ideas. Thanks and congratulations on how beautifully everything came together!!
This is amazing!!! I absolutely love the boards on the walls!!
Wow I love everything about this room. Especially that you did it on a budget.
I love this room. It is gorgeous. Everything about it is perfect. Jealous!!!! I am featuring this at somedaycrafts.blogspot.com.
I love this room. It is gorgeous. Everything about it is perfect. Jealous!!!! I am featuring this at somedaycrafts.blogspot.com.
I love this room. It is gorgeous. Everything about it is perfect.
Hi, just discovered your blog on My Uncommon Slice of Suburbia. Beautiful girls room – very Scandinavian! Love the walls – what a fabulous idea – you are clever! Great accessorising too! 🙂
Forgot to mention – I found you over on the My World Made By Hand link party!<br />:D
I can't even begin to tell you how gorgeous this whole room is. I'm starting to become obsessed with everything being white and just adding pops of color with toys and bedding and such, and this is just perfect! The beds – please. I am totally drooling over how genius they are, I love the industrial look of the wheels mixed with the cottage feel of the entire space. I'm just staring
This is amazing. I'm not a blogger, I found this on Pinterest. But what a wonderful inspiration! I have a 3yr old girl and I'm pregnant again and I was looking for ideas for the future shared room, and this is great. Every detail is just beautiful ( and yes there are a lot of details, but I appreciate every single one!)<br />Thank you for sharing, especially the details on the walls and
This has got to be the cutest girls bedroom I've ever seen! I love everything about it. Those beds are awesome! <br /><br />I'd love it if you would share this at "What We Accomplished Wednesday," at Green Willow Pond. It will go live at about 6:00 PM tonight. Have a great week!<br /><br />Hugs,<br />Deborah
I LOVE LOVE LOVE this room! You and your husband did an amazing job!
What a cute room. I am sure any little girl would love it.
Wow, wow, wow!! This is amazing. You did a wonderful job 😉 I'm your newest follower!<br />Jamie ~ Better With Age
What a totally precious room! Life to the full, Melissa @ DaisyMaeBelle
LOVE LOVE LOVE what you have done in this room. All that thriftyness gets me all giddy and excited! A job WELL DONE! Just a shame I can't decorate my little boys room like that! LOL
This is absolutely gorgeous! I love every detail of this room. Pinning 🙂
You created the sweetest little girls room! I love each and every beautiful detail. The walls, the colors, the beds, the bedding, just everything! It is absolutely lovely! <br />Thanks for sharing, <br />Suzanne
Oh my this is gorgeous!!!! Such a perfect space for two beautiful girls!<br />Thanks for sharing and linking up.<br />XO<br />Kristin
LOVE THIS! And I'm totally dying over the wall! I'd love for you to link up in my very first linky party {ya, ya…I'm a bit behind the times apparently} that started today.<br /><br />Jessica<br />myworldmadebyhand.blogspot.com
oh my! that room rocks my world. you have a fantastic way of putting stuff together. cheers Veronica
Love it. You did a great job! By the way, I am still hoping you do a tutorial on how to make a ruffled bed skirt. I love the one you made and I nervous to start mine.
WOW! I found you last month, when I was searching for ideas for my daughter's room and came across your "Little Big Girl Bedroom". This one is just as lovely! And I love how you share how you do things and how much they cost. You are such an inspiration! (And my daughter is really happy with her new room, thanks to you! LOL!) Love those beds and can't wait to show them to
My goodness! I just love the few before and all of the after photos you have posted. It is just amazing how much space you were able to create and also keep the room enjoyable for the girls. I love how clean and stylish it looks. I also must say I love it when you list what you spent to make something cause it inspires me to be more thrifty too.
WOW! You are such an inspiration! It is perfect in every way. Awesome bed solution; we had the same problem and just ended up covering part of the closet door because we're not as inventive as IKEA. lol! I have also concluded I need to get my husband some tools, and maybe a class on how to use said tools…