This post may contain affiliate links, which means I get a small percentage of the sale at no extra cost to you. I only recommend items I love and have had a positive experience with. Thank you!
Join me for a tour of our new motorhome remodel! I’ll share my best tips for RV storage and organization ideas, as well as the before and after.

Remember a few years back when Mr. Tidbits and I bought a used RV to live in while we built our pole barn home? We remodeled that RV from top to bottom and managed to pack our whole family into it for months! I lovingly called it our Tidbits on Wheels.
Do you also remember how I loved, but kind of hated it? I didn’t dislike the RV itself, but it was a huge project and we were in it for much longer than I wanted. By the time we were ready to move into our house I was done with motorhome living. I never wanted to have another one again. Ever. Remember that?
Why Another Motorhome Remodel?
I sure do, but here’s the thing – my hubby and I were talking about taking our family on a cross country road trip. We looked at all our options to see what would be the most affordable method for a family of 6 to take that kind of a trip.
In the end, an RV was the least expensive method. Especially since we knew we could buy a used motorhome, remodel it, use it and then sell it once we had completed our adventures. And just like that we were back in the thick of a motorhome remodel while also selling and moving from our old house!

We might be a bit crazy (maybe a lot crazy), but we sure are excited for some new adventures! Now that the dust has settled, I’d like to show you around our Tidbits on Wheels 2.0 version. I’ll also share my best tips for organizing an RV and making the most out of limited storage situations.
If you’d like to watch the video of this blog post, click on the button below to find it on my YouTube channel!
More ways to watch
Find this post on YouTube!
Table of contents
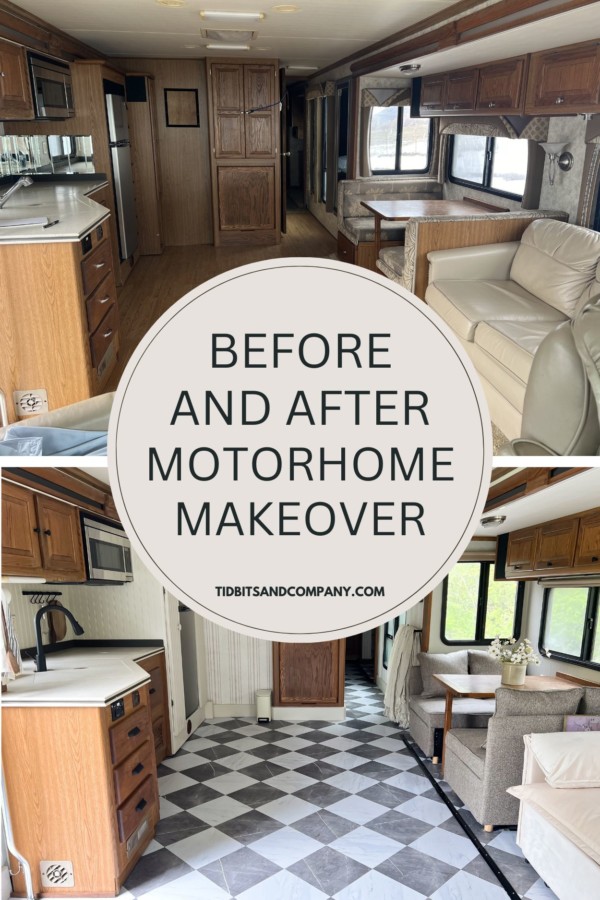
Before the Motorhome Remodel
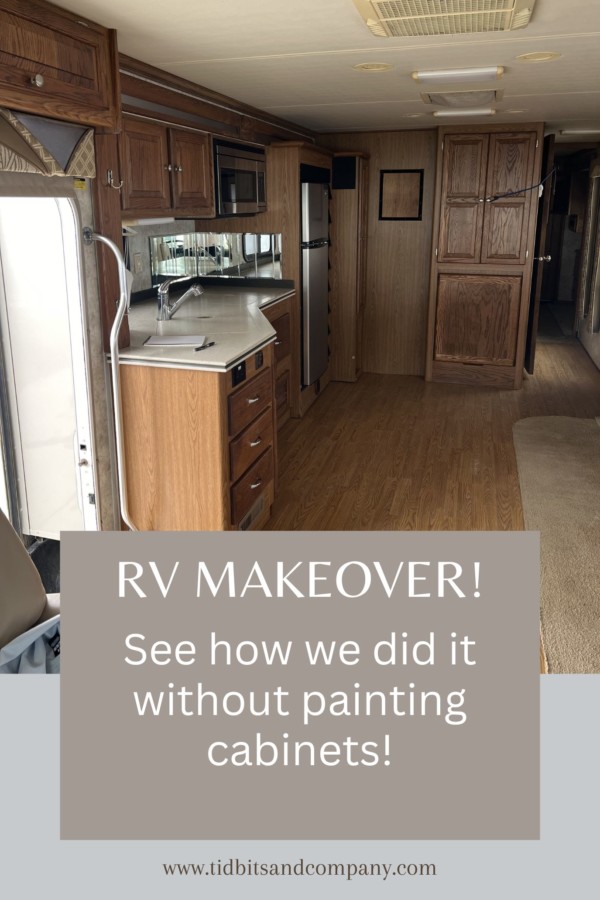
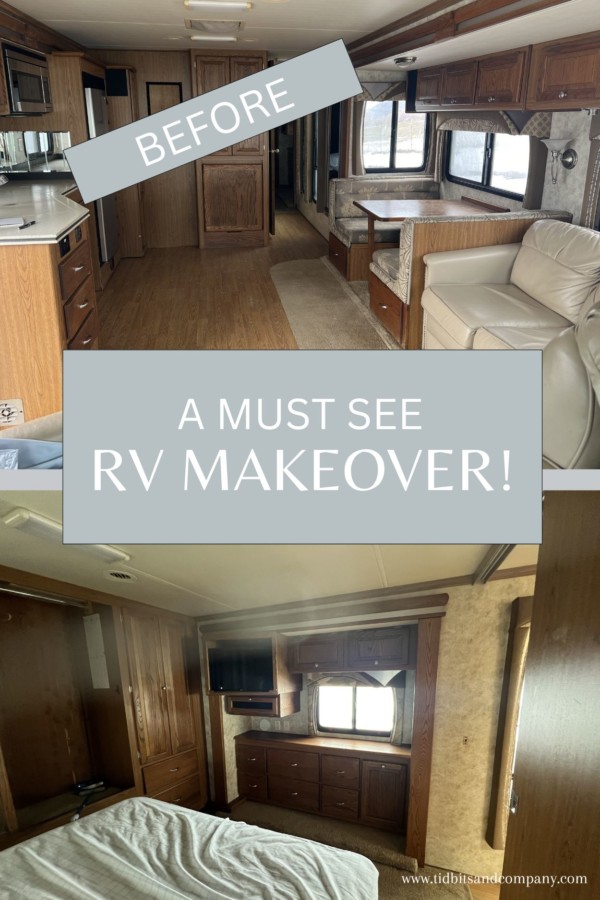
Let’s start things off with some good ol’ before pictures so you can get an idea of what we were working with.
As you can see, this RV wasn’t horrible. The RV interior was a bit dark and dated feeling. The hard flooring was not in very good shape. It also had the typical yucky carpet you find in old campers which is next to impossible to keep clean. The furniture, while it looks okay from a distance, was pretty gross and had holes all over it from a cat.


The bathroom was in decent shape, but I knew a little elbow grease could really improve this space.


Heading down the hallway toward the bedroom we see old wallpaper, some out dated window valances and more of the same carpet.


Again, not the worst I’ve seen, but there was definitely room to improve.
After the Motorhome Remodel
Now, let’s see where we ended up after the RV renovation. I’ll walk you through each area and explain what we did.
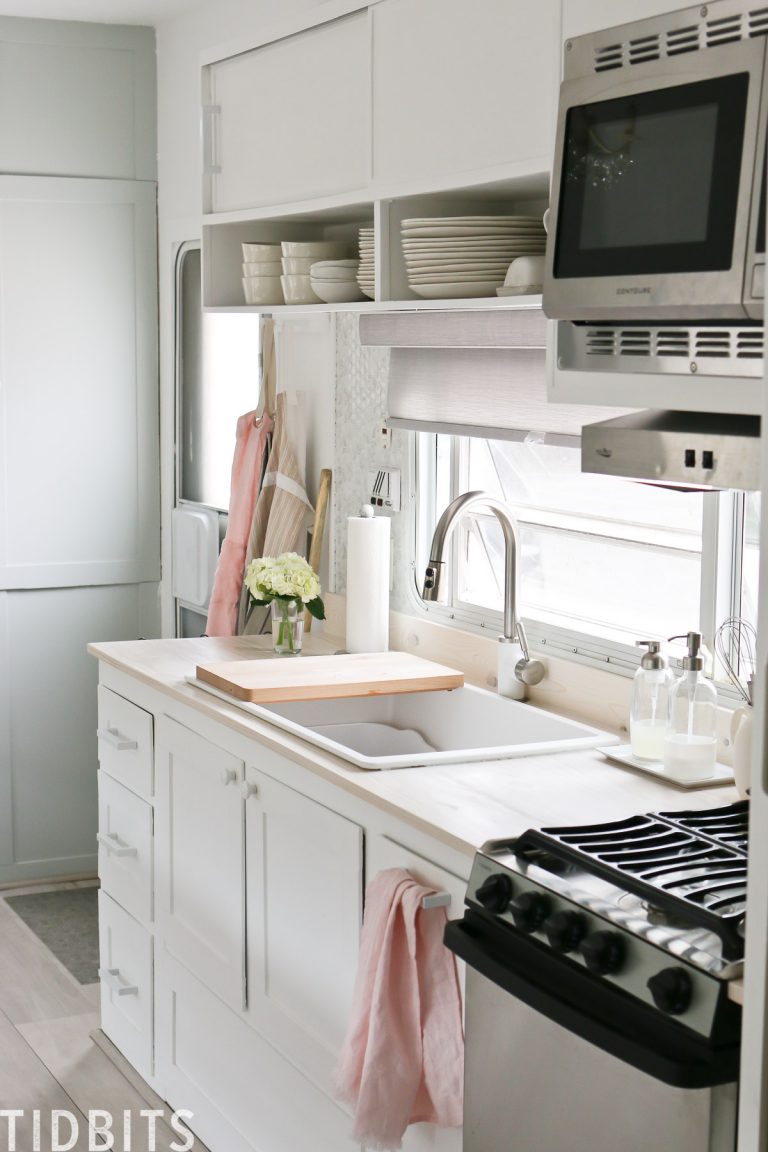
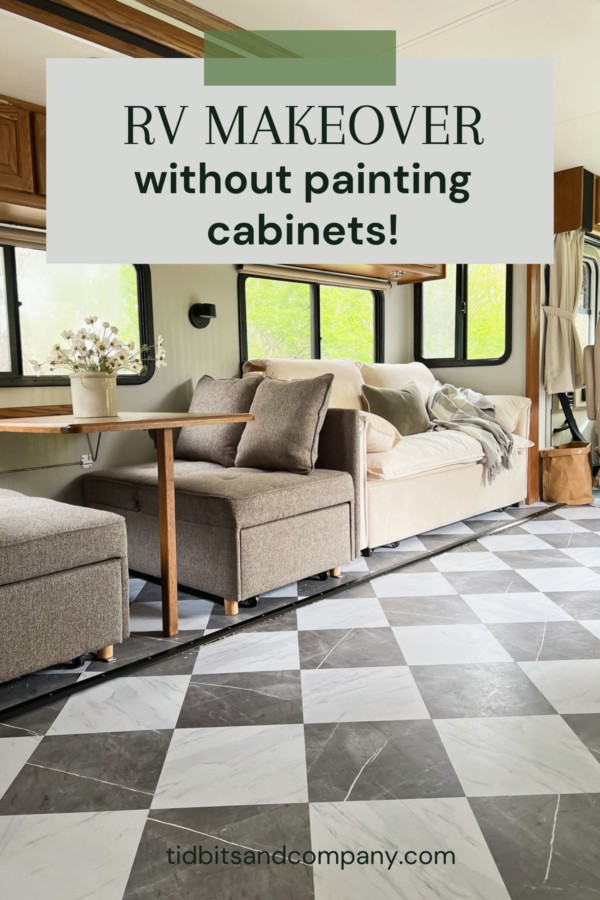
Main Living Area After
All of the RV floors were replaced with this black and white checkerboard peel-and-stick vinyl tile. It’s a super DIY-friendly way to makeover travel trailer floors.
We had to actually rip out the subfloor (there was some water damage) and create a new floor out of a quarter inch underlayment. We used a little self adhesive floor tile primer before laying the peel and stick checkerboard tiles for extra hold.

As you can see, we didn’t paint the cabinets. They were in good shape and I thought the wood tone would look great with the new flooring. Also, painting RV cabinets is a giant pain. We were more than happy to skip that chore during this camper remodel!


Looking over toward the RV kitchen, you can see the dinette, countertop/prep area and cabinets.

The area around the fridge required some repair work due to water damage, which is common to find during an RV reno. Mr. Tidbits was able to repair that damage and make some custom pantry cabinets, which are the creamy white cabinets you see around the fridge.

We used a paintable bead board wall paper for our backsplash and pantry cabinets.


The countertops in the motorhome were in great shape so we didn’t change those. However, we did replace the kitchen faucet with a new matte black version which matches the black kitchen hardware we installed on the drawers and cabinet doors.
Hallway and Bathroom After
Heading into the hallway you can see more of the accent wall paper we used on the walls to brighten up the space. We used a peel and stick wallpaper from Spoonflower, since I read in many blog posts that this brand seems to hold up better with all the temperature and humidity changes that you can experience in a RV. This is the striped wallpaper and this is the bathroom camper wallpaper we got.


You can also see the towel rod where we hung with 4 throw blankets. This is an easy way to keep blankets handy for the kids without being a mess on the floor (usually).

A look into the bathroom shows the darling peel and stick wallpaper with an outdoor theme. How cute is that?!

The motorhome remodel included a few bathroom upgrades like a new light fixture, bathroom faucet, shower head and towel hooks.


Making over small spaces is so much fun because everything you do results in a big payoff.
Bedroom After
Next, we’ll head into the bedroom.

We kept it pretty simple in here with new wallpaper and ceiling lights. Some simple bed linens and pillows help this space feel calm and uncluttered, which I love when traveling in tight quarters.


And those are the main areas of this motorhome. It’s small, but it’s got everything we need for our family adventure!

Motorhome Remodel Ideas and Tips
Every inch of space in your motorhome is precious. After remaking two of these old RVs, I’ve learned a thing or two about how to make the most of the limited space. Here are some of my favorite storage and organization solutions.
Shoe Storage
Shoes can be a huge problem in a camper trailer. There is nowhere to put them and they can often end up scattered all over the very limited floor space.

We bought a slim shoe organizer to put near the main door of our motorhome. You can easily find shoe organizers like these at places like IKEA or Amazon.
This organizer isn’t a piece of furniture that is made for RV’s, but with it’s slim design it fits very well and saves us from tripping over piles of shoes. We also attached some hooks to the side of the shoe organizer to keep keys or jackets handy.
It’s a good idea to keep things like tape and first aid supplies on hand when traveling, so we’ve got those stored in the shoe organizer as well.


I covered the motor entry in this RV with a cute rug.
Pantry Storage and Organization
Speaking of storage, let’s head over to the kitchen for a look at our pantry organization.
One of the things that kept our last RV kitchen organized were the Command Strip caddy’s that you can attach to the back of cabinet doors. It’s a great way to store often-used items in reach for easy access.

As you can see, we’ve got the kitchen stocked with dishes and utensils. The knives with covers are really useful when you don’t have a knife block for storage – no cut fingers!
Using drawer liners helps to freshen things up and they are easy to clean.


We’ve also got kitchen towels, plates and bowls within easy reaching distance for everyone.


I like using non-breakable dishes in the RV. They are durable and won’t get damaged from a little bumping or jostling around.
Over in the cabinets you can see more of the drawer liner and even some leftover wall paper that we used in the area below the sink. It really helps these dark wood cabinets feel cheerful and bright.
Did you notice the cleaning caddy? It’s perfect for a motorhome because everything stays together and can be grabbed all at once. And similarly, the nesting pans and bowl set are a life saver when space is limited.


Bathroom Storage
Here’s a look at some of the bathroom organization. Bins and storage containers do wonders to keep your cupboards from becoming a mess, especially if you have deep shelves. Keep like items together and you can quickly find what you want. Storage containers are also a great way to reduce visual clutter.

The bathroom is another area that requires creative storage solutions. Simple ideas like using towel hooks instead of towel rods can give you more storage options in the same amount of space.
In the shower, mounting things on the wall helps keep the floor clear and easy to use. For us, a few simple items was all it took.


Furniture Solutions
Now, I know some of you are wondering about the furniture we used in this motorhome remodel. You might also be wondering where our kids will sleep since this motorhome has no bunk beds. Let me show you one of my favorite parts of this motorhome remodel – the furniture.

We ended up purchasing new furniture for the RV since it would have been expensive to reupholster the existing furniture. What we didn’t do was buy RV specific furniture because that can be very expensive.


Instead, we measured our spaces and found a pull-out couch that converts into a double bed and two pull out benches that also convert into single beds. Mr. Tidbits was able to attach them to the floor so that they won’t be sliding around. He even installed seat belts that tuck into the couch and benches for the kids to wear while driving.

How cool is that?! And by buying “standard” furniture instead of special RV furniture, we saved a bundle. I also purchased sleeping pads to lay over top of these beds to make it more comfortable.
Over in the bedroom we are taking advantage of the space under the bed to store the extra blankets and bedding.

Window Treatments
Along with the new furniture we also tore down the old valences and just exposed the sleek pull-down shades. They are much less bulky than the traditional curtains and valances usually found in campers.

Decor Solutions
Finally, we’ve come to my favorite part – the decor!
I like to have a few pieces of decor on my walls and on counters, but they are prone to falling off or being jostled around. To combat this issue, I use Gorilla Mounting Putty. A little dab behind or underneath the item will keep it securely in place and looking great!

Try it for your clocks, pictures, hand soaps and RV other essentials. I love it!
Where Can I Buy These Products?
If you are interested in any of the items I used in this motorhome remodel, see my TIDBITS & Company RV Products Moonsift page. That page will have links to all the furniture, accessories, dishes and other supplies used in this makeover.
More Motorhome Remodel Ideas and Inspiration
Tidbits on Wheels 2.0 is ready to hit the road! Did you have a favorite makeover feature? If you do, let me know below.
Thanks for being here today! If you are looking for more rv remodel ideas and inspiration, try some of these:
- Tiny Home and RV Bathroom Organization
- What You Must Know Before You Update RV Light Fixtures
- TIDBITS on Wheels RV Renovation
- RV Renovation Tour | Pre-Decor
- 20 RV Makeovers and Motorhome Design Ideas
- RV Art | Home is where you park it FREE Printable Pack
- Got Stinky RV Probs? 8 Solutions Learned the Hard Way
- RV Master Bedroom Essentials
- RV Renovation | Kitchen Details
- Easy DIY Cabinet Shelf Risers
- The BEST RV Bunk Bedding
- RV Budget Blinds and Window Treatments
- My 10 Best Tips for Small Pantry Organization | RV Life Lessons
- Our 9 Super Practical, Healthy and Easy Camping Breakfast Ideas
- Staging our RV to Sell
- Life Lessons Learned Living in an RV with a Family of 6


Do you have links for the pull out benches?
Do you have links for the pull out benches? And do you have an article or video of how to install and the seatbelts you used? Thanks!
Hello can you tell me where you purchased the pull out benches for your remodel please!
Hi Cami, I bought linen towels from you in the past and I love them. They truly do get softer and better the more I use them. With that said, I’ve recently become interested in buying linen sheets for my queen size bed. I first came to your website to see if you made and sold sheets and since you don’t, can you share your thoughts on linen sheets? Like are they worth trying and if so where would you recommend purchasing them,?
Hi Jean! I wish I could have them made and sold but they are quite an endeavor. That said – yes, I have a lot of recommendations! I have only slept in linen sheets for about 5 years. Once you try them, you can’t go back. If they are too cheap of linen they will wear holes in quick, especially if you tend to have rough feet like me! My absolute favorite sheets have been from Saphyr Linen. They are great quality and the edging is to die for beautiful! I’ve also recently tried a brand I discovered on Amazon called Simple Opulence. They seem to be holding up great. I’ve also had success buying from etsy shops that specialize in linen products. They generally really care about quality. Don’t be tempted to buy cheaper versions (often made in China) – as those are the ones that wear easily. You think you are saving money but then you have to buy new ones too soon. It’s one of those things that quality really matters, and is 100% worth it. I often sell some of my stuff on Facebook to afford a nice set! It’s just worth it!!! I hope that helped!